Lake Observer User Guide
Our App Video Guides can be found here. They offer a brief introduction to using our Android and iOS mobile apps.
For a brief overview of the Lake Observer system you can refer to our Quick Start Guide.
Table of Contents
Getting Started
Lake Observer Account Registration (Sign Up)
Login to the Web App
Update your Profile Settings
Join a Project
Request ‘Approved User’ Status
Set Your Preferred Waterbodies
Projects
Create a Project
Project Name & Description
Project Users
Organizations & Secondary Projects
Project Waterbodies & Sites
Important Fields
Advanced Options
Edit a Project
Data QA
Approve Users
Data Submission
Project, Country, State and County Selection
Waterbody and Site Selection
Latitude & Longitude
Monitoring Date and Time
Water/Ice Data Entry
Water Quality: Single Depth
Water Quality: Multiple Depths
Laboratory Sample Collection
Secchi Depth
Ice Cover
Weather Data Entry
Air Temperature
Cloud Cover
Precipitation
Wind
Aquatic Organism Data Entry
Algae
Aquatic Invasives
Metaphyton
Data Groupings
Getting Started
If you have any questions or comments about the Lake Observer system, please contact us.
If you experience any issues with our system, please report all errors and bugs to our support team.
Lake Observer Account Registration (Sign Up)
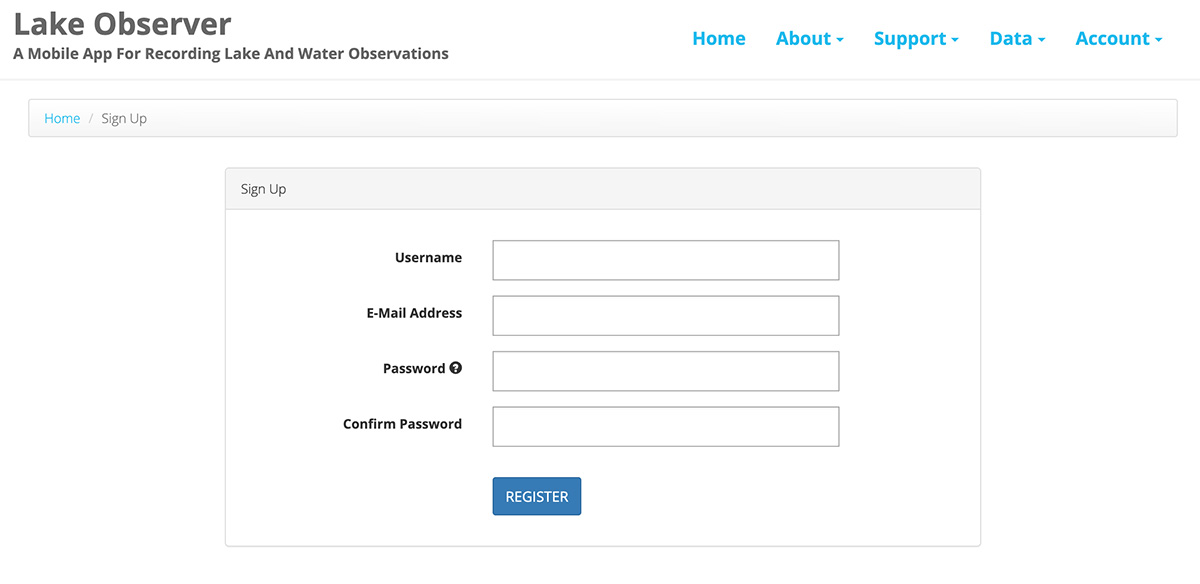
Go to lakeobserver.org/user/register and complete the ‘sign up’ form.
Complete the Sign-Up form by entering a username, your email address, and a password. After filling in the form, click the “Register” button.
TIP: Your username will be public, so choose a name that you are comfortable with anyone seeing. We also recommend writing down your username and password somewhere!
You will see a popup message instructing you to check your email for a confirmation message. Go to your email inbox to check for a message from Lake Observer (be sure to check junk mail, too) and follow the link. This step is essential for completing the user registration process.
Login to the Web App
Once you have registered your account and confirmed it by clicking on the email link provided, you can log in to the web app.
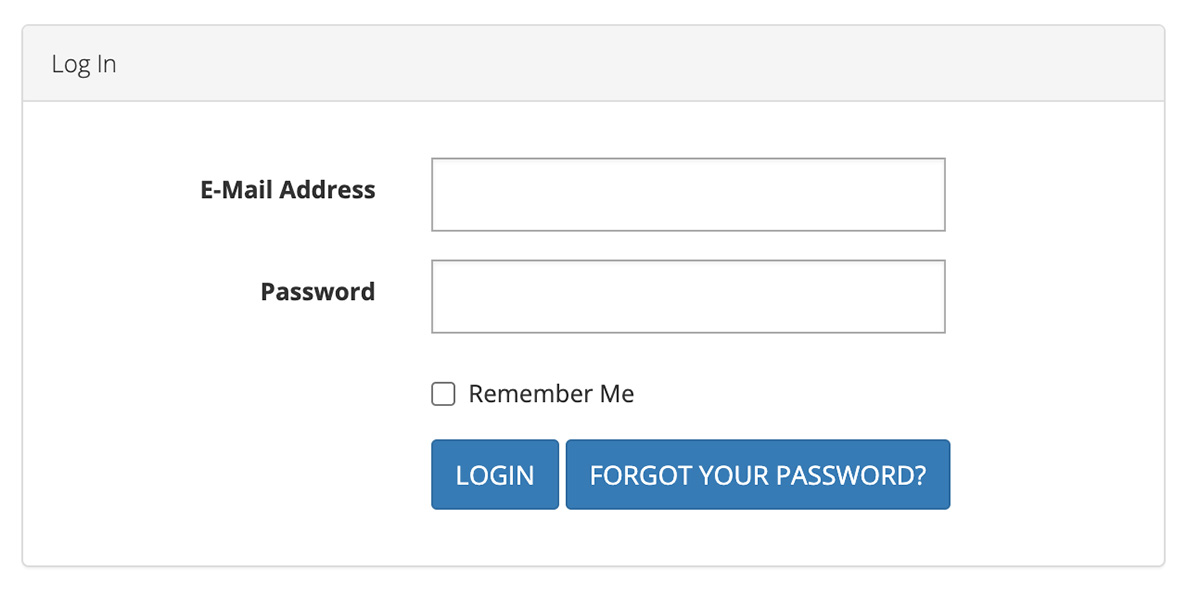
Go to lakeobserver.org/user/login. (From the Lake Observer homepage, you can select “Login” from the “Account” menu option at the top of the page.)
Enter the email address and password that you used to register in the previous step. If desired, select the “remember me” option to save your log-in information for next time. (This is not recommended if you use a public computer.)
Click the blue “Login” button.
Update Your Profile
The first time you login you may automatically be redirected to the “My Profile” section of the Lake Observer web app. You can also go to the Profile section by clicking “My Profile” from under your username at the top right of the home page.
Your profile consists of three tabs: Profile Settings, Account Settings, and Privacy Settings.
Important: It is essential that you update your profile before submitting data to our system, particularly if you plan on submitting data as part of a Project.
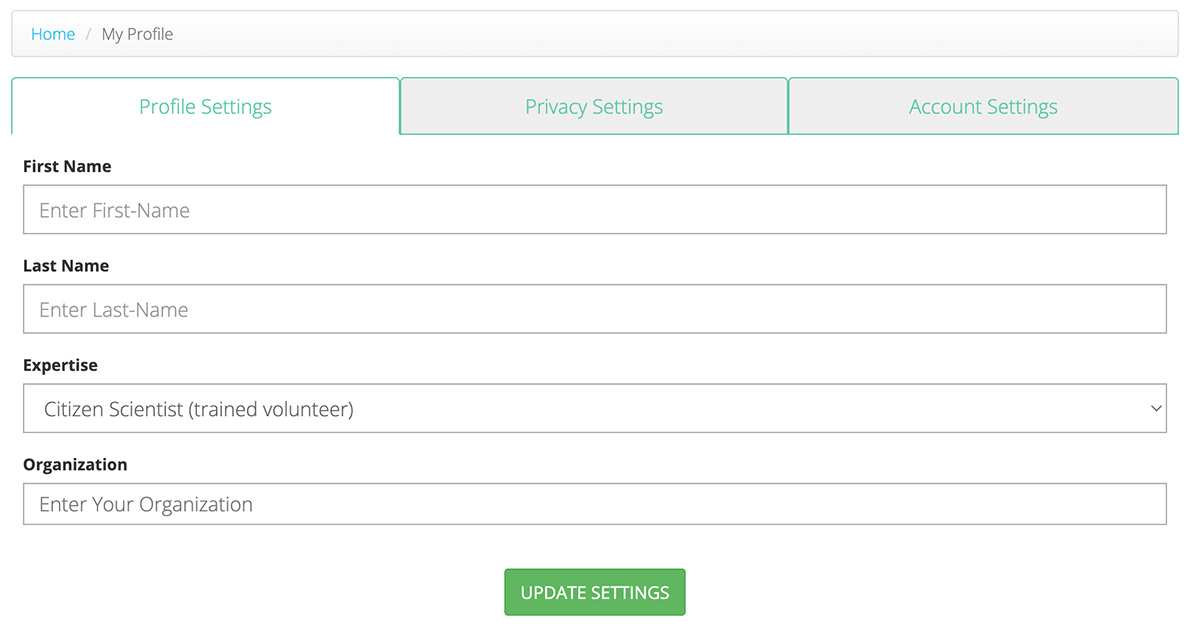
Profile Settings
In the Profile Settings tab enter your first name and last name.
Enter your level of expertise. If you have completed some training as part of a volunteer monitoring program you will probably enter “Citizen Scientist (Trained Volunteer)” for level of expertise. If you are a professional, please enter “Research Scientist.”
Type the complete name of your organization(s) in the Organization box. You can enter more than one organization by hitting the Enter or Tab button after each.
Note: if another user has already entered your organization it may automatically appear; select it when it appears if so.
When done click ‘update’. If the changes were saved the page will refresh and you will see a green “Success” banner at the top of the page.
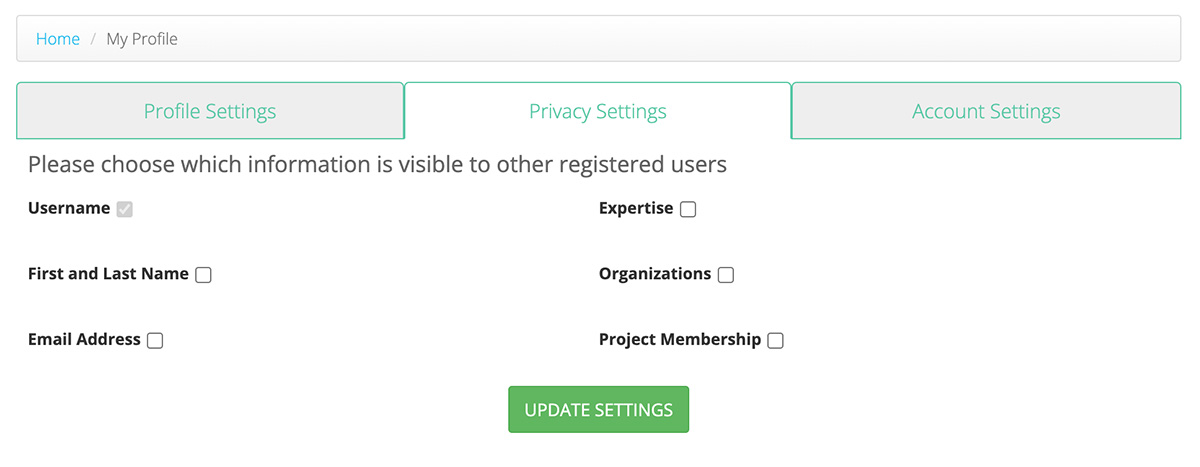
Privacy Settings
In the Privacy Settings tab, you can select what information from your Profile Settings tab is available to others. If the box is checked it means that that field will be visible to other registered Lake Observer users.
Your Username is always visible to other users.
Note: If you make a request to become an approved user for a Project, all of your profile information will be made available to the Project Administrator, regardless of your privacy settings.
When done click ‘update’. If the changes were saved, you’ll be returned to the Profile Settings tab and see a green “Success” banner at the top of the page.
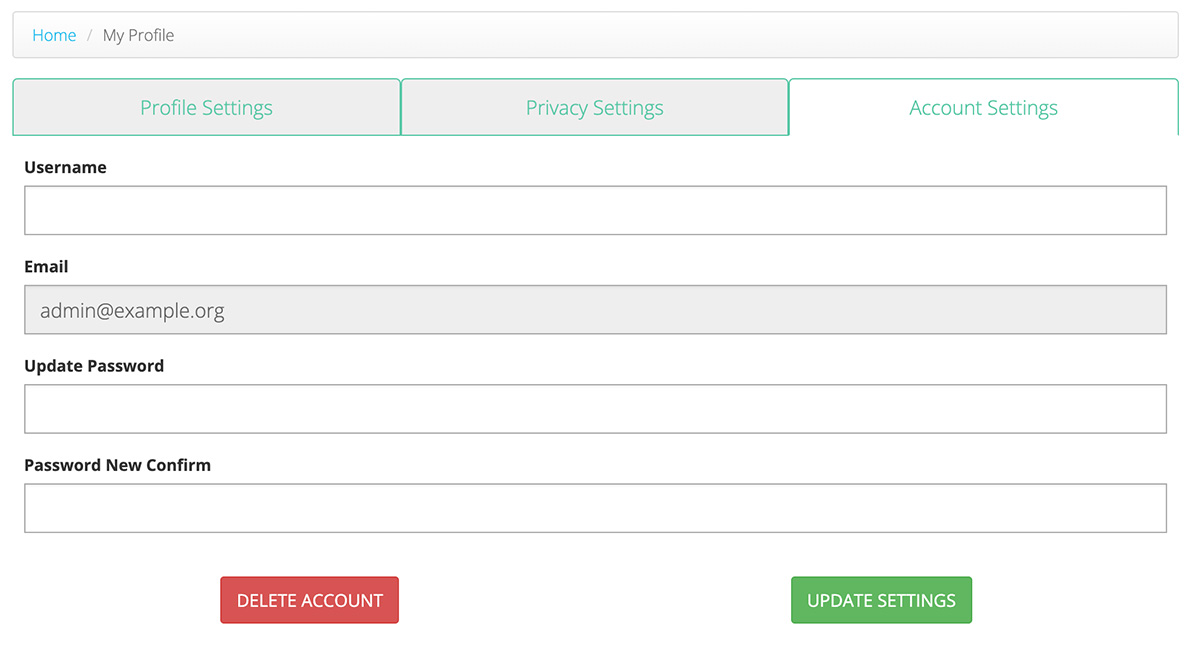
Account Settings
In the Account Settings tab, you can change your username and/or password if desired. To do so enter a new username, or a new password.
The email that you used to sign up will also be shown in gray; this cannot be changed.
When done click ‘update’. If the changes were saved, you’ll be returned to the Profile Settings tab and see a green “Success” banner at the top of the page.
You can also delete your account from this tab by clicking the 'Delete Account' button.
Important: Deleting your account is permanent and cannot be undone.
Join a Project (Optional)
If you wish to submit data as part of a Project such as NALMS Secchi Dip-In or a volunteer Lake Watch group, please follow the instructions below.
From the navigation menu, select 'Projects' from underneath the 'Data' menu or visit lakeobserver.org/projects/view
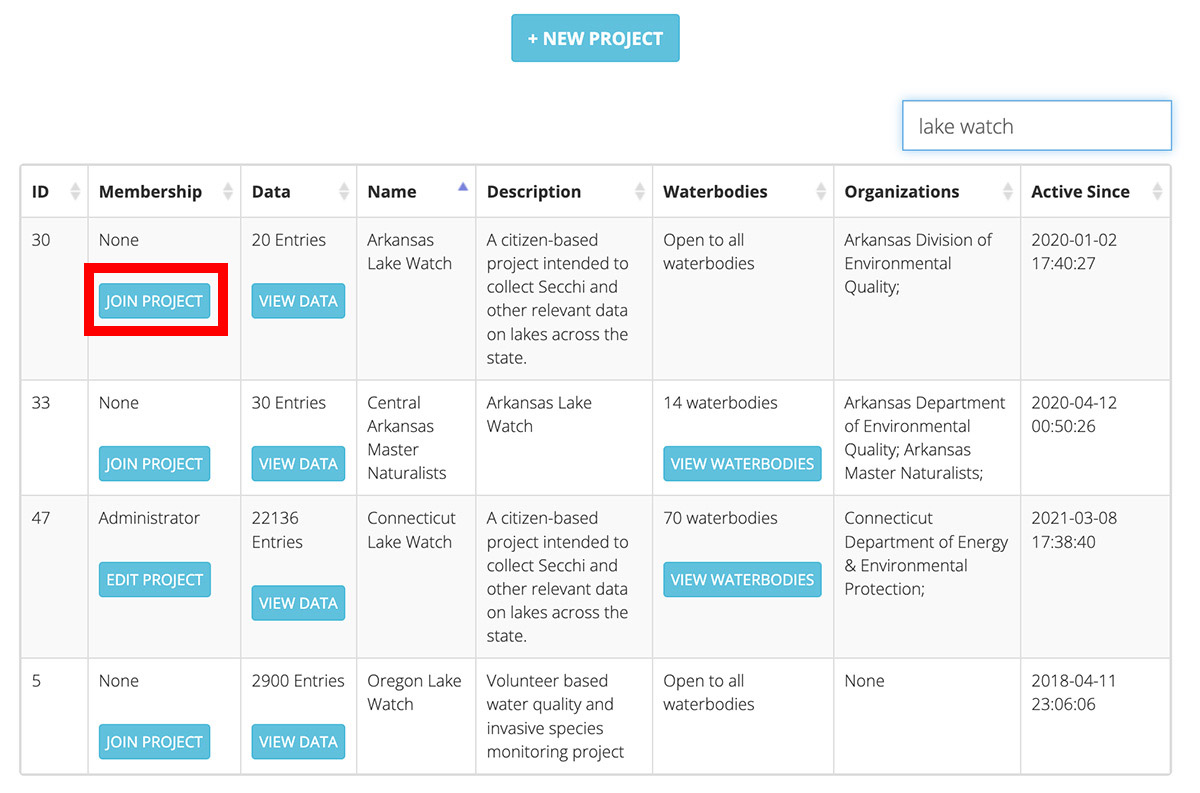
The list of Lake Observer projects will appear, sorted alphabetically by Name.
If you know the name of the Project you'd like to join, you can type the name into the Search box to filter the list results. Click the ‘Join Project’ button in the membership column associated with that row.
You may get a ‘Are you sure…?’ pop-up; click “OK”.
You should then be redirected to your 'My Projects' page, and that project should now be listed.
Request ‘Approved User’ Status (Optional)
After joining a project (previous step), you will be brought back to the ‘My Projects’ page and should now see your project listed.
Click on the project name to go to the project summary page.
Click the “Request Approval” button. Click “OK” if you receive a pop-up message.
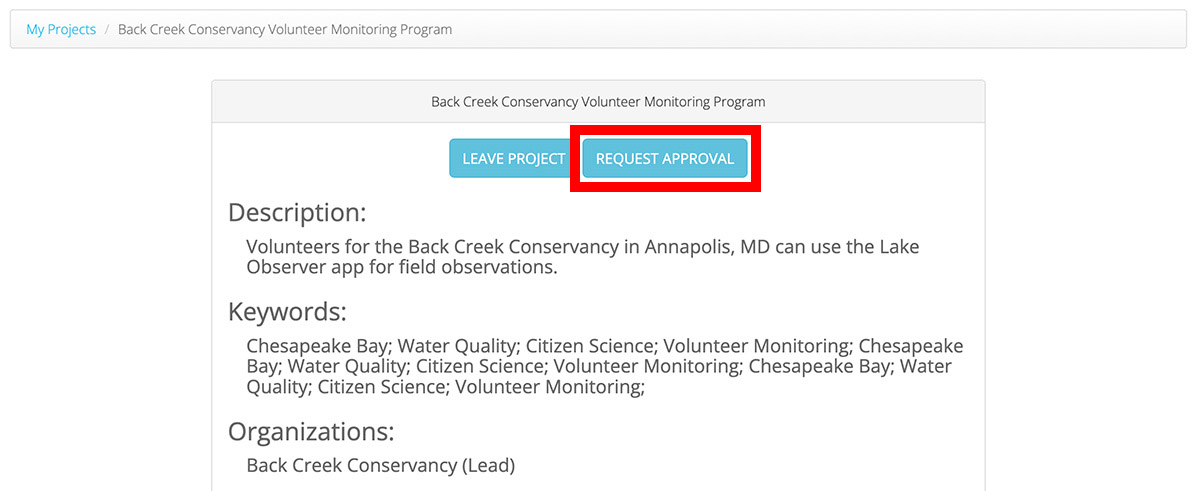
The top of the page should now say “Approval Pending” where the “Request Approval” button previously was.

The Program Coordinator will receive an email alerting them that a new user has requested to be added to the project as an ‘approved user.’
Once the Coordinator has verified your status as an ‘approved’ user, you will see “[Approved]” after the project in your ‘My Projects’ list.
You can now add data to the project as an approved user. This is significant because some projects require that data are quality checked after submission, and the Coordinator may not approve data submitted from those who have not been added as approved users. Also, when searching for data an individual can search by data only from approved users.

Set Your Preferred Waterbodies (Optional)
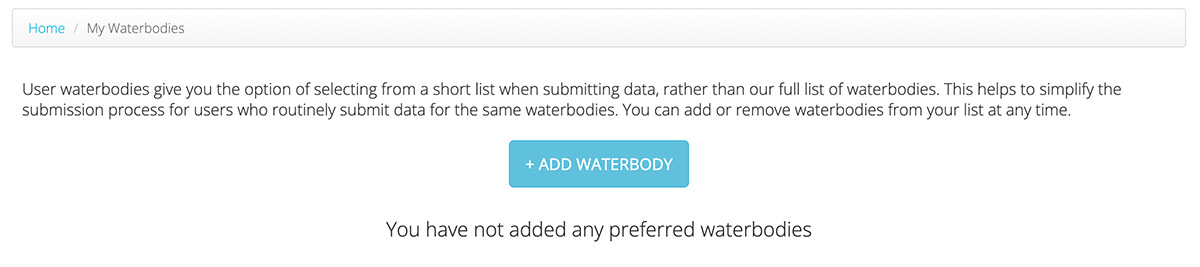
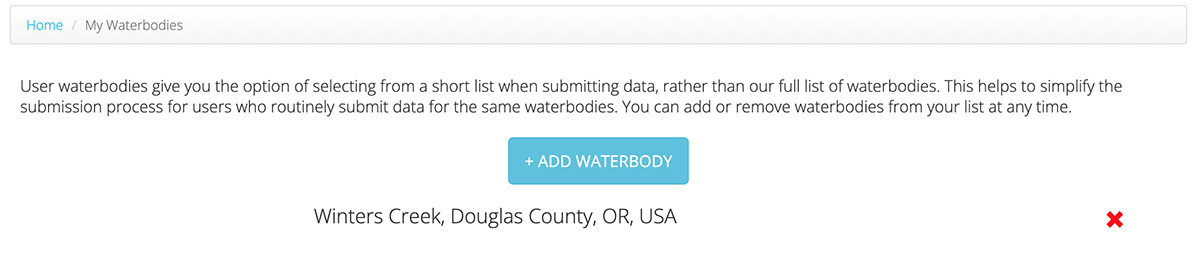
You can add Waterbodies to the “My Waterbodies” list associated with your profile to give you the option of selecting from a short list when submitting data, rather than our full list of Waterbodies. This helps to simplify the submission process for users who routinely submit data for the same Waterbodies. You can add or remove Waterbodies from your list at any time.
To add a Waterbody go to your 'My Waterbodies' page by selecting “My Waterbodies” from the Username menu at the top right of the page, or go to lakeobserver.org/user#waterbody.
Click the blue “Add Waterbody” button.
The ‘Add Waterbody’ pop-up window will appear. Enter your country, followed by your state or province.
Begin to type your Waterbody name in the Waterbody box. As you type the database will automatically provide you a list of available options based upon what you have typed. Use your mouse or down arrow to select the lake from the list that appears.
Once the Waterbody is selected, the map will update to show you the selected lake with a red pin on it. Use the “+” and “-“ to check to make sure you have selected the correct Waterbody as there may be Waterbodies with the same name. (Note: The pin is just a general location for the lake and does not represent any particular site.)
Once you have confirmed the Waterbody selected is correct click the “Add Waterbody” button.

You will be returned to the “My Waterbodies” page and the selected Waterbody should now appear in your list of Waterbodies. Repeat this process for any additional Waterbodies you wish to associate with your account.
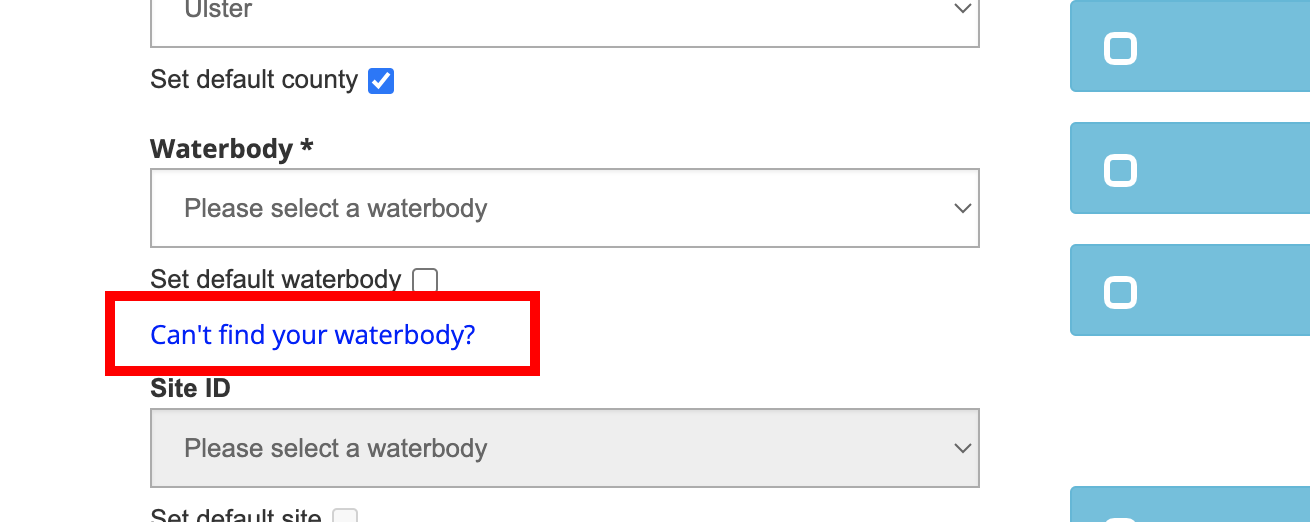
Note: If your Waterbody is not listed, you can submit a new Waterbody to our database by clicking the blue text, "Can't find your waterbody?" You can find instructions for adding a new Waterbody here.
Data Submission
The following Submit Data option is best for entering data for a single date of monitoring. If you need to enter data for multiple dates or multiple sites, you may prefer to use the Batch Data Upload option described in Advanced Data Entry.
From the Lake Observer homepage select “Submit Data” from the “Data” menu option at the top. Or go directly to lakeobserver.org/submissions
Project, Country, State and County Selection
A ‘Select Project' pop-up will appear. If you have joined any Projects they will appear in the dropdown menu. You can also choose to submit data without a Project. After making your selection, if desired you can check the ‘Set default project' option. This will allow you to skip this process the next time you submit data. Click "Next."

If you've selected a Project, you may see a pop-up alerting you about "Highlighted fields." These are fields designated as important by the Project Administrator. See the next section for more information.
If you've selected a Project, you may now be prompted to select your Waterbody. If so, please skip ahead to Waterbody and Site Selection. Otherwise, you will now be prompted to select your Country.
Select your Country from the dropdown menu and click "Next." If you've selected either USA or Canada, you will be prompted to select your State or Province. Otherwise, please skip ahead to Waterbody and Site Selection.
After selecting a State you may also be prompted to select a County to further narrow your Waterbody choices. You can also select 'All counties' to view all the Waterbodies for a particular state.
Important Fields
When submitting data as part of a project, you may see a prompt alerting you that "highlighted fields have been designated important by the project administrator."
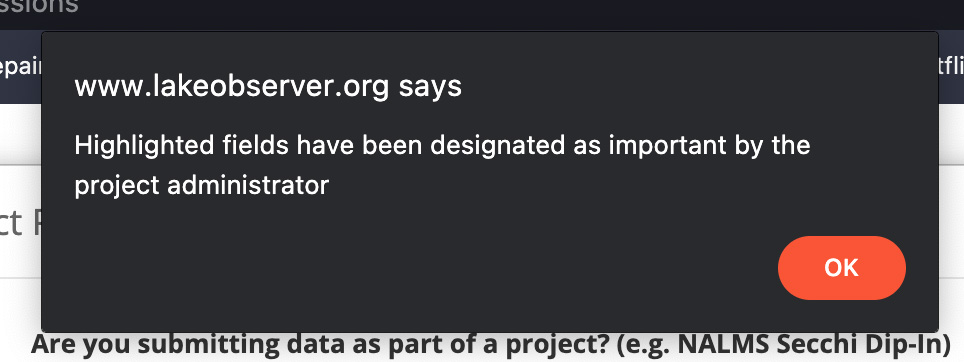
As you go through the varoius sections you will notice a blue highlighting around certain sections or inputs. These are specific data fields that the project administrator has deemed significant. While they are not required (other than those marked with an *), you are encouraged by the project administrator to include this data if available.
Waterbody and Site Selection
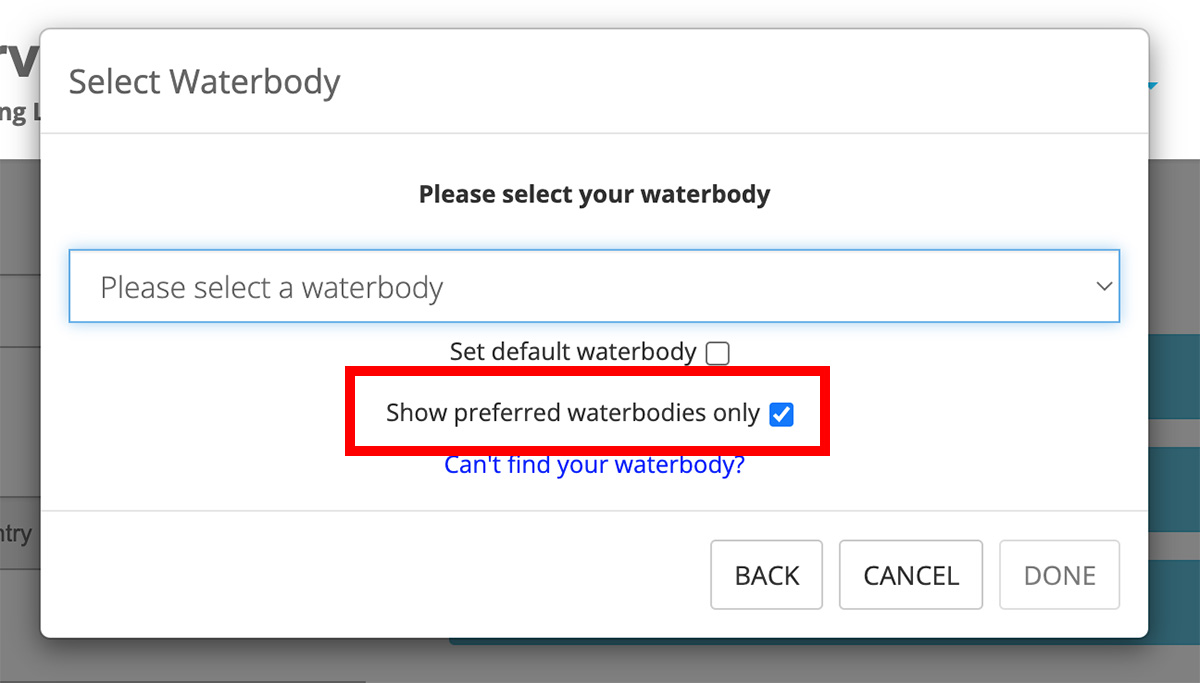
A ‘Select Waterbody' pop-up will appear. Select your Waterbody from the list of available Waterbodies. If you have set any Preferred Waterbodies, you can check the 'Show preferred Waterbodies only' checkbox. This will limit your Waterbody options to only your preferred Waterbodies.
Note: If you are submitting data as part of a Project, your selection of Waterbodies may also be limited by that particular Project. In this case, you may not see all of your preferred Waterbodies. If you would like to have additional Waterbodies included in a Project, you will need to reach out to the Project Administrator.
After selecting your Waterbody, a “Select Site” pop-up may appear next. Not all Waterbodies have Sites associated with them. A Site identifies a specific monitoring location (latitude/longitude) on a Waterbody. Specifying a Site is not required, but if you know your exact monitoring location, using a Site is preferable. New Sites for Waterbodies can be created by anyone. You can find instructions for adding a new Site here.
Note: If you are submitting data as part of a Project, your selection of Sites may also be limited by that particular Project. In this case, you may not see all available Sites. If you would like to have additional Sites included in a Project, you will need to reach out to the Project Administrator.
The left-side of the data entry page will now be populated with the Waterbody and Site information that you selected. Check this information to ensure it is correct before proceeding.

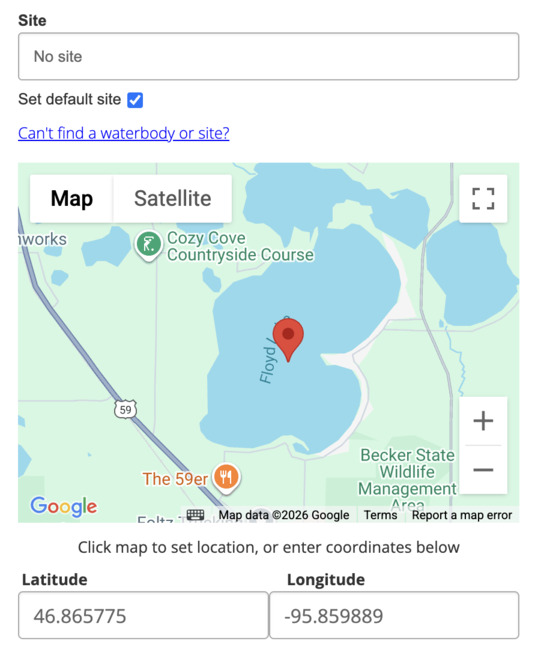
Latitude & Longitude
If you have selected a specific site, then the latitude and longitude fields will be autopopulated and 'locked' to match the latitude and longitude values of your selected site. However, if you have not selected a specific site then these inputs can be adjusted to match your exact location on the waterbody.
TIP: You can use the “+” and “-“ arrows next to the map to zoom in and out. You can also click and drag the map marker to adjust the latitude and longitude, or you can manually enter latitude and longitude values.
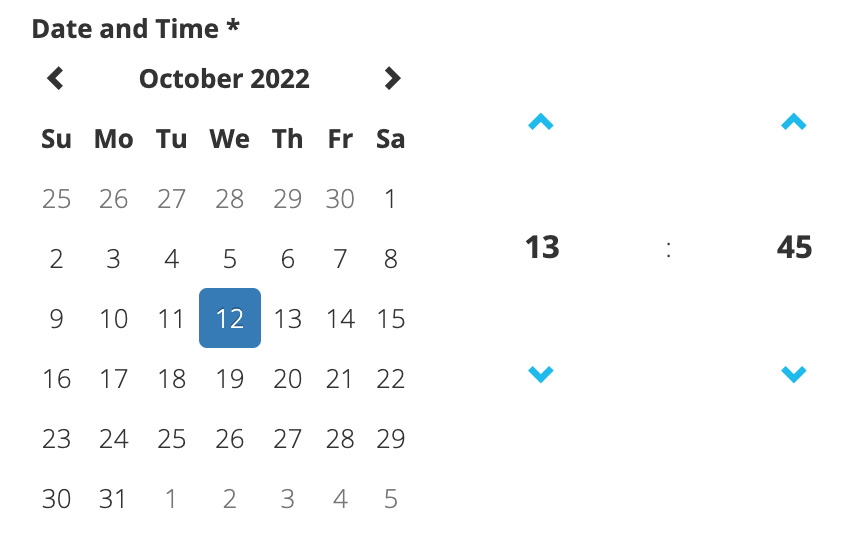
Monitoring Date and Time
Scroll to the bottom left of the data entry page. You should see a calendar and clock icon.
Important: By default, the web app will set the calendar and clock feature on the bottom left to the current date and time. You will need to change these to the date and time that you monitored.
To change the calendar, click on the date that you monitored, once selected it will turn blue. To view a previous month, click the “<” arrow at the top of the calendar (to the left of the current month name).
To adjust the time, use the blue up and down arrows, or click on the numbers. Note that time is displayed in military or 24-hour time (e.g. 4:00pm = 16:00 hours), please be sure to enter 12 through 23 for PM times.
Water/Ice Data Entry
Water Quality: Single Depth
Water quality readings including temperature, conductivity, pH, dissolved oxygen, turbidity, and chlorophyll can be recorded here. Note that you can enter data for multiple depths as well in this section.
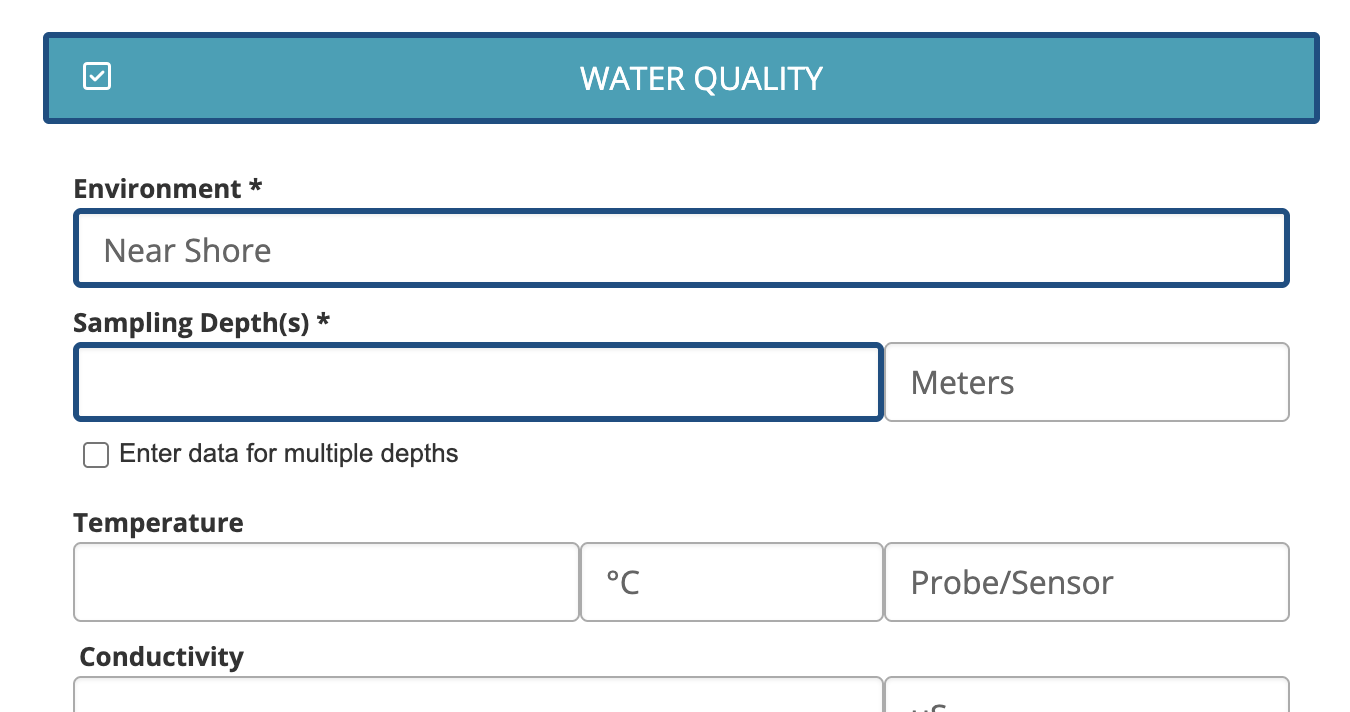
Click the blue “Water Quality” button to expand the section. If you are submitting data as part of a project, minimum requested fields may be highlighted in blue.
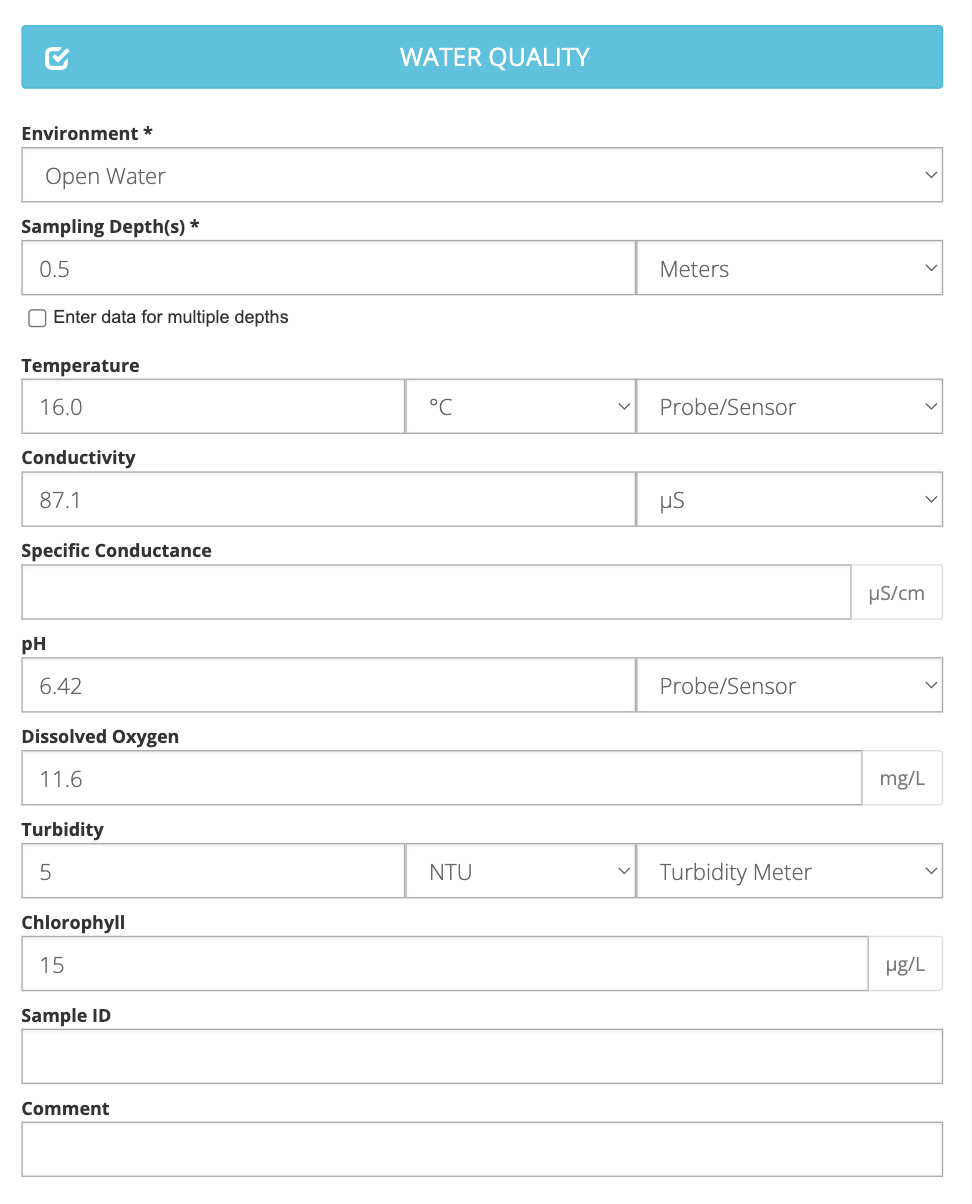
Set the Environment.
- Select “Open Water” if sampling from a boat, or "Near Shore" if sampling from a dock or the shore.
Set the Sampling Depth(s).
- If you recorded readings at a single depth, enter the depth value in the Sampling Depth(s) field. The default unit is set to meters.
- If measuring in feet be sure to adjust the units.
- If you have readings from multiple depths to enter, see the section below.
Set the Water Temperature, Units and measuring device.
- In the temperature box enter the water temperature value observed.
- Read and enter values to the nearest decimal point. (e.g. “16.0” rather than “16”)
- The default unit is Celsius; if you measured in Fahrenheit be sure to change the units.
- If you took your reading using a thermometer rather than a probe/sensor, adjust the selected measuring device.
Set conductivity, specific conductance, pH, dissolved oxygen, turbidity and/or chlorophyll readings in the spaces provided.
- Leave blank any fields that your probe/sensors do not measure
- Where applicable measure and enter values to the nearest decimal point.
- Be sure the correct units are selected
- Select Probe/Sensor for the sampling method wherever required
TIP: Some fields are set to allow a value only within a particular range. If you receive a popup message indicating that a value is outside of the range please double-check the value before proceeding. If the value is correct but you continue to receive an error message, please contact our support team.
In the comment section at the bottom, you can enter any additional information such as the type of multi-parameter meter used, meter ID (e.g. serial number) and the date of last calibration, if known.
Water Quality: Multiple Depths
Check the “Enter data for multiple depths” box beneath the Sampling Depth(s) field.
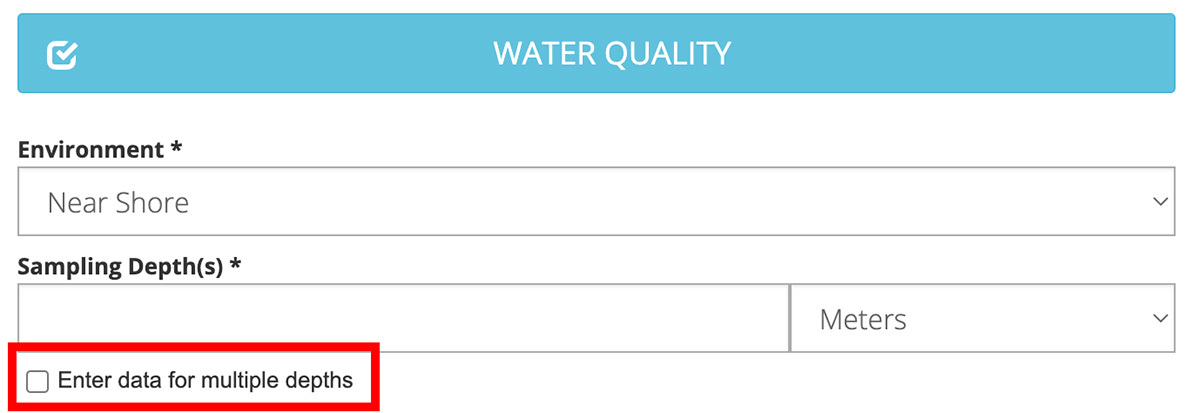
A pop-up box “Enter Depth Values (m)” will appear.
NOTE: Depth values MUST be entered in METERS to use this feature.
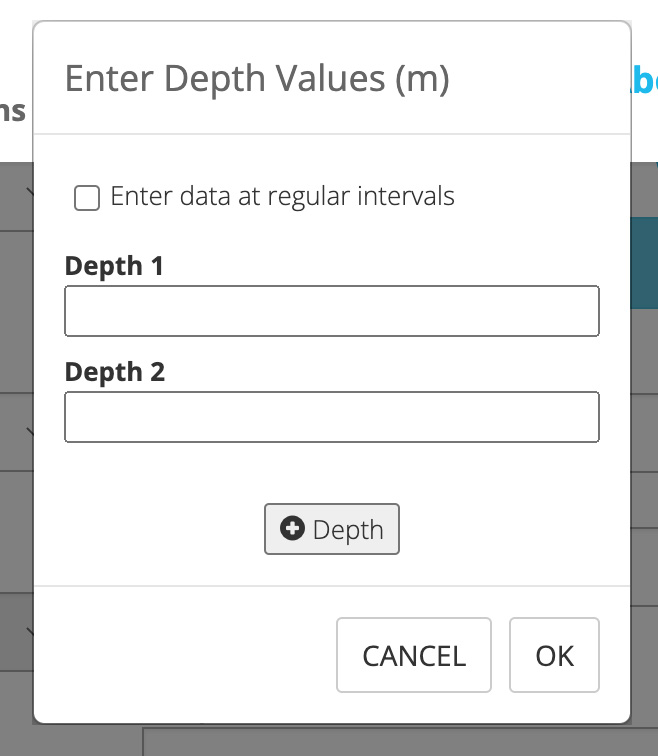
Enter the depths at which readings were recorded. If measurements were made at more than two depths click the “+ Depth” button to add additional rows.
OR
If you sampled at regular intervals (e.g. every 1 meter until bottom) check the “Enter data at regular intervals" box.
- Enter the interval value (e.g. 1.0 meter)
- Enter the depth at which the first reading was recorded in the Initial Depth field.
- Enter the total number of depths sampled at.
For example, if your first reading was taken at the surface (0m) and you sampled every 1 meter until hitting bottom at 5m you would enter:
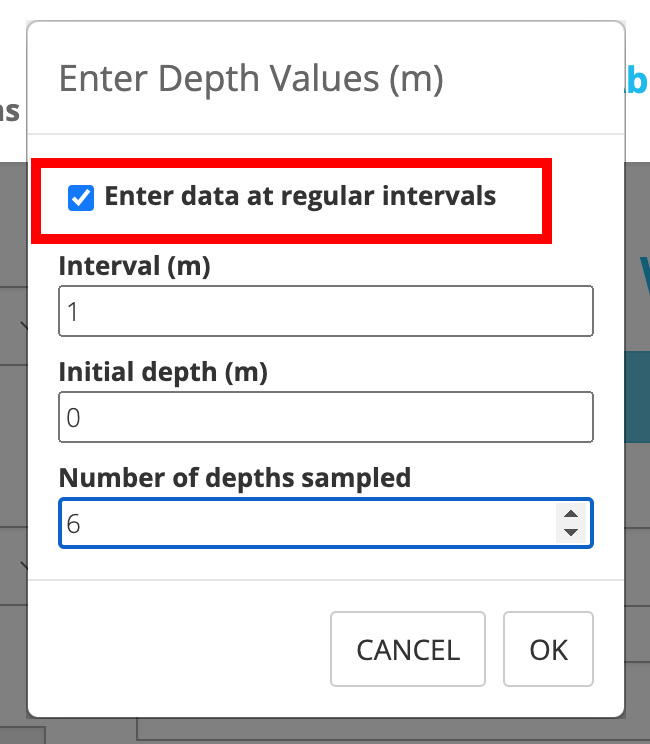
Click “OK” and the Sampling Depth(s) field will now be populated with values based upon the information you entered.
Enter Water Temperature data. Click in the Water Temperature text box. A pop-up box will appear showing the sampling depths and a place to record the value for the water temperature at each depth:
Enter your temperature values and click “OK”. The Water Temperature field will now be populated with a combination of depth/temperature values. For example, if you entered a temperature of 19.0 at your first depth of 0m, the first entry you will see is “0:19.0”.
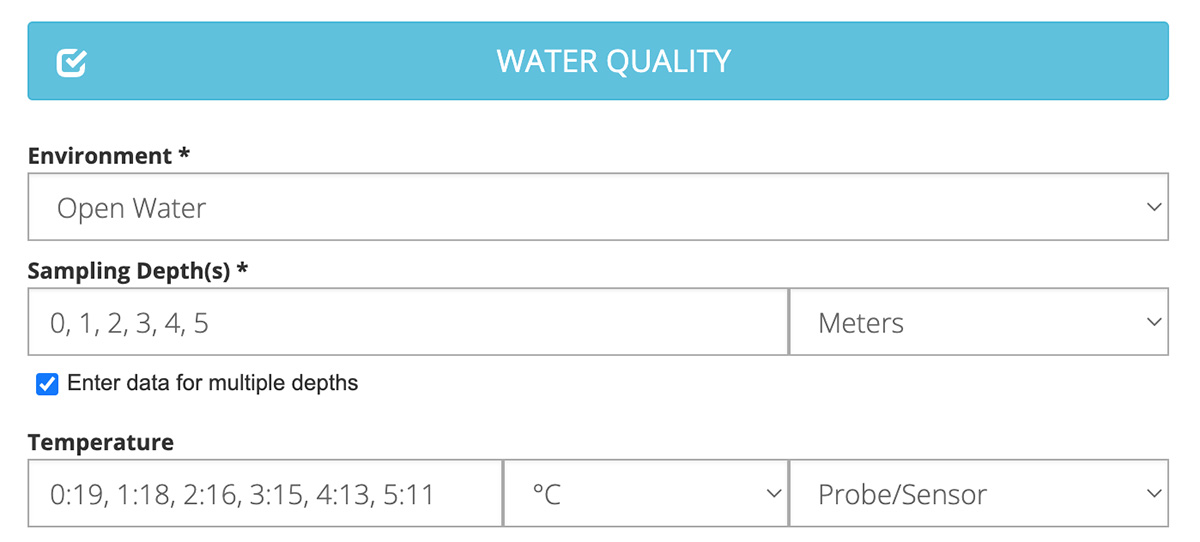
The default unit for temperature is Celsius; if you measured in Fahrenheit be sure to adjust the units before proceeding.
Continue entering additional data recorded (e.g., conductivity, pH, dissolved oxygen, turbidity and/or chlorophyll readings) using the same steps as described above for temperature. Each time a pop-up window will appear with the depth values and a box to record your measurements for that parameter.
Data Entry Tips and Guidelines:
- Skip/leave blank any parameters that you did not measure
- Pay attention to decimal points. Enter values to the nearest decimal point recorded by your meter. (e.g. enter “16.00” instead of “16” if your meter recorded the values to the nearest hundredth.)
- Be sure the correct units are selected for a parameter before proceeding to the next parameter.
- A value must be entered for each depth; if you leave a box blank when entering data, you will receive an error message.
- If you enter a value outside of the allowed range a pop-up window will appear alerting you of the error.
- Accepted value ranges are listed below
-
- Temperature must be between -3.89 and 40 C (or 25 and 104 F)
- pH must be between 0 and 14
- Conductivity must be between 0 and 2000 µS
- Dissolved oxygen must be between 0 and 14 mg/L
- Turbidity must be between 0 and 5000 NTU
- Chlorophyll values must be between 0 and 5000 ug/L
Laboratory Sample Collection (Optional)
If your group is conducting advanced monitoring and collected a sample for Laboratory Analysis, enter the sample ID(s) in the Sample ID box at the bottom of the Water Quality section.
This will allow you to quickly link your field measurements with your laboratory results once they are returned. Separate sample IDs with a comma if needed (e.g. if a sample and a field duplicate were collected at a location).
Below is an example of an entry representing a grab sample and a field duplicate collected at the same site on 06/06/2021. Note that Sample ID format is determined by local protocol; check with your local volunteer leader to determine how samples should be labelled.

Secchi Depth
Click the blue “Secchi Depth” button to expand the section. If you are submitting data as part of a project, minimum requested fields may be highlighted in blue.
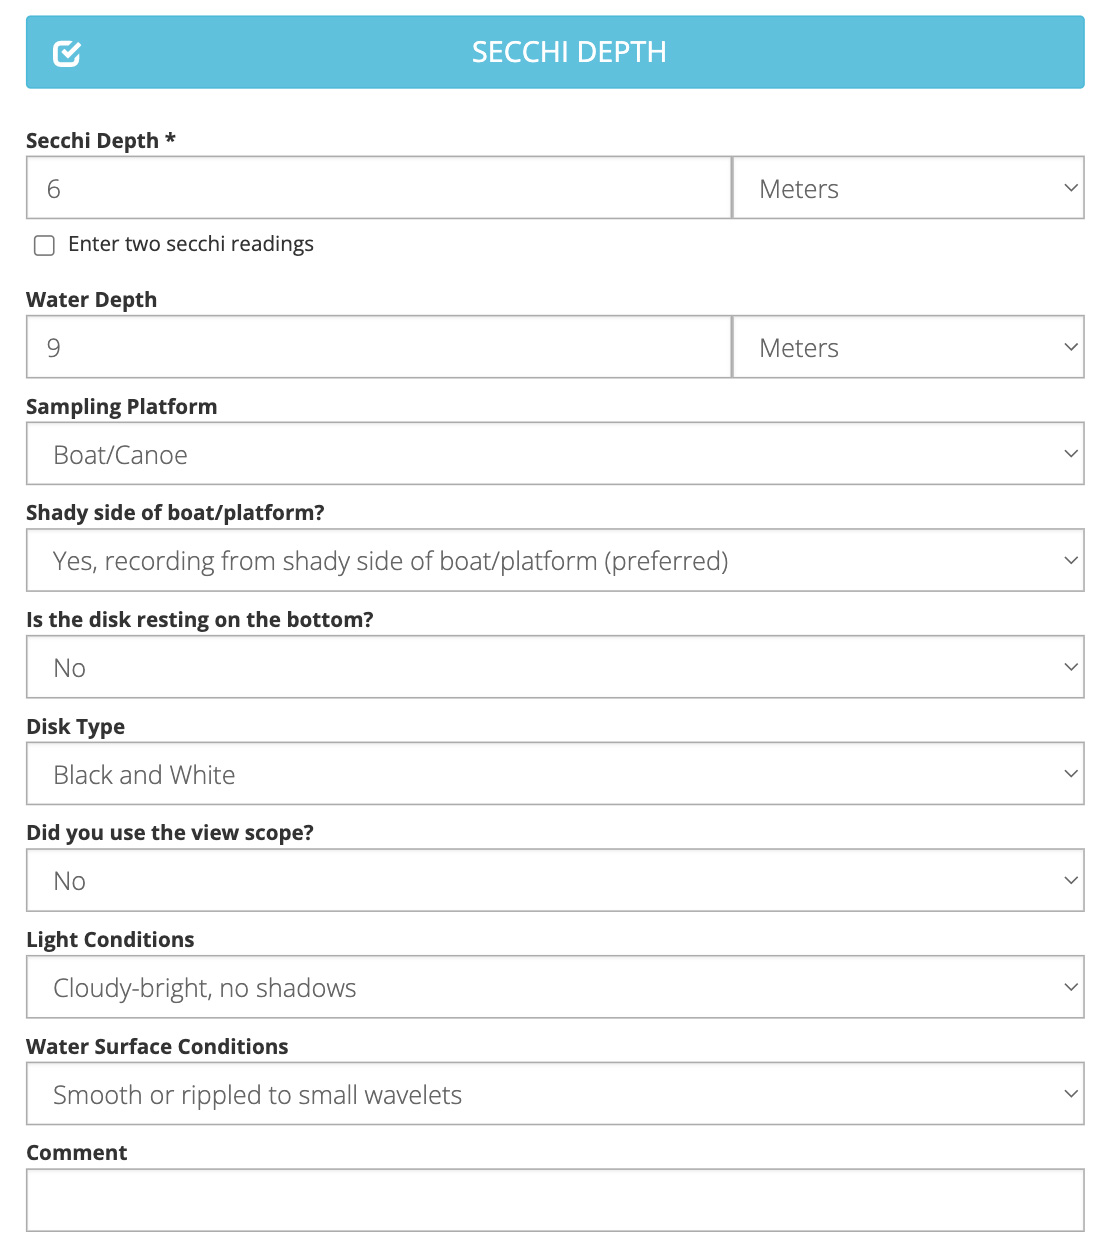
Secchi Depth. Enter the depth at which you could no longer see the disk in the water.
- Enter the depth to the nearest decimal value (e.g. 3.1 m)
- The default unit is meters, if measuring in feet be sure to adjust the units.
Entering Two Secchi Depths. For some organizations, it is protocol to record two secchi depths, one using a viewscope and one without a viewscope. To record two secchi depths check the box to "Enter two secchi readings." You will see an additional text field appear for your second depth, as well as an additional field for "Is the disk resting on the bottom?" and "Did you use a viewscope?"
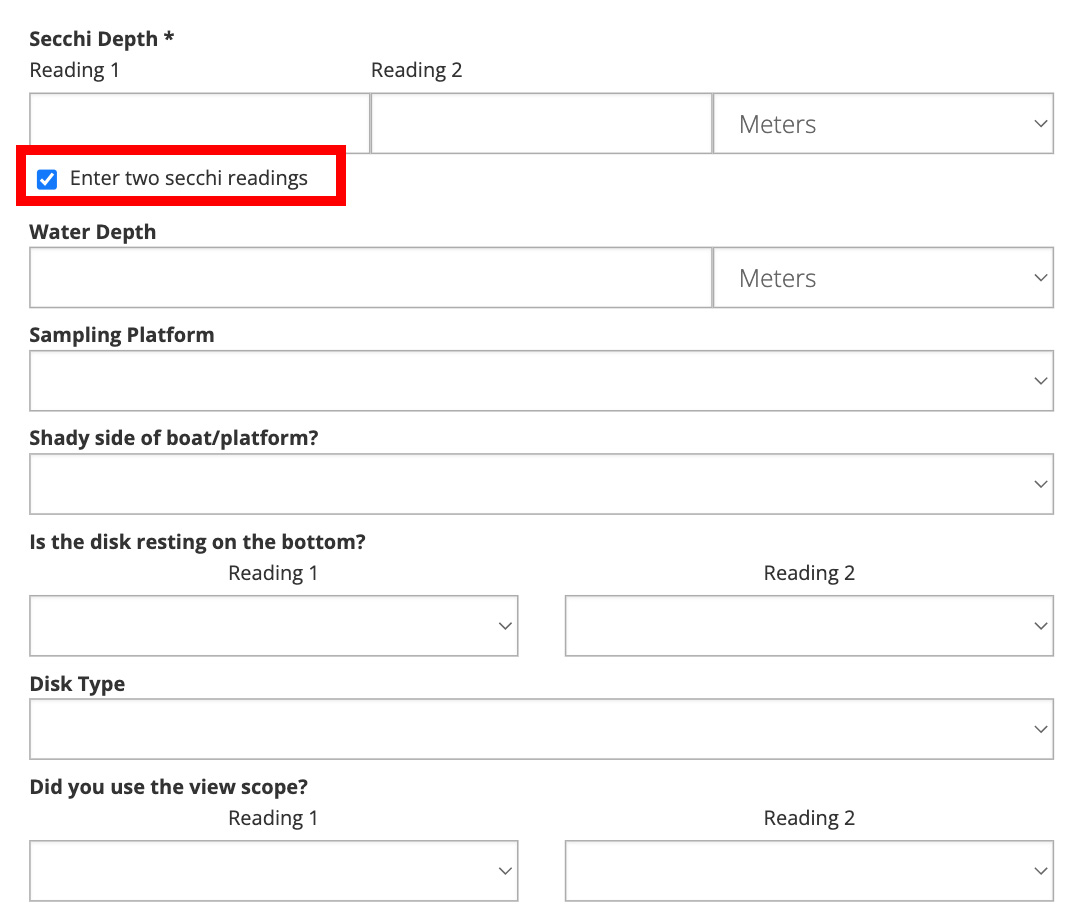
Water Depth. If known, enter the depth at which the secchi disk hit the bottom.
- Enter the depth to the nearest decimal value (e.g. 3.1 m)
- The default unit is meters, if measuring in feet be sure to adjust the units.
Sampling Platform. Select where you monitored from.
Shady side of boat/platform? Select “Yes…” if you were able to take your secchi depth readings on the shady side of your sampling platform. If not, select “No…”
Note: It is general protocol for most organizations to sample on the shady side of the vessel, however this is not always possible (i.e. if the sun is directly overhead).
Is the Disk Resting on the Bottom? If the disk was on the bottom select “yes”, otherwise select “No.”
Disk Type. Indicate the type of secchi disk used.
Did you use a view scope? Select whether a viewscope was used (yes or no). If you select “yes” a viewscope was used, an additional field “View Scope Type” will appear. Select whether you used an open tube or a clear glass/plastic bottom scope.
Light Conditions. Select the option that best describes light conditions at the time of monitoring.
Water Surface Conditions. Select the option that best describes the lake/pond surface at the time of monitoring.
Comment. Enter any additional notes that might be important for providing context for the conditions under which readings were recorded.
Ice Cover
Click the blue “Ice Cover button to expand the section. If you are submitting data as part of a project, minimum requested fields may be highlighted in blue.
Event. Select the information type that you wish to record from the following choices:
- No ice - to indicate that no ice cover is present on the waterbody
- Percent Lake Cover - to indicate what percentage of the waterbody has ice cover. If you select this option, you must enter the Percent Cover in the field that appears.
- Ice Thickness - to indicate how thick the ice cover is. If you select this option, the following additional fields will appear:
- Ice Thickness – enter the value and select the correct units (cm is default)
- Snow Thickness – if there is any snow cover on top of the ice, enter the value and units (cm is the default unit)
- Ice Type – Select “clear ice”, “black ice”, or “Other”. If you select “Other” please provide a description in the field that appears.
- Ice On - to indicate the date that a waterbody is completely covered iced over
- Ice Off - to indicate the date that a waterbody is completely free of ice cover
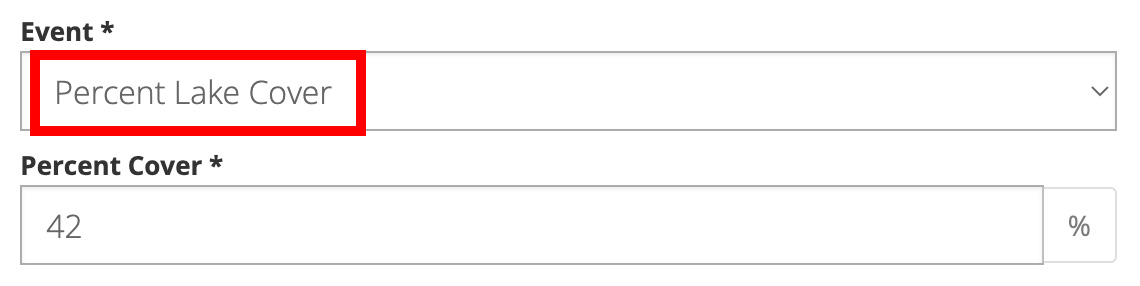
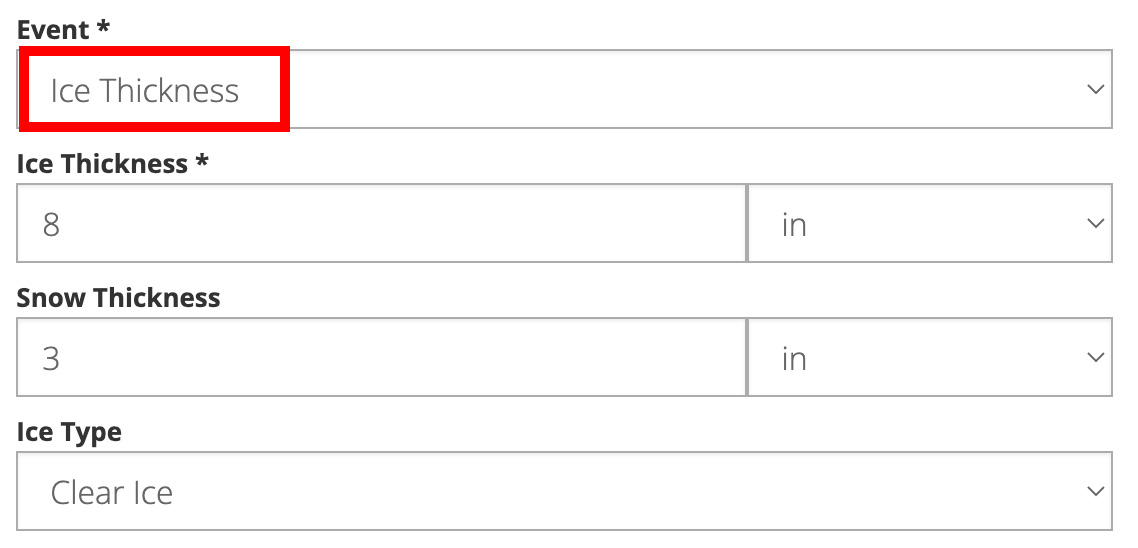
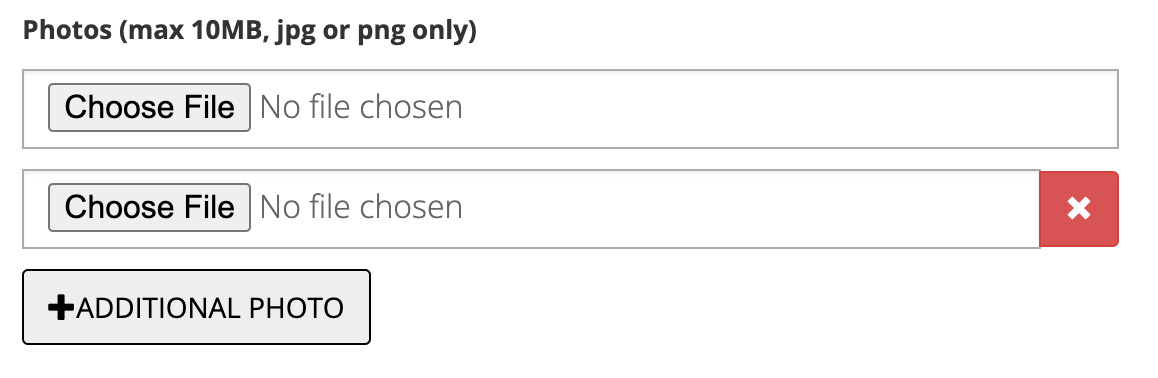
Photo. Upload one or more photos of ice conditions if taken.
- Accepted formats include .jpg and .png only
- Photo files cannot be larger than 10 MB
- Click the “Choose File” button. Use the file explore window that opens to locate the first photograph that you wish to upload. Click the file name to select it and then click “Open.” The file name will appear in the box if successful.
- If you wish to upload additional photos click the “Additional Photo” button. Then click the second “Choose File” button that appears and repeat the steps above.
- Click the red “X” box to delete a file.
Comment. In the comment section enter any additional information about ice conditions. If photos were uploaded provide descriptions of the photos to help future users understand what they are intended to represent.
Weather Data Entry
Air Temperature
Click the blue “Air Temperature" button to expand the section. If you are submitting data as part of a project, minimum requested fields may be highlighted in blue.
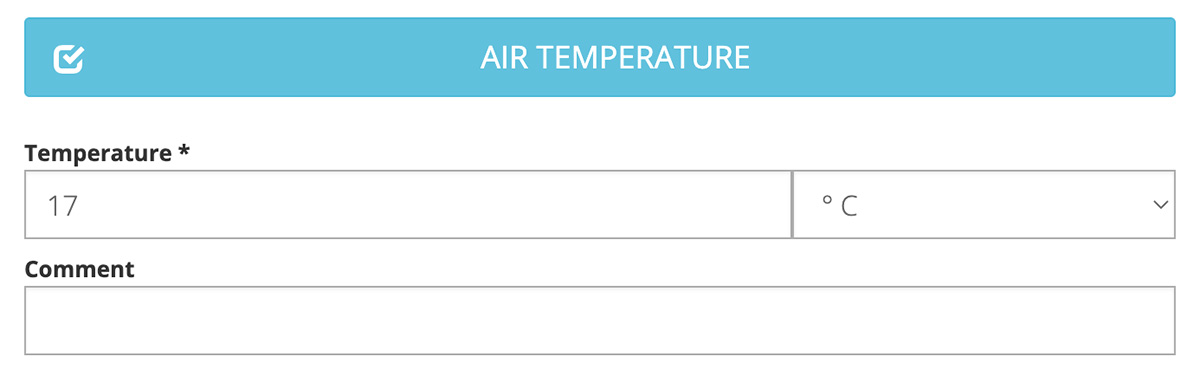
Temperature. Enter the air temperature value recorded. Be sure to select the appropriate units (Celsius is the default).
Comment. Enter any information relevant to your observation such as the source of the temperature information (e.g. field thermometer reading, weather.com, etc.)
Cloud Cover
Click the blue “Cloud Cover" button to expand the section. If you are submitting data as part of a project, minimum requested fields may be highlighted in blue.
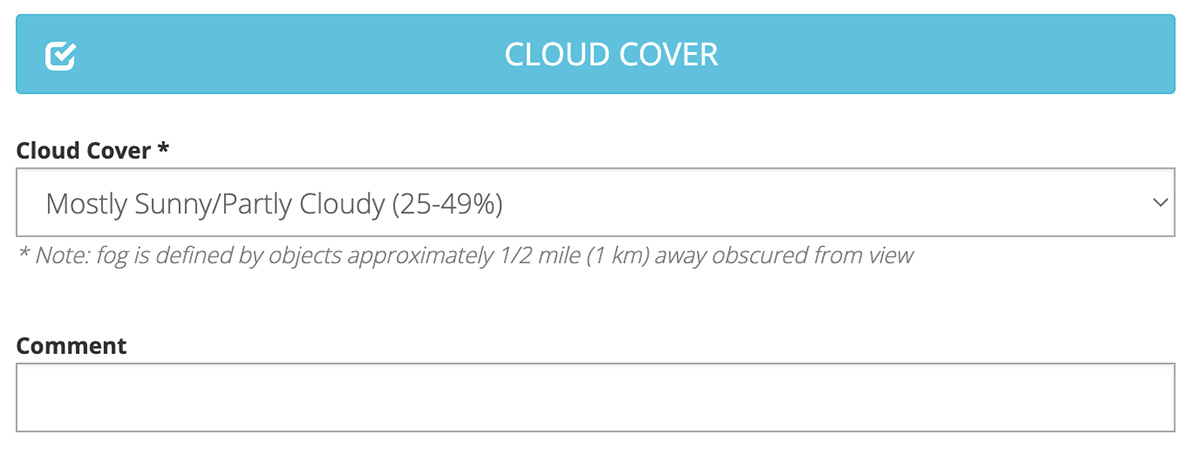
Cloud Cover. Enter the approximate amount of cloud cover at the time of sampling using the options provided.
Comment. Enter any additional relevant comments here, particularly if cloud cover may have impacted data quality.
Precipitation
Click the blue “Precipitation" button to expand the section. If you are submitting data as part of a project, minimum requested fields may be highlighted in blue.
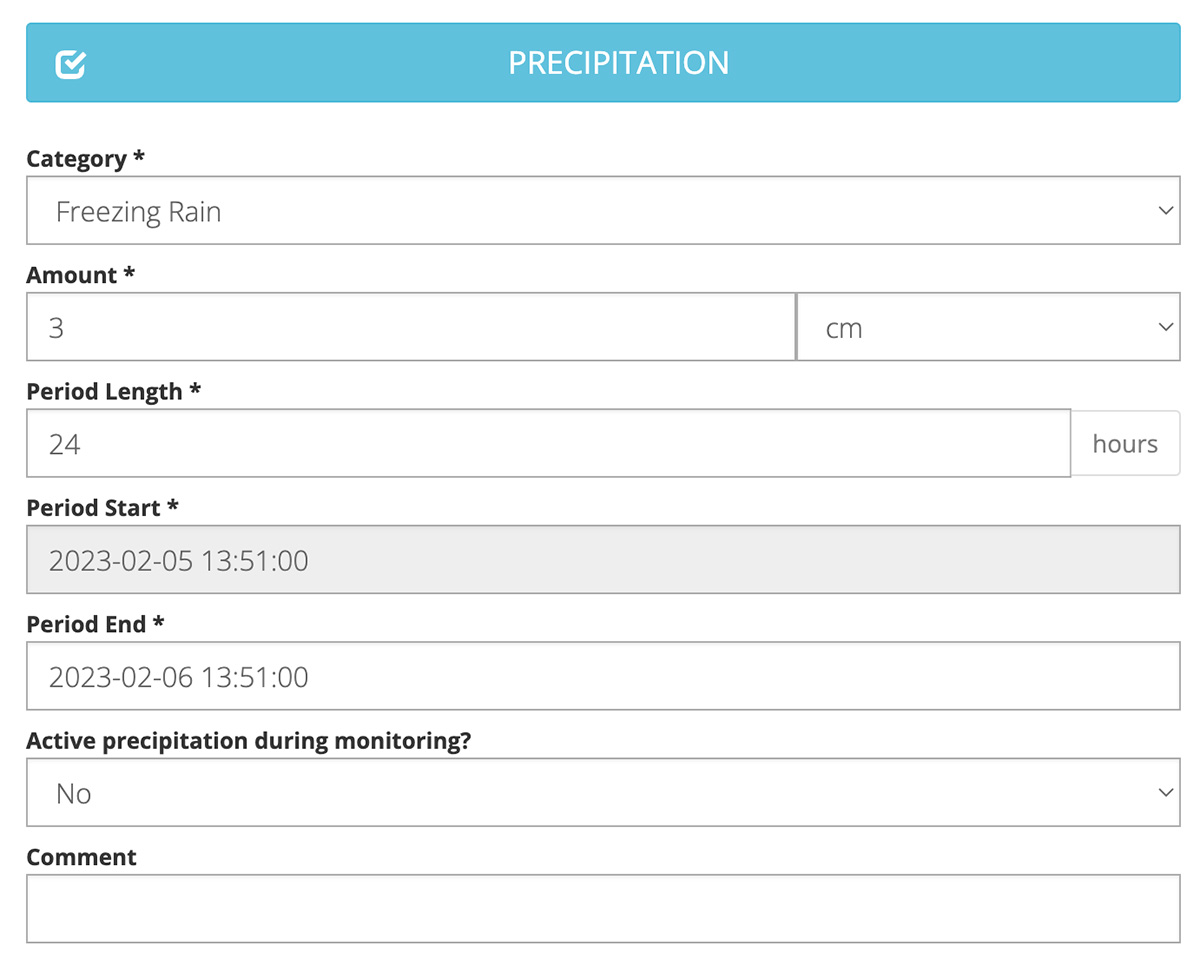
Category. Enter the dominant type of precipitation (or none) observed over the time period indicated.
Amount. Enter the amount of precipitation recorded over the time period indicated.
Period Length. Enter the number of hours for which you are reporting precipitation data. The units are set to hours and cannot be changed.
Period Start. This value will be calculated automatically based on the period length and end time.
Period End. Enter the date and time during which sampling occurred. This will likely be the same date and time set using the calendar and clock feature in the lower left of the submission screen.
Active Precipitation During Monitoring? Answer Yes or No if there was active precipitation while you were collecting data.
Comment. Enter any additional relevant comments here, particularly if precipitation may have impacted data quality.
Wind
Click the blue "Wind" button to expand the section. If you are submitting data as part of a project, minimum requested fields may be highlighted in blue.
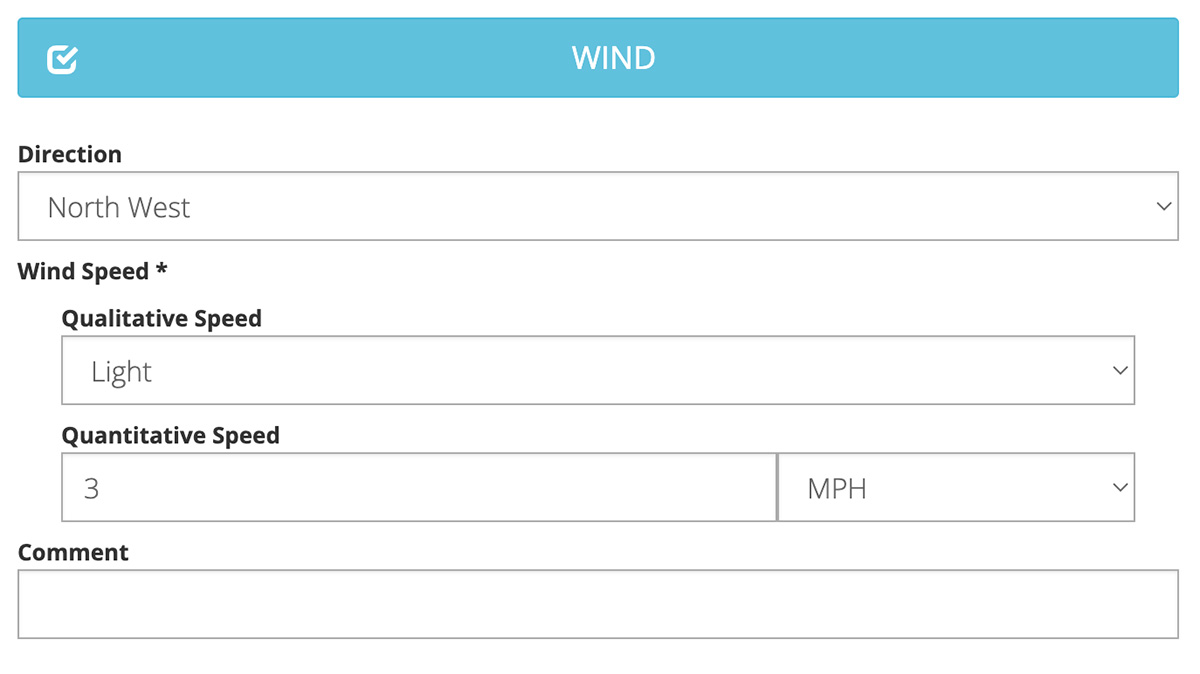
Direction. If known, enter the wind direction. If not known, leave blank
Wind Speed. If the actual wind speed is known you can enter it in the Quantitative Speed field. Be sure to note whether the units are m/s or MPH. Alternatively, if the exact wind speed is not known you can provide a description of the speed by making a selection from the Qualitative Speed dropdown menu.
Comments. Enter any additional relevant comments here, particularly if wind may have impacted data quality.
Aquatic Organism Data Entry
Algae
Click the blue "Algae" button to expand the section. If you are submitting data as part of a project, minimum requested fields may be highlighted in blue.

Environment. Select “Open Water” if sampling from a boat or "Near Shore" if sampling for a dock or the shore.
Transparency. Select the range of values that includes your secchi disk reading for the site. For example, if your secchi disk depth was 0.8m you would select the option “1.5-3.0 ft (0.5-1.0m)”.
Description. Select the option(s) that best describes the general appearance of the algae on the water surface and within the water column. You can select more than one option. There is also an option to record that no algae is present (“Nothing”). After making a selection you will also be asked to describe the color of the algae.
Extent of Bloom. Enter the general extent of the bloom using one of the descriptors.
Sample Collected. If an algae sample was collected check the box next to “Sample Collected” and enter the Sample ID in the field provided. If no sample was collected leave this section as is (i.e. box unchecked).
Recreational Suitability. Select the option the best represents recreation conditions at the time of monitoring.
Physical Condition. Select the option the best represents physical conditions at the time of monitoring.
NOTE: If a fish kill is observed please note the number and types in the comment field. Depending on your region, you might also consider reporting the fish kill to your local fisheries department.
Algae Type. Check off the algae type(s) observed. If you select “Other” or “Unknown” please provide a description in the field provided.
If "Gloeotrichia" is selected as an algae type, two additional fields will appear; Dot Spacing and Visual Scale.
Important: Only fill in the Algae Type section if you are trained in algae identification.
Comment. Enter any additional relevant comments here.
Photo. Upload one or more photos of the observed algae if taken.
- Accepted formats include .jpg and .png only
- Photo files cannot be larger than 10 MB
- Click the “Choose File” button. Use the file explore window that opens to locate the first photograph that you wish to upload. Click the file name to select it and then click “Open.” The file name will appear in the box if successful.
- If you wish to upload additional photos click the “Additional Photo” button. Then click the second “Choose File” button that appears and repeat the steps above.
- Click the red “X” box to delete a file.
Aquatic Invasives
Click the blue "Aquatic Invasives" button to expand the section. If you are submitting data as part of a project, minimum requested fields may be highlighted in blue.
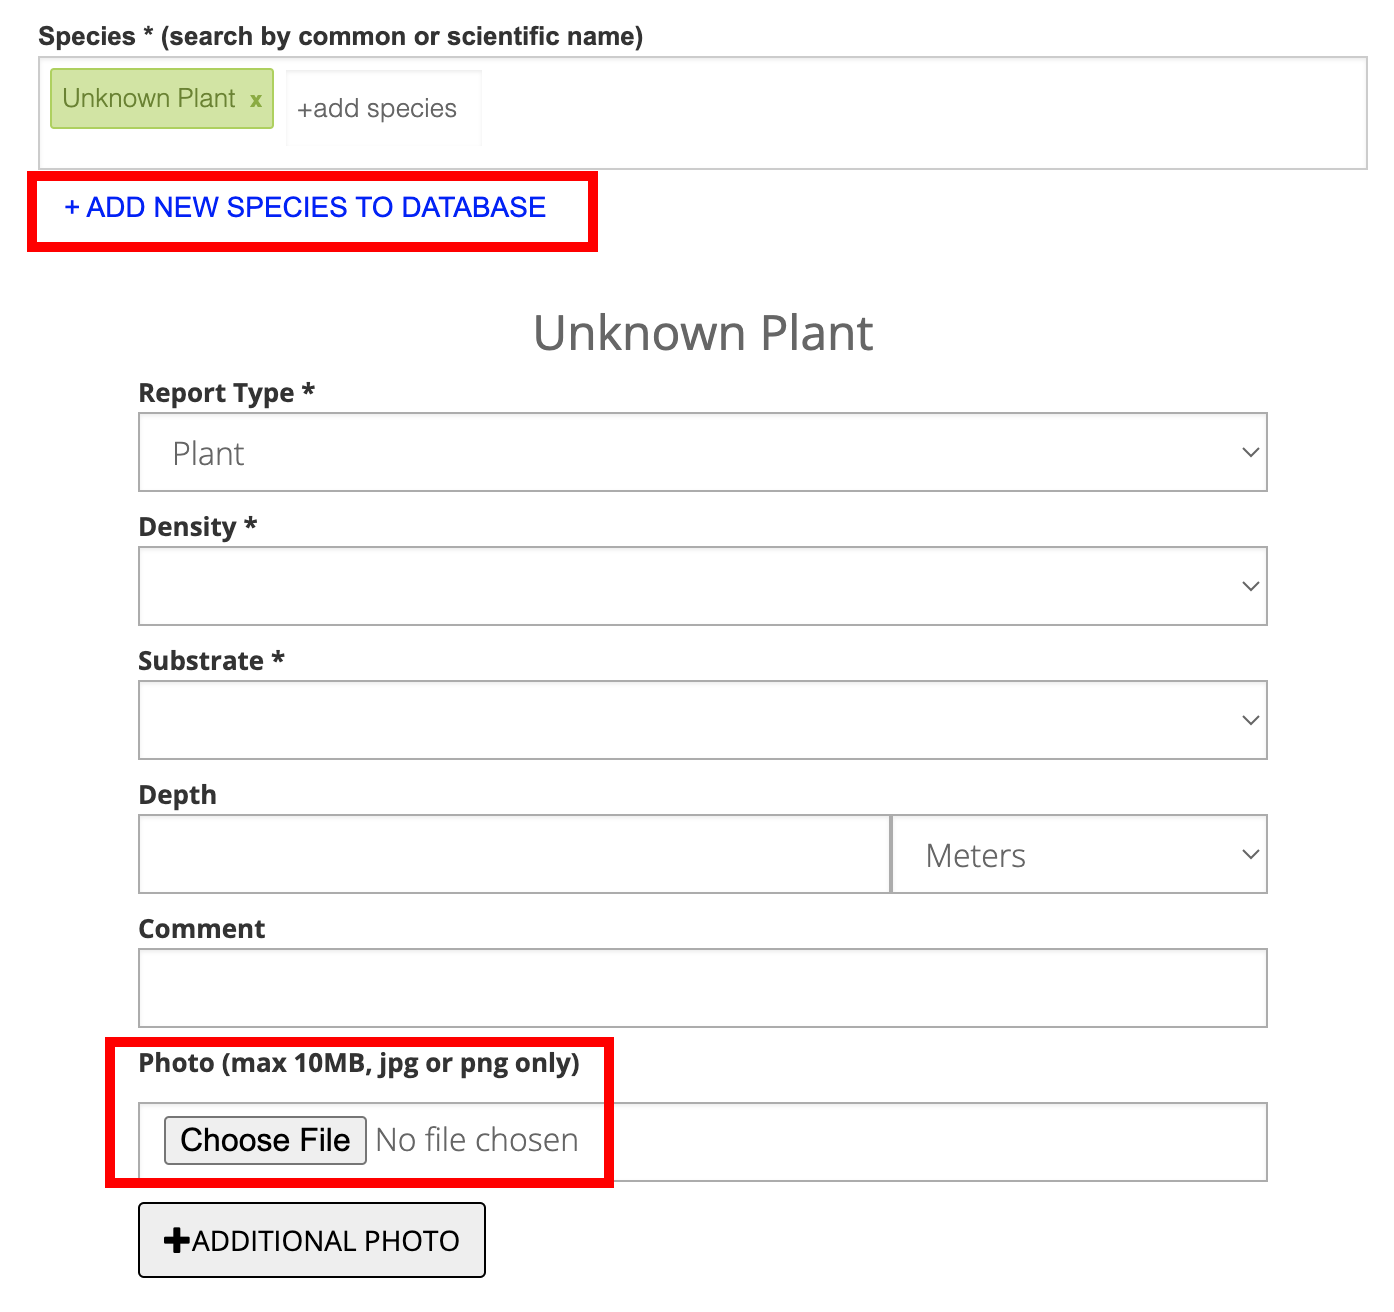
Species. Enter the name(s) of the species observed. If you are submitting data as part of a Project, there may be particular species that are of interest for the Project. Check with your Project Coordinator for more information.
Begin typing the name of the observed organism. Organisms can be searched by both their common and scientific names. As you type you will begin to see a list of matching organisms. Select the organism that matches your search. If you cannot identify the organism you can select "Unknown Animal" or "Unknown Plant." If you do know the name of your organism but cannot find it in the list, you can add a new organism to our database. Instructions for adding a new organism can be found here.
After selecting your organism you will see a number of additional data fields.
You can add observations for any number of species. To remove a species, click the 'x' next to its name.
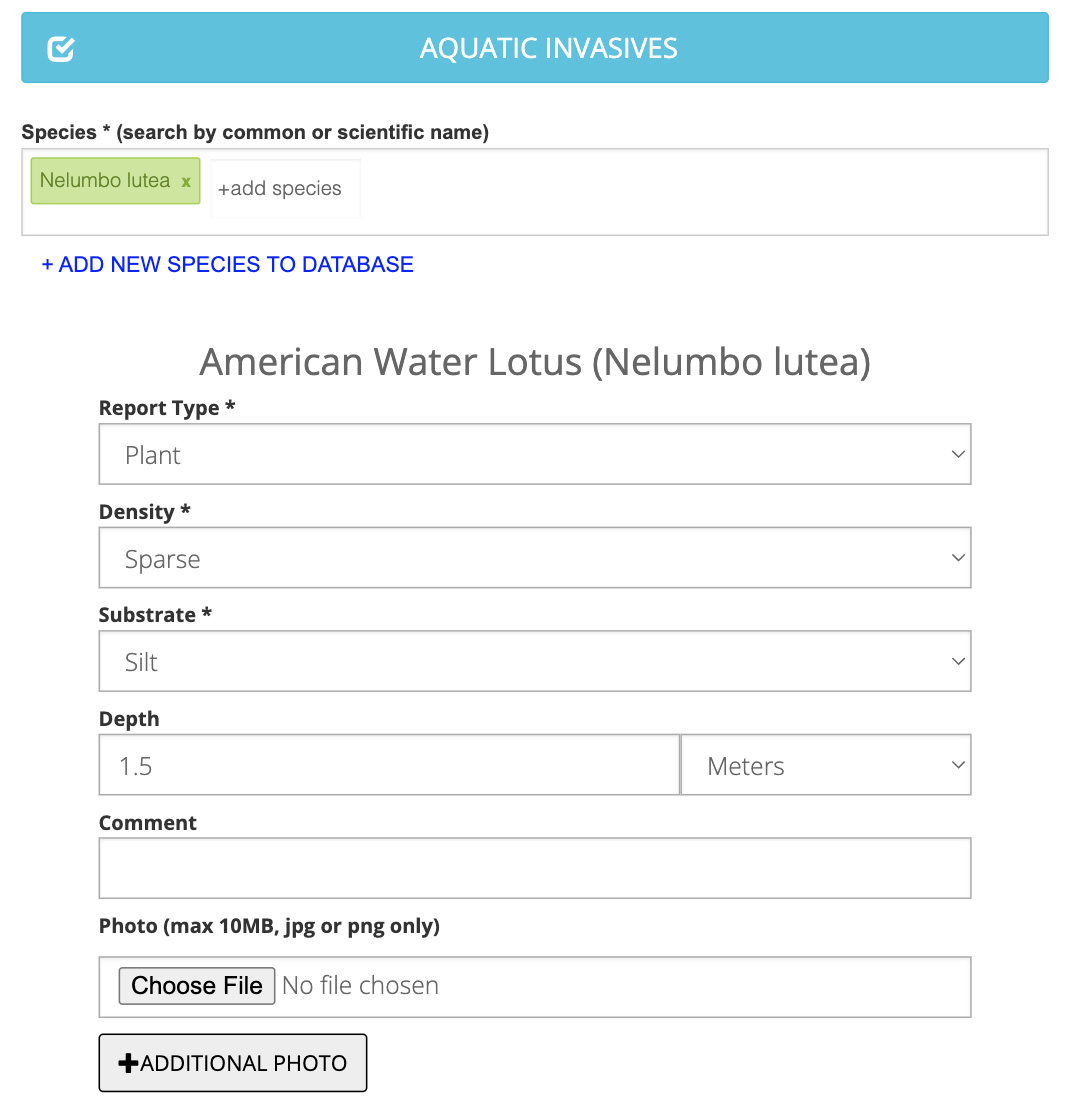
Report Type. Indicates whether the observed organism is a plant or animal. This field should be filled in automatically based on your species selection.
Density/Number Observed. If your selected organism is a plant, you will be asked to describe the density of the plants. If your selected organism is an animal, you will be asked to record the number of animals observed.
Substrate. Indicates the type of substrate where the organism was observed.
Depth. Indicates the depth at which the organism was observed. Make sure to select the appropriate units of measurement.
Comment. Enter any additional relevant comments here.
Photo. Upload one or more photos of the observed organism(s) if taken.
- Accepted formats include .jpg and .png only
- Photo files cannot be larger than 10 MB
- Click the “Choose File” button. Use the file explore window that opens to locate the first photograph that you wish to upload. Click the file name to select it and then click “Open.” The file name will appear in the box if successful.
- If you wish to upload additional photos click the “Additional Photo” button. Then click the second “Choose File” button that appears and repeat the steps above.
- Click the red “X” box to delete a file.
Metaphyton
Click the blue "Metaphyton" button to expand the section. If you are submitting data as part of a project, minimum requested fields may be highlighted in blue.
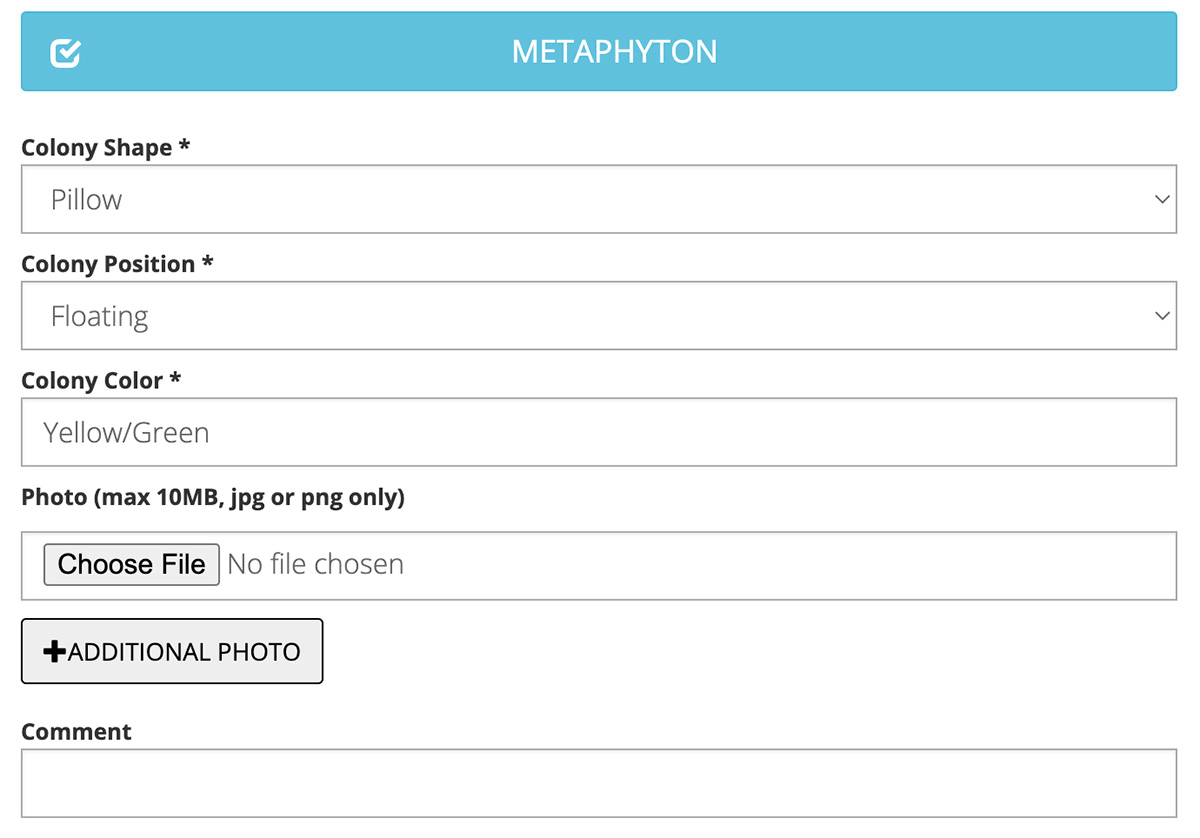
Colony Shape. Select the descriptor that best describes the colony shape observed.
Colony Position. Select the descriptor that best describes where in the water column the colony was observed.
Colony Color. Select the color that best describes the colony observed.
Comment. Enter any additional relevant comments here.
Photo. Upload one or more photos of the observed metaphyton if taken.
- Accepted formats include .jpg and .png only
- Photo files cannot be larger than 10 MB
- Click the “Choose File” button. Use the file explore window that opens to locate the first photograph that you wish to upload. Click the file name to select it and then click “Open.” The file name will appear in the box if successful.
- If you wish to upload additional photos click the “Additional Photo” button. Then click the second “Choose File” button that appears and repeat the steps above.
- Click the red “X” box to delete a file.
Data Groupings
A grouping represents a set of data that were submitted at a single location around the same time. Groupings are automatically created when submitting data. For example, if you submit data via one of our mobile apps, and if you were to include air temperature data, cloud cover data, and secchi data, all of those submissions would become part of a single grouping. If submitting water quality data, each measurement type entered will create a separate entry, but all of those entries will be grouped together. Likewise, if you submit water quality data at various depths, all of the depth readings will be part of the same grouping. See our section on Viewing Data for more information on how to view data groupings.
Projects
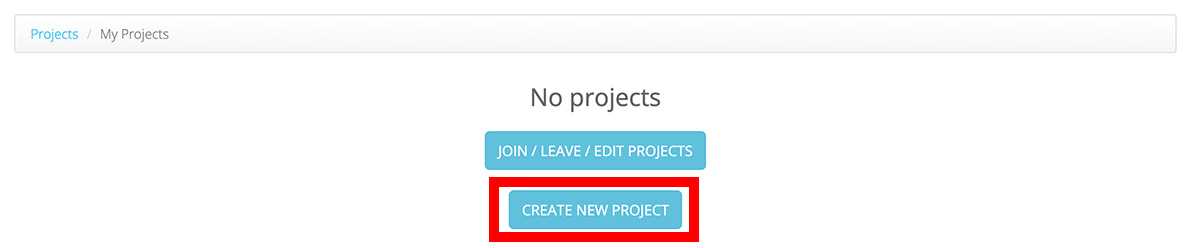
Create a Project
To create a new project, make sure you are logged in, then select 'My Projects' from the 'User' menu, or visit lakeobserver.org/projects. Then click the 'Create New Project' button.
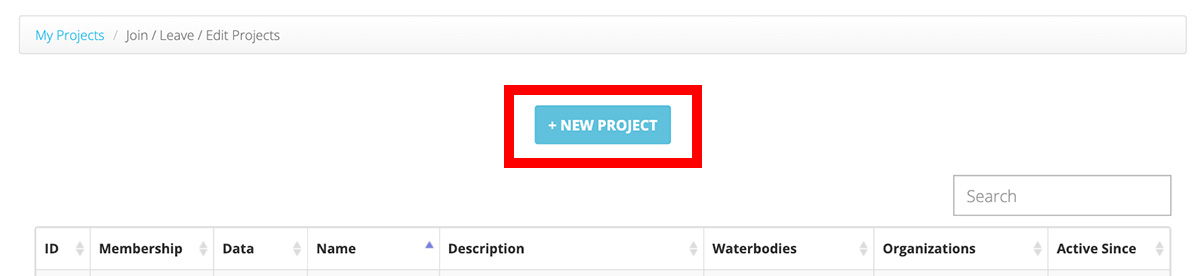
You can view a list of current Projects by selecting 'Projects' from the 'Data' menu, or by visiting lakeobserver.org/projects/view. You can also create a new Project from here by clicking the '+ New Project' button. If you need help joining an existing Project, view our guide here.
Note: Any user can submit data to any Project. However, Project Administrators have to ability to limit public data to only those entries that are submitted by Approved users.
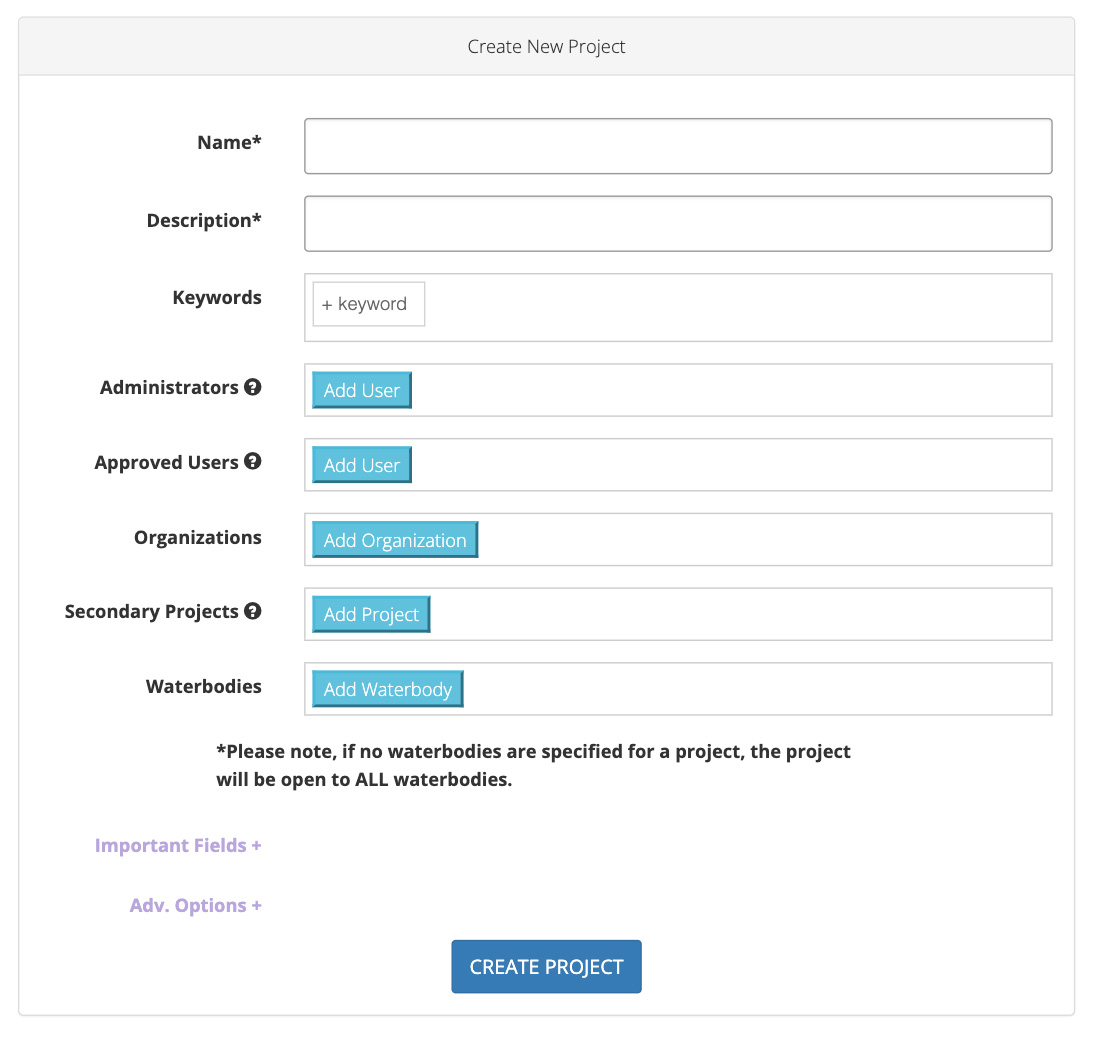
Project Creation: Name & Description
Enter a name for your Project. The Project Name can be anything but should be short, simple, and indicate to someone what the Project is related to. Some examples include, 'Connecticut Lake Watch', 'PLEON: Wallenpaupack Citizen Science Program', or 'Shelburne Pond Monitoring.' The Project Description should explain the purpose of the Project in more detail.
Project Creation: Project Users
When creating a Project, you can designate other Users as Administrators or Approved Users. The User that creates the Project will automatically be assigned as an Administrator. This can be adjusted, however, every Project must include at least one Administrator.
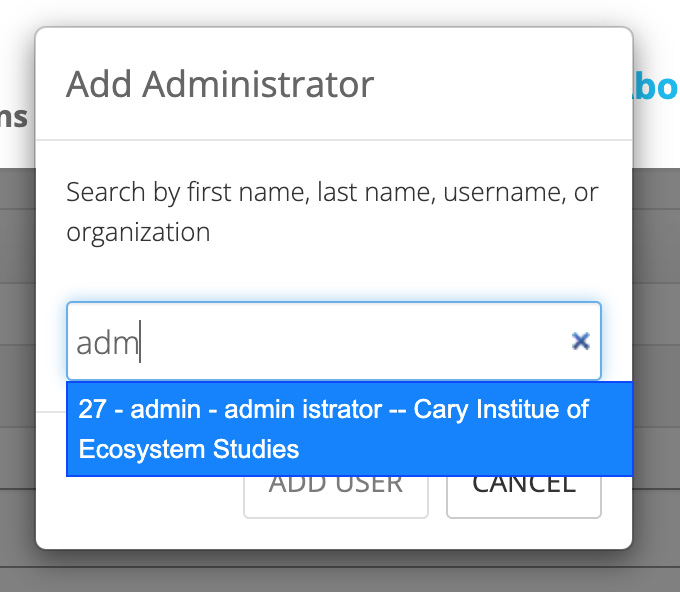
To add a new Administrator or Approved User, simply click the blue 'Add User' button next to the appropriate section. You can search for a user by their Lake Observer username (if you know it), by their first and last name, or by their organization (if they have designated this in their User Profile). Begin typing your search term until you see the name of the User appear. Select the User from the list and click the 'ADD USER' button to finalize your selection. If you need to remove a User after you have added them, click the 'x' next to their name. If you add a User as an Administrator, their is no need to add them as an Approved User.
Administrators. Project Administrators have several roles and privileges.
- Administrators have the ability to edit a Project in the future, as well as disable a Project that is no longer in use.
- Administrators have the ability to Approve Users that have requested to join a Project.
- Administrators are responsible for Data quality checking, if that Project requires Data QA.
- Administrators have the ability to receive email notifications regarding a Project.
Approved Users. Because any user can join and submit data for any Project, Approved Users give Project Administrators and other users a way to differentiate Project Data.
- During Data QA, a user's membership status will be displayed to the Project Administrator.
- During Data Search, a user can choose to filter data and only display submissions from Approved Users.
- Approved Users can add Waterbodies and Sites to a Project.
Project Administrators can designate Approved Users by adding them manually during the Project creation process. Alternatively, users can request to become Approved Users after a Project has been created. Project Administrators have control over the process of approving users.
Project Creation: Organizations & Secondary Projects
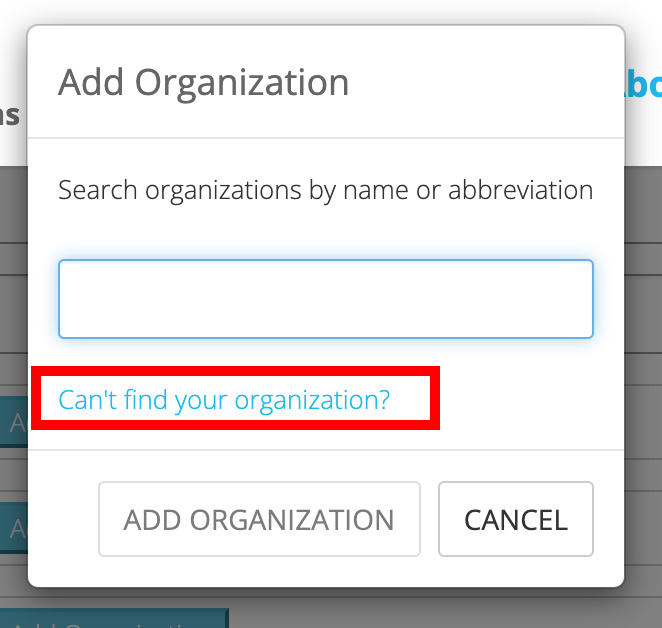
Organizations. If your Project is being set up as part of a program with a particular Organization, you can designate it here. Click the 'Add Organization.' Begin typing the name of your Organization. When you see the name appear in the list, select it, then click the 'ADD ORGANIZATION' button to finalize your selection.
Note: If your Organization is not listed here, you will need to add it to our database.
Secondary Projects. Data from Secondary Projects will be included in the data set when you, or others, are searching and downloading your Project's data. This can be useful if another organization is collecting data that coincides with your Project's sampling goal.
Note: You will NOT have administrative privileges (e.g. Data QA) over data from secondary projects.
Project Creation: Project Waterbodies & Sites
Waterbodies. If your Project is limited to collecting data for only a specific set of Waterbodies, it is recommended that you add those Waterbodies to your Project. This will simplify the data submission process for Users by only presenting them a short list of Waterbodies to choose from. If you choose not to add any Waterbodies to a Project, then that Project will be open to data submissions from ALL Waterbodies.
To add a Waterbody, click the blue 'Add Waterbody' button. Enter the country and state (if applicable) of your Waterbody. Enter the name of your Waterbody and select it from our database list. Click "ADD WATERBODY" and you will now see the Waterbody name appear in the Waterbodies section of your Project. If you wish to remove a Waterbody from your Project, click the 'x' next the name of the Waterbody.
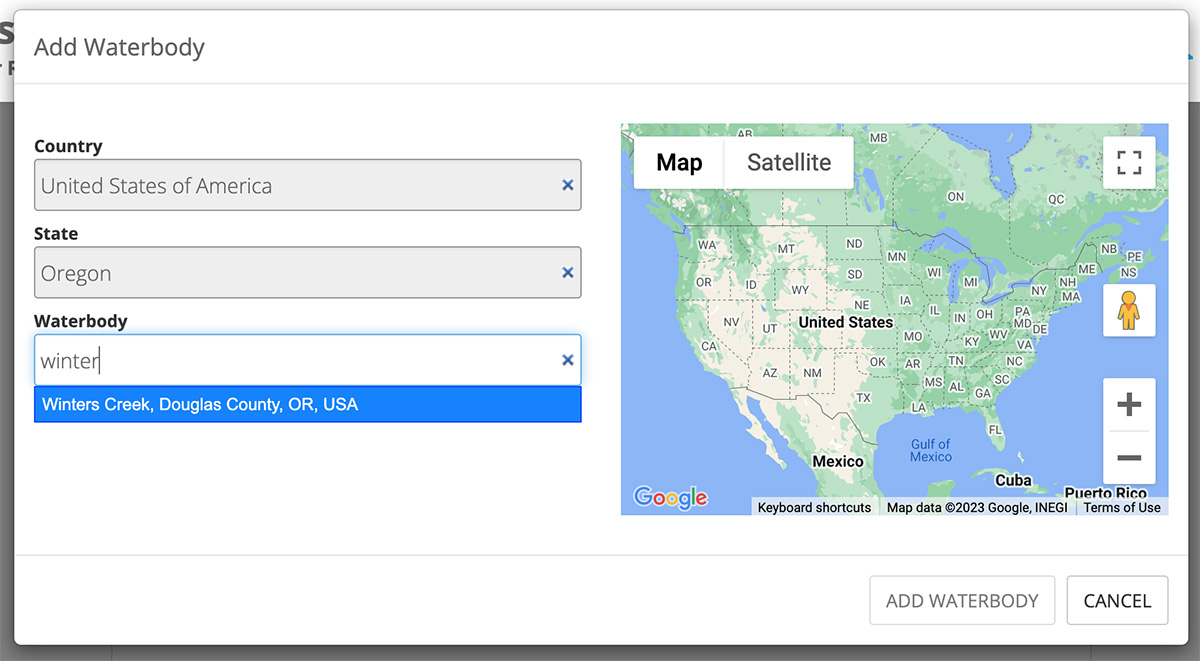
Note: If your Waterbody is not listed, you can submit a new Waterbody to our database by clicking the blue text, "Can't find your waterbody?" You can find instructions for adding a new Waterbody here.
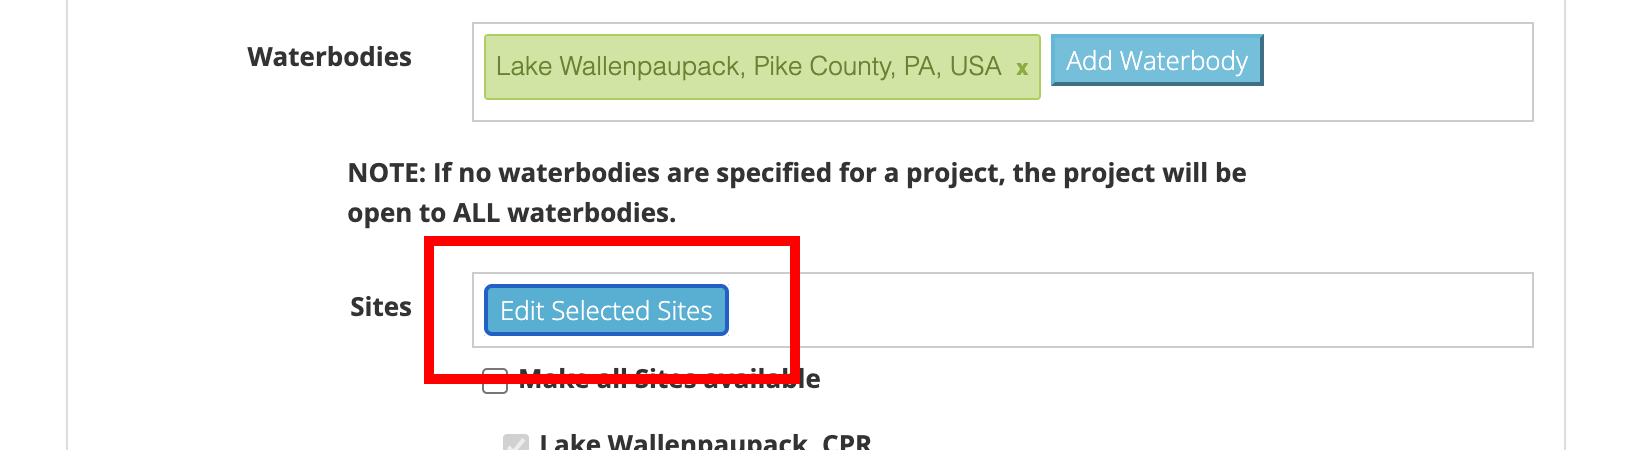
Sites. If your Project/Organization is limited to monitoring specific Sites within a Waterbody, it is recommended that you add those Sites to your Project. After adding a Waterbody to your Project, you will see all available sites listed in the Sites section.
Note: Not all Waterbodies have designated Sites so you may not see any Sites listed.
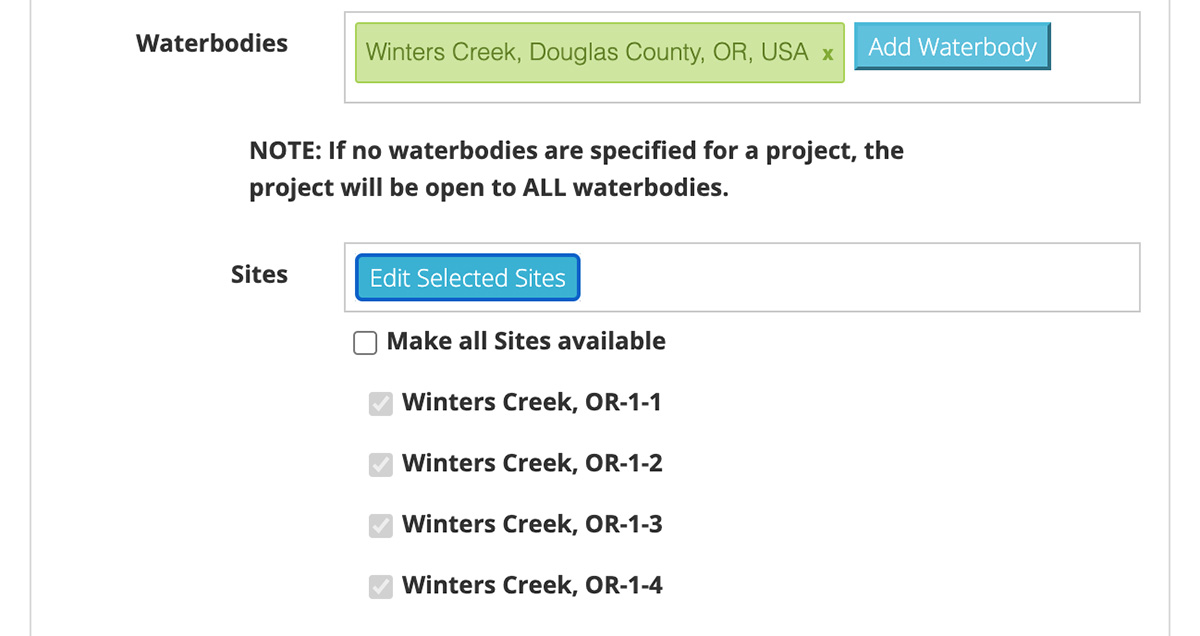
To select your Sites, click the blue 'Edit Selected Sites' button.
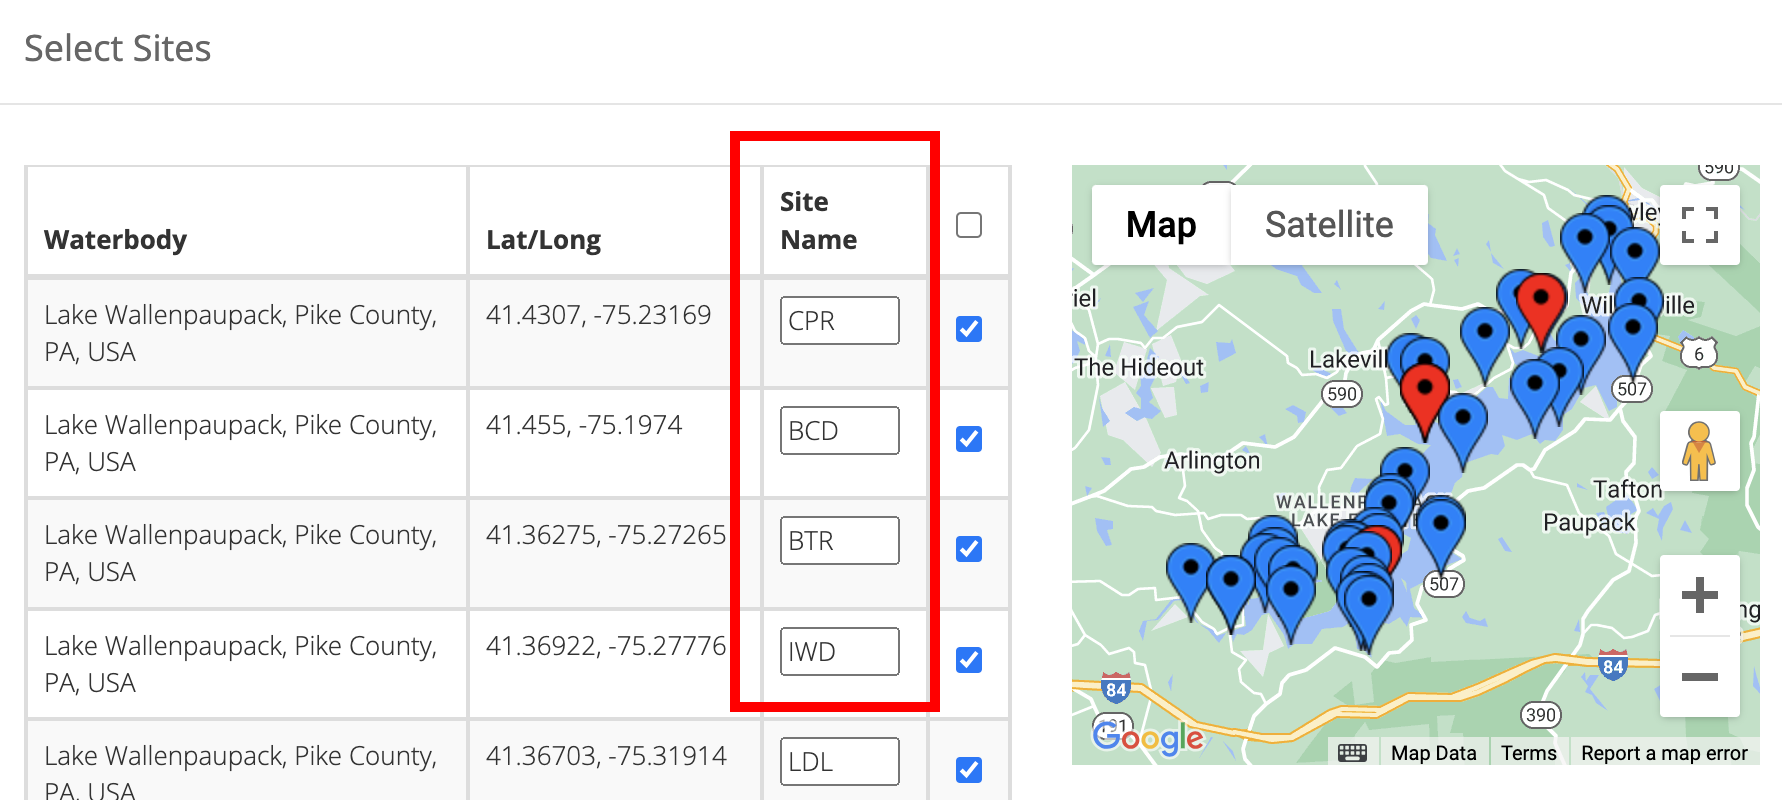
You will now see a list of all available Sites across all of your Waterbodies. Sites can be selected by ticking the checkbox next to their name, or by clicking their corresponding marker on the map. If a Site is selected the map marker will turn from red to blue.
You will notice that every Site is given a Site Name. The Site Names are assigned automatically based on the State and County data of the Waterbody. You can assign a custom name to a Site by editing the text box that corresponds to that Site.

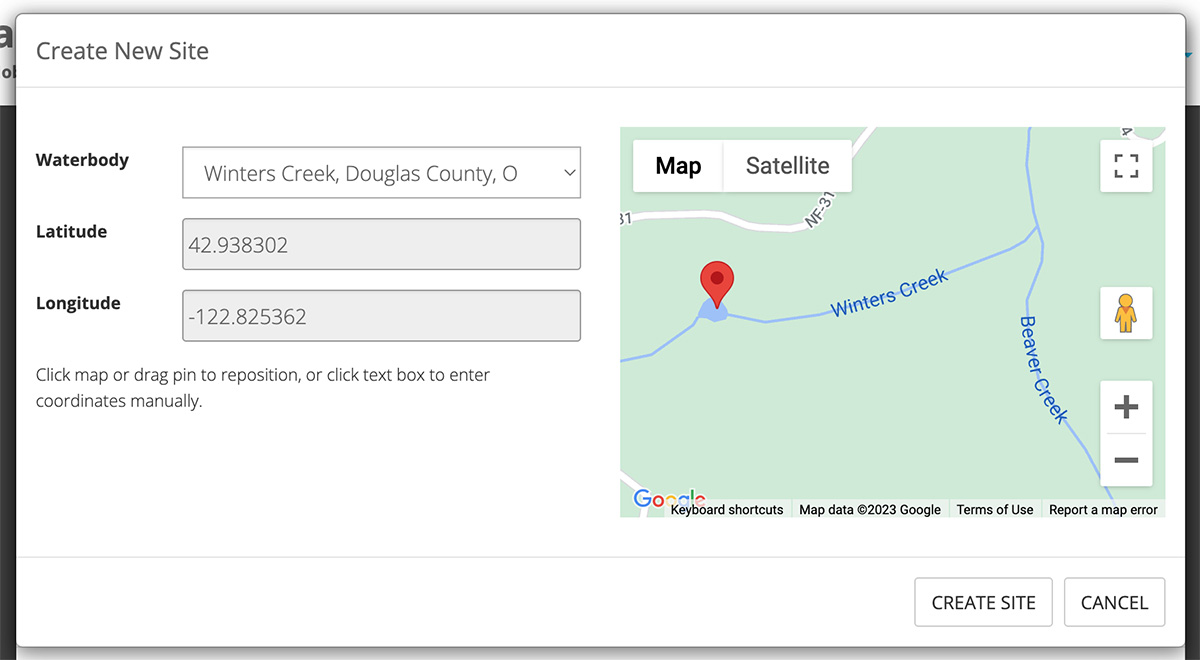
If your Site is not available you can create a new Site by clicking the blue '+ New Site' button. Then, select the Waterbody for which you are adding a Site, and either enter the Latitude and Longitude values manually, or click on the corresponding map location. Click the 'Create Site' button to finalize your new Site.
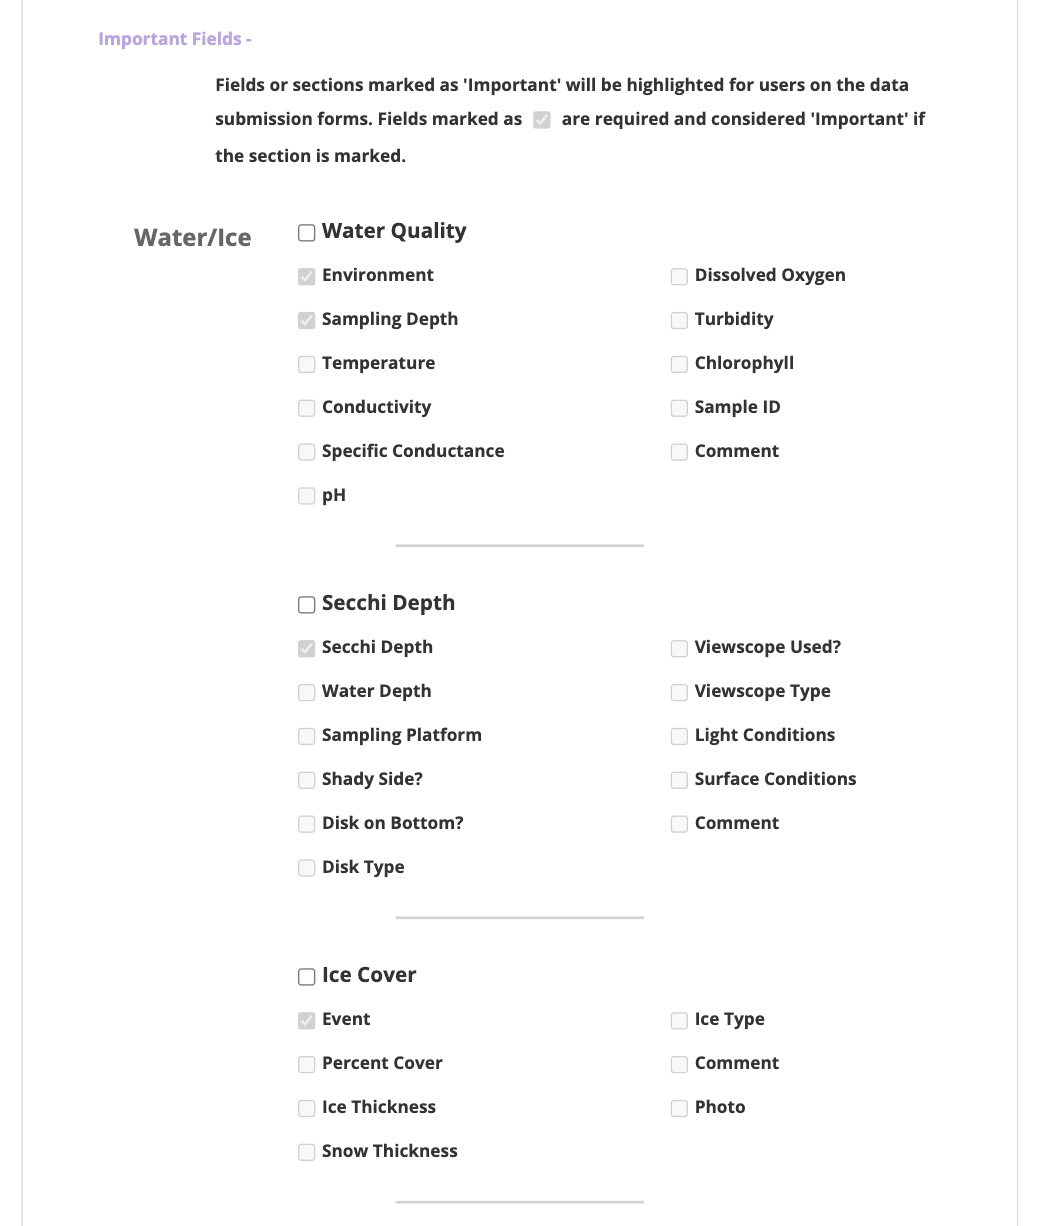
Project Creation: Important Fields
Important Fields enable you to alert your Project participants to what information is most relevant to the Project's objective. When Users are submitting data as part of your Project, these fields will be highlighted and Users will see a notification about the significance of the highlighted fields.
To select your Project's important fields, click the blue 'Important Fields +' text area to expand the section. You will see ten different data types (Water Quality, Secchi Depth, Ice Cover, etc) split into three different categories (Water/Ice, Weather, and Aquatic Organisms).
Select all of the data types that are significant to your Project. After selecting a data type, all of the checkboxes within that data type category will be enabled. You can then select which specific fields for each data type you want to be required.
Note: Some data fields are required for each data type. These checkboxes will appear grayed out and checked.
Project Creation: Advanced Options
Several advanced options are also available when creating a Project.
WQX. WQX/Storet is a US federal database of water quality information. All water quality data collected from Lake Observer is submitted to WQX by GLEON unless you opt out. If you are part of an organization that normally submits your water quality data to WQX and would like GLEON to submit data using your WQX Project ID, please provide this information. If you would prefer to submit your app-collected data under your own WQX organization ID, just let us know by selecting "do not submit my data to WQX.
Data QA. If you choose, you can require that all data submitted under your Project undergo review by a Project Administrator. In this case, data submissions will not be made publicly visible until they undergo quality checking.
These data submissions will still be available to the submitting User under their 'My Data' page, and they will be available to Project Administrators under their 'Data QA' page, but no other Users will be able to see this data. From the Data QA page, Project Administrators can view, edit, and approve all data submissions for the Project. For more information, see our Data QA guide section.
Email Preferences. Project Administrators can also choose to receive email notifications about a Project. You can opt in to receive the following notifications:
- when a user submits or edits data
- when a user joins or leaves the project
- when a user requests to become an 'approved user'
- when a user makes changes to the project
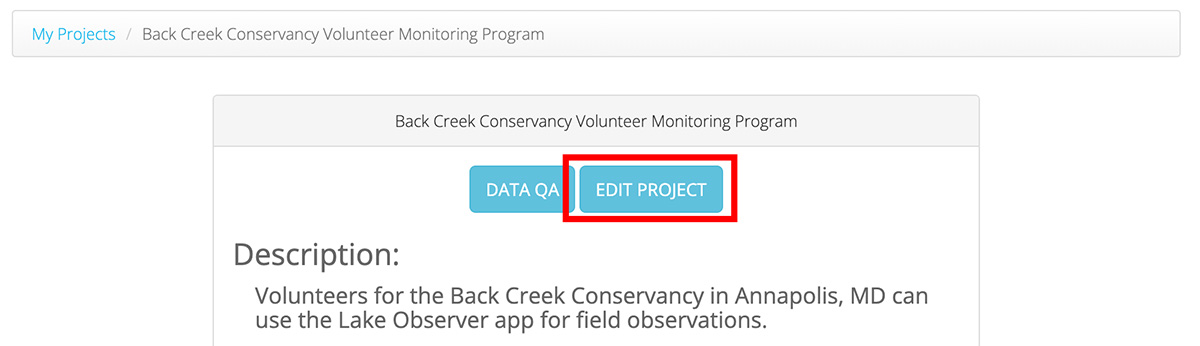
Edit a Project
Project Administrators can always make changes to a Project after it has been created. To edit a Project, go to your My Projects page and click on the Project name that you'd like to edit. You will now see an overview of all of the Project's settings. From here, click the blue 'Edit Project' button to make changes to the Project.
Data QA
If you choose, you can require that all data submitted under your Project undergo review by a Project Administrator. In this case, data submissions will not be made publicly visible until they undergo quality checking.
These data submissions will still be available to the submitting User under their 'My Data' page, and they will be available to Project Administrators under their 'Data QA' page, but no other Users will be able to see this data. From the Data QA page, Project Administrators can view, edit, and approve all data submissions for the Project.
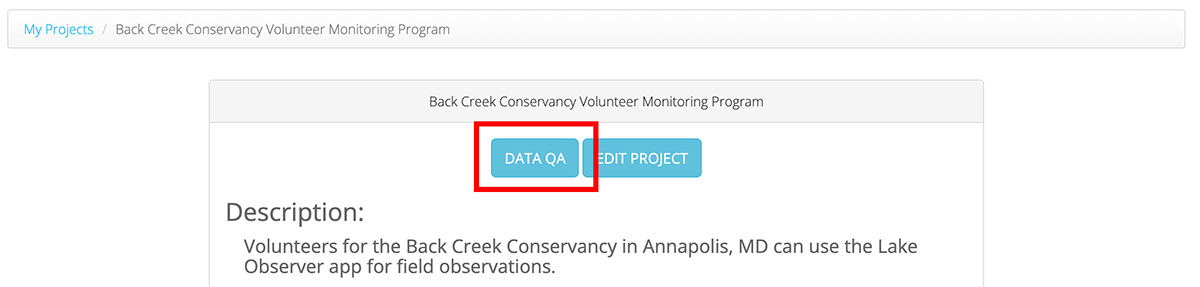
You can access the Data QA page from the User menu in the top right of the site navigation, or by going to that Project's information page (from your 'My Projects' page) and clicking the blue 'Data QA' button.
From your Data QA page, you will see all data listed for all Projects that require Data QA for which you are an administrator. You can click through the various data type tabs to view the data submissions.
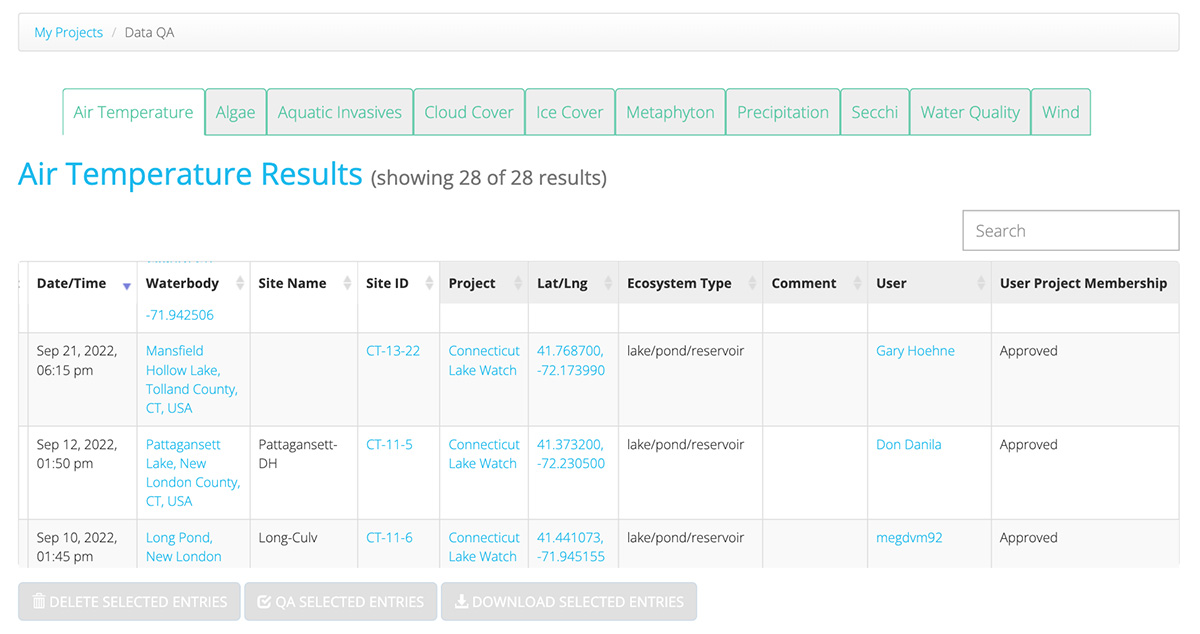
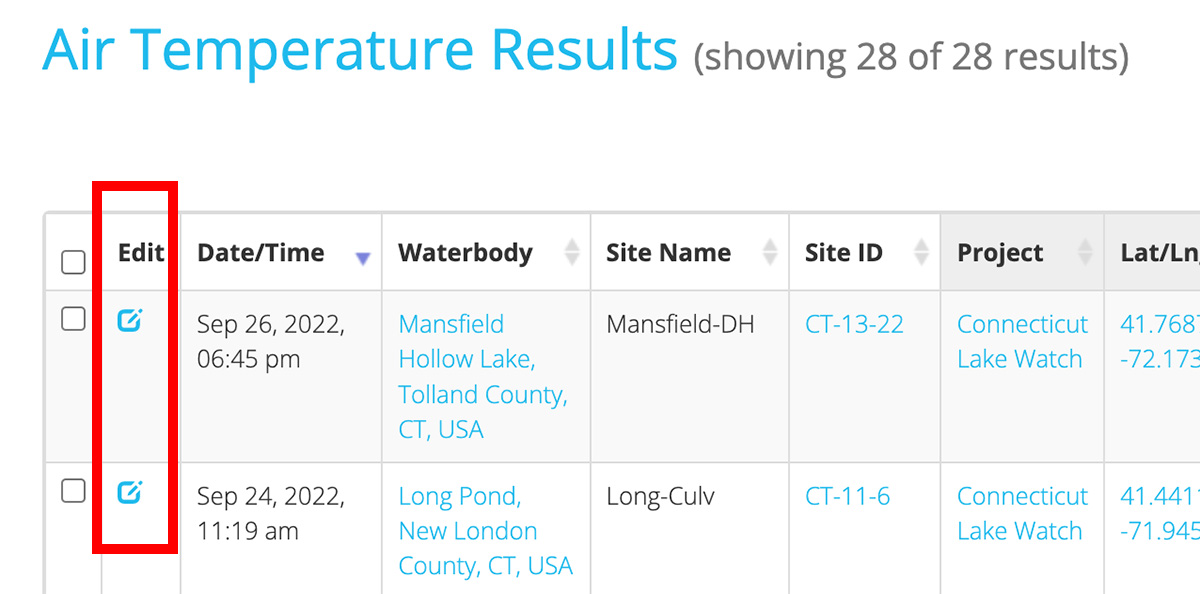
You will see all data values for the submissions, including the name of the submitting User and their membership status for the Project ('Admin', 'Approved', or 'None'). You can make changes to any data submission by clicking the blue Edit button that corresponds to that submission. See our guide section for more information on editing data.
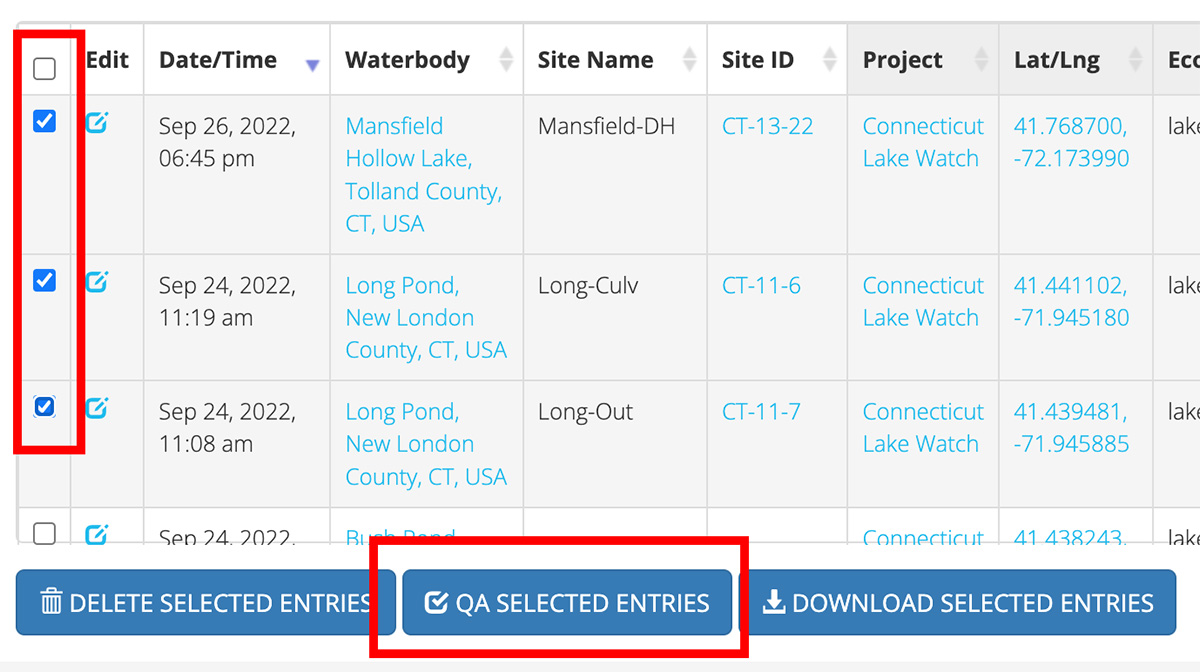
Once you have reviewed a submission and determined it to be good quality data, you can then select that data by ticking the checkbox on the left side of the data display table. Select all data that you wish to approve and then click the blue 'QA Selected Entries' button at the bottom of the table.
Approve Users
Because any user can join and submit data for any Project, Approved Users give Project Administrators and other users a way to differentiate Project Data.
- During Data QA, a user's membership status will be displayed to the Project Administrator.
- During Data Search, a user can choose to filter data and only display submissions from Approved Users.
- Approved Users can add Waterbodies and Sites to a Project.
Project Administrators can designate Approved Users by adding them manually during the Project creation process. Alternatively, users can request to become Approved Users after a Project has been created. Project Administrators have control over the process of approving users.
If a User has requested to become an Approved Users for a Project for which you are an Administrator, you will see a red '!' notification near your username in the upper right portion of the navigation menu. You may also receive an email notification, if you have set them up in the Project settings.

To review all User requests, go to your My Projects page and select the Project for which there are requests. You will also see a red notification next to the Project name, indicating the number of Uses requests. Click the red 'Review Requests' button to review the requests.
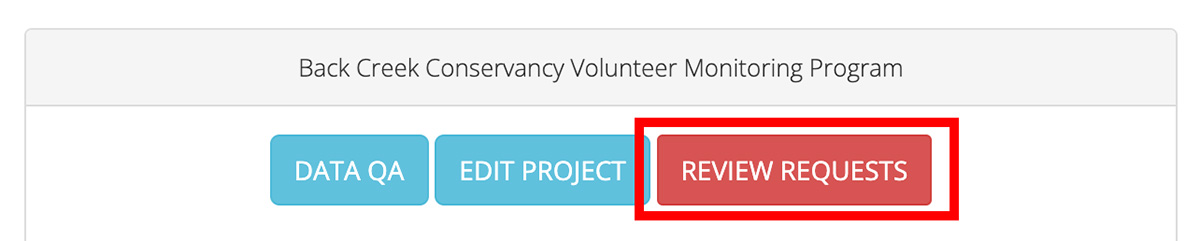
You will see a list of all User requests. You can either approve or decline a User's request to become an approved User for your Project. You can also view a User's profile, which will give you information about who that User might be, as well as how to contact them.

Advanced Data Submission
Batch Data Upload
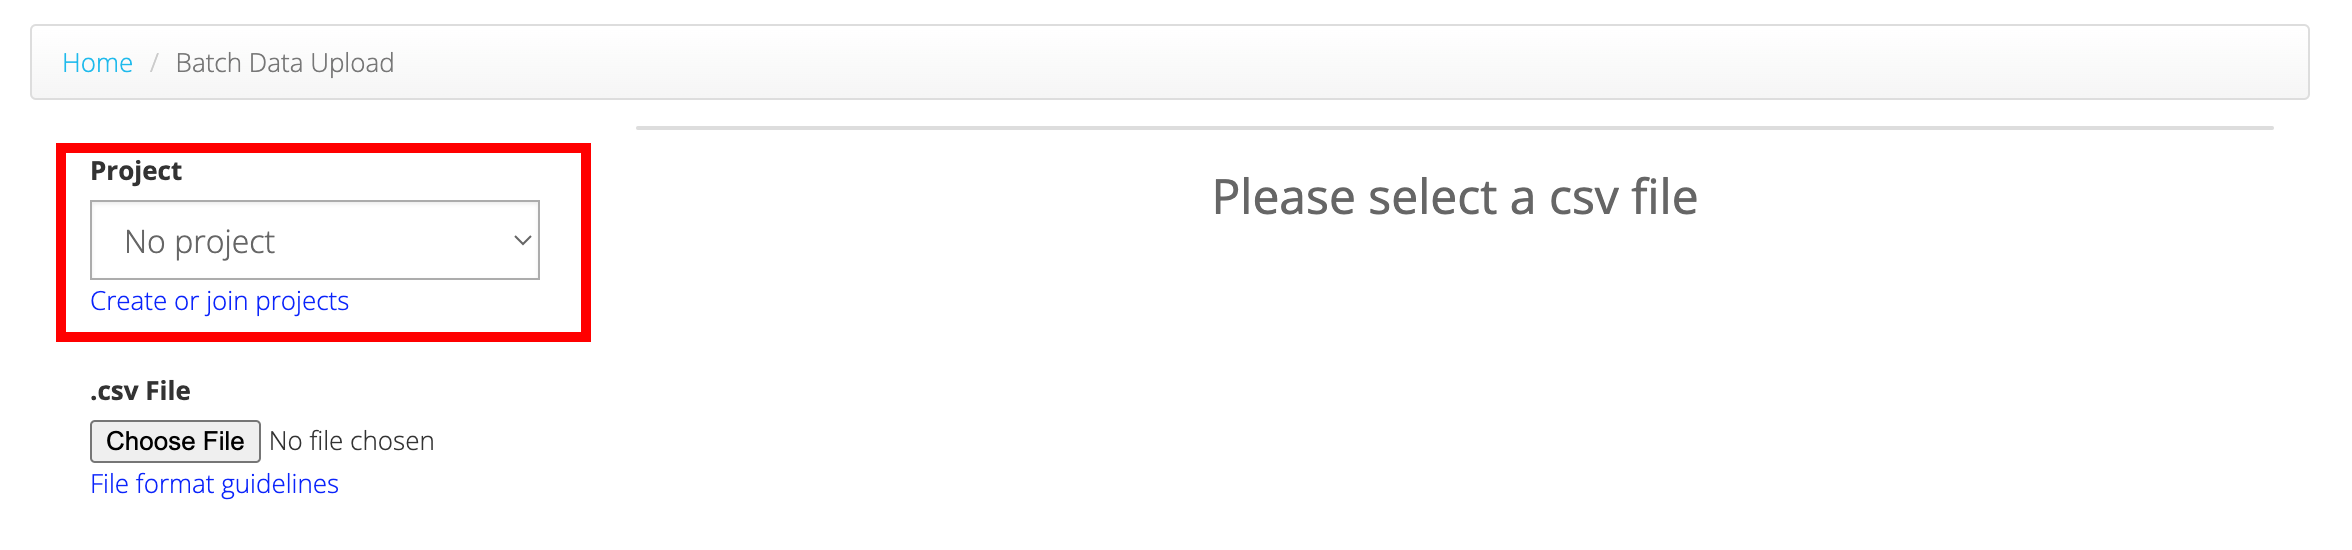
If you have large quantities of data that you would like to submit to Lake Observer you can use our Batch Upload system. Data is submitted to our Batch Upload system via csv files. A csv file (comma separated value) is a type of text file and can be easily created by any spreadsheet software.
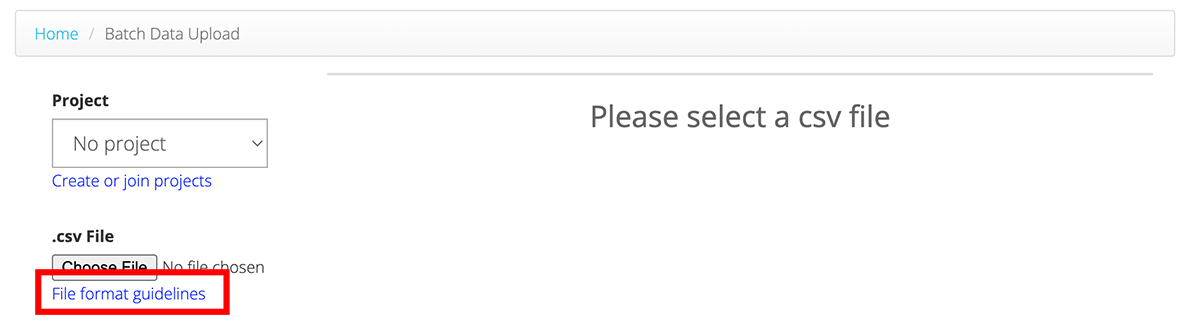
If all of the data you are submitting is part of the same Project, you can select your Project from the dropdown list. Please note, you will only see Projects listed in the dropdown menu if you have joined those Projects.
Site ID
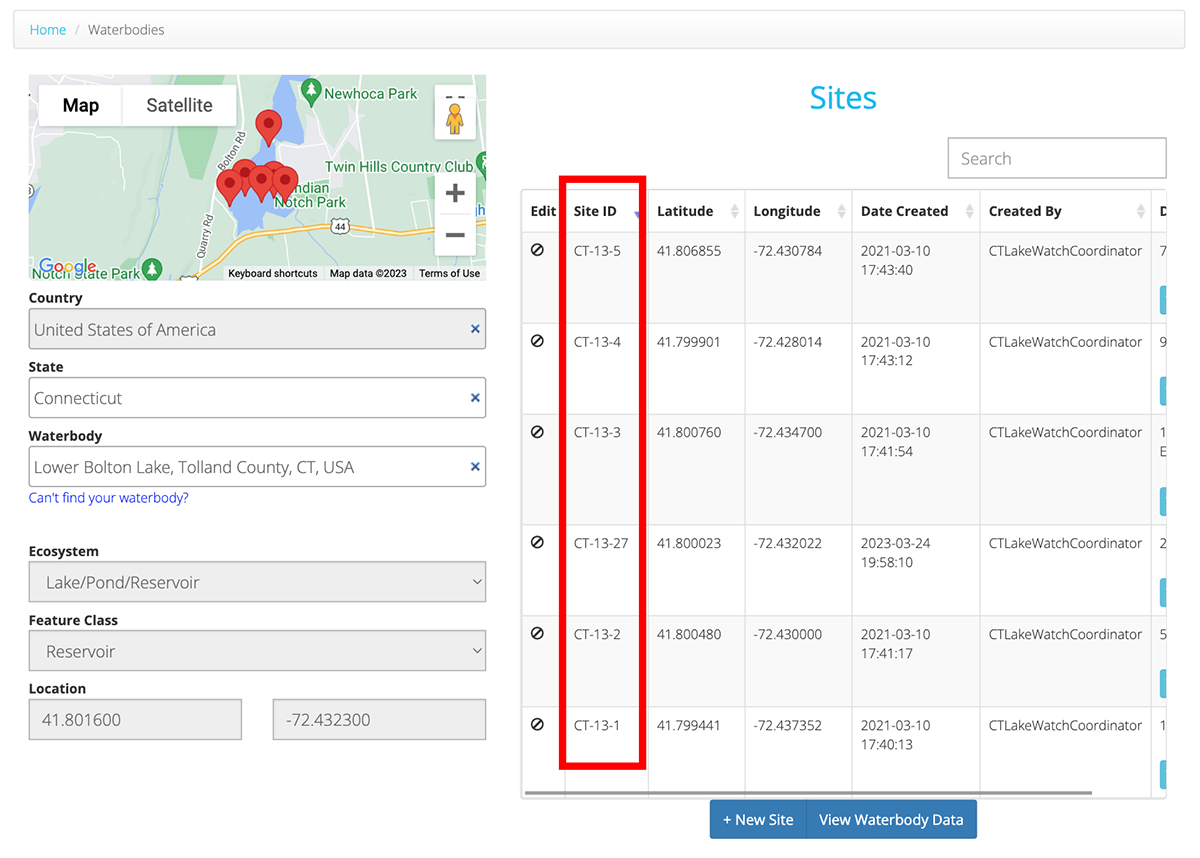
All data submitted via our Batch Upload system needs to be associated with a specific Site, and you will need to know the unique ID of your Site.
To find your Site's ID you can go to the Waterbodies page. Enter your country, state, and waterbody name. You should then see a list of all available Sites for your selected Waterbody along with their corresponding IDs.
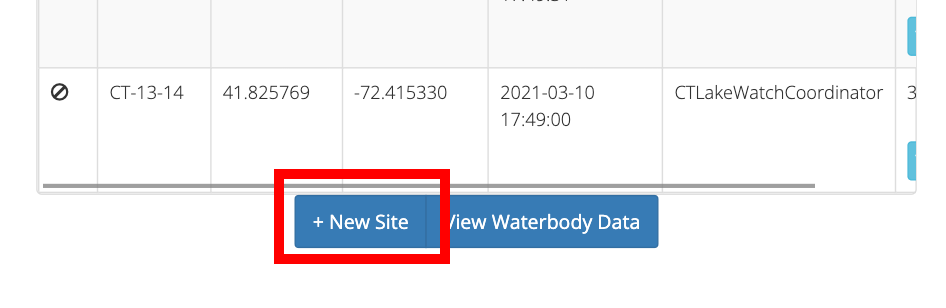
If your Site does not yet exist, you can create a new Site for the Waterbody. You will only need to know the latitude and longitude values of the Site location. You can enter the latitude and longitude manually or by clicking on the map.

File Format Guidelines
Once you have your Site IDs you can begin creating your csv file for upload. Please review our file format guidelines to help you create your csv file. Please note, that some fields are required for ALL submissions (Site_ID, Date, Time, Data_Type), while other fields will be specific to the type of data that you are submitting. Fields marked with an '*' are required for data submission. You can refer to the sample csv for guidance.

Once your csv file has been prepared for upload, you can select your file. After the file has been selected you may see some notifications if there are any errors in your file format. The rows that contain errors will be highlighted in yellow. Review these errors and make any necessary changes to your csv file. Re-select your updated csv file. If you are seeing errors that you are unable to correct, please contact us for support.

Viewing, Downloading & Editing Your Submissions
Viewing Data
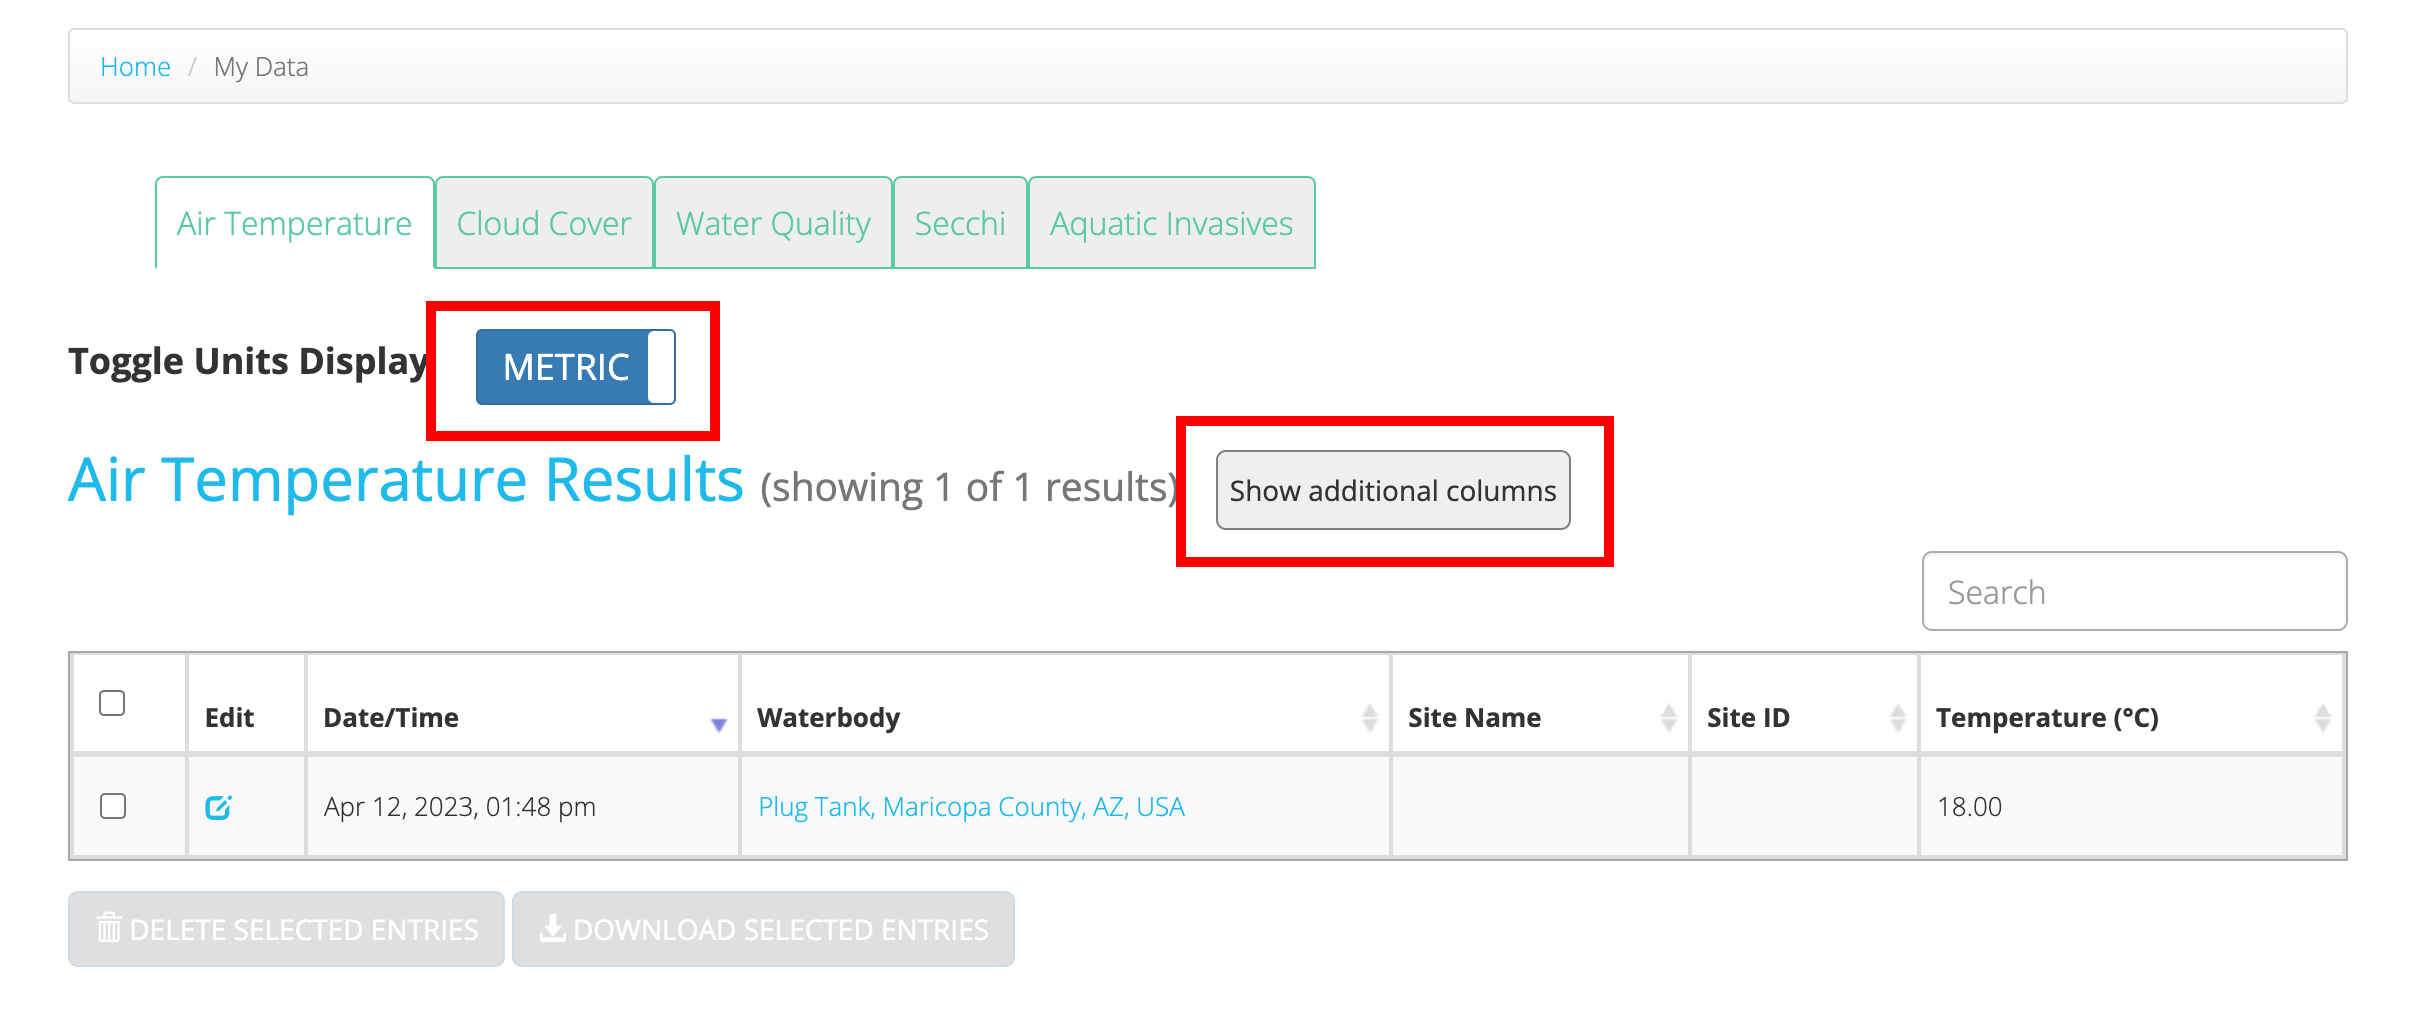
You can view all of your submitted data at any time after submission. From under the user menu, select 'My Data' or go to lakeobserver.org/my_data. From here you can see your data, with each data type organized under its own tab.
You can toggle the units display between metric and imperial units, depending on your preference. Some columns, such as the submitting username and client, will be hidden by default. You can toggle the display of these hidden columns with the 'Show/Hide additional columns' button. Please note, that hidden column data will still be exported when downloading csv data.
Downloading & Deleting Data
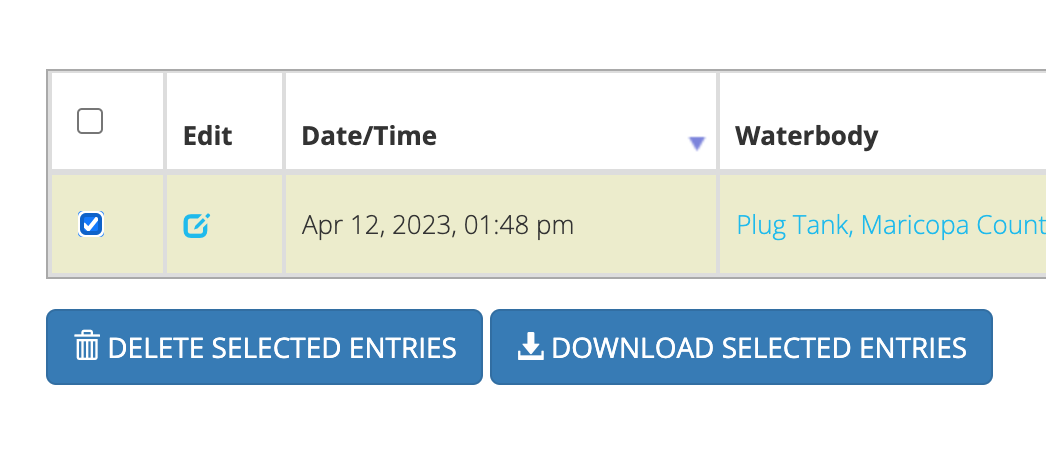
To download or delete data entries, you will need to select those entries. You can select entries by clicking the checkbox in the leftmost table column. You can also double click a table row to select it. Once you have selected your entries, they can be downloaded or deleted by clicking the corresponding button at the bottom of the table.
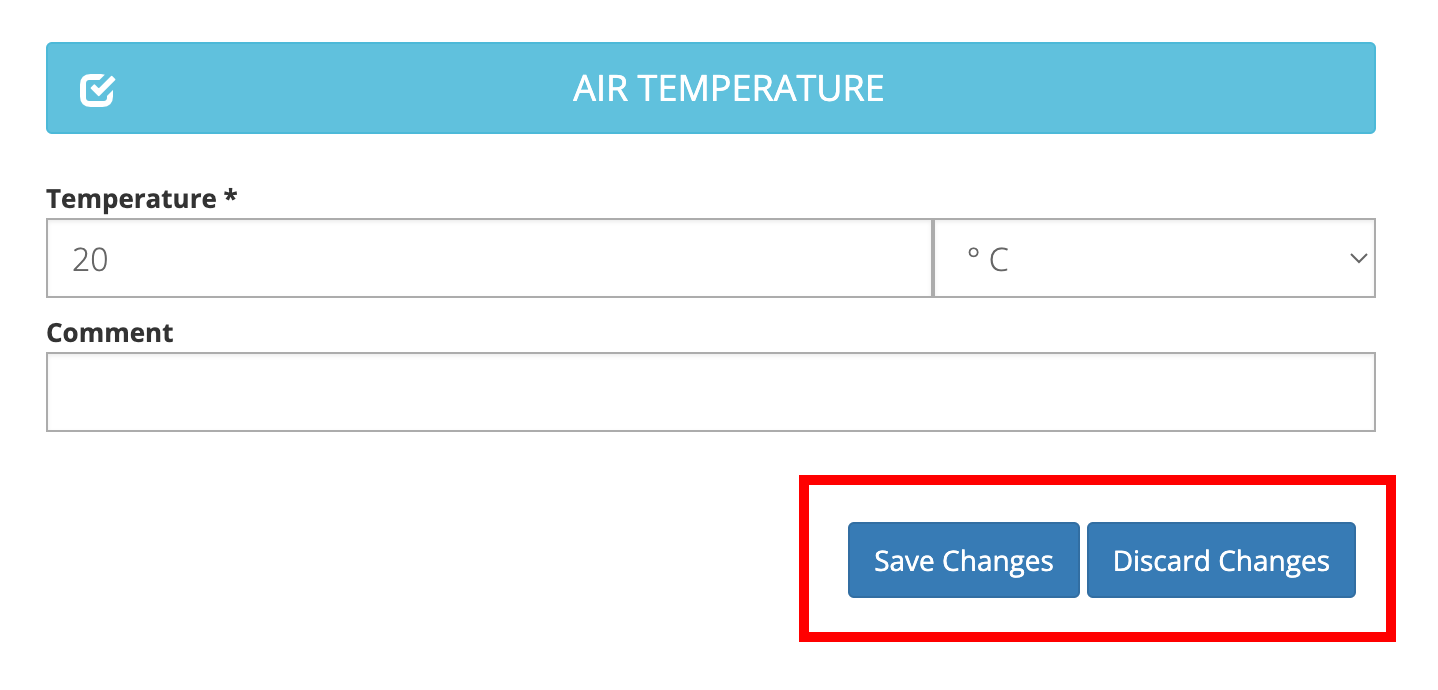
Editing Data
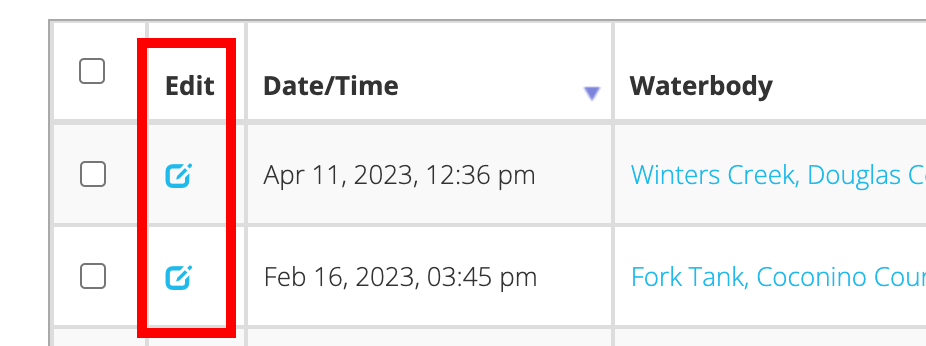
You can also edit any of your past submissions from your My Data page. To edit an entry, simply click the pencil icon under the Edit column that corresponds to an entry. You will be redirected to our web submission page with all of the input fields filled in. Make any desired changes to the input fields. Click the Save Changes button to make the updates, or Discard Changes to revert the updates.
Searching & Downloading Public Data
All data submitted to Lake Observer is available publicly to search and download. To search through our data, click the Search Data link under Data section in the navigation menu, or visit lakeobserver.org/search. On the search page, you will see that there are three different tabs available at the top of the page: Search, Table View, and Map View. The Search tab is where you can specify the parameters of your search, such as data type, date range, waterbody, site, etc. The Table and Map view tabs offer two different ways to view the returned data.
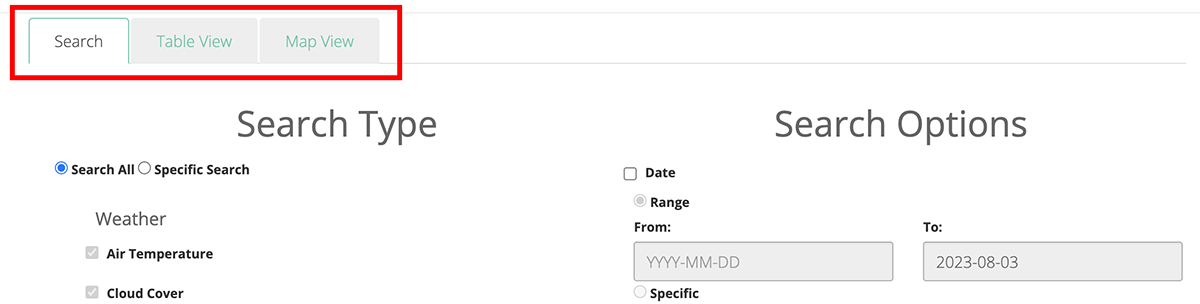
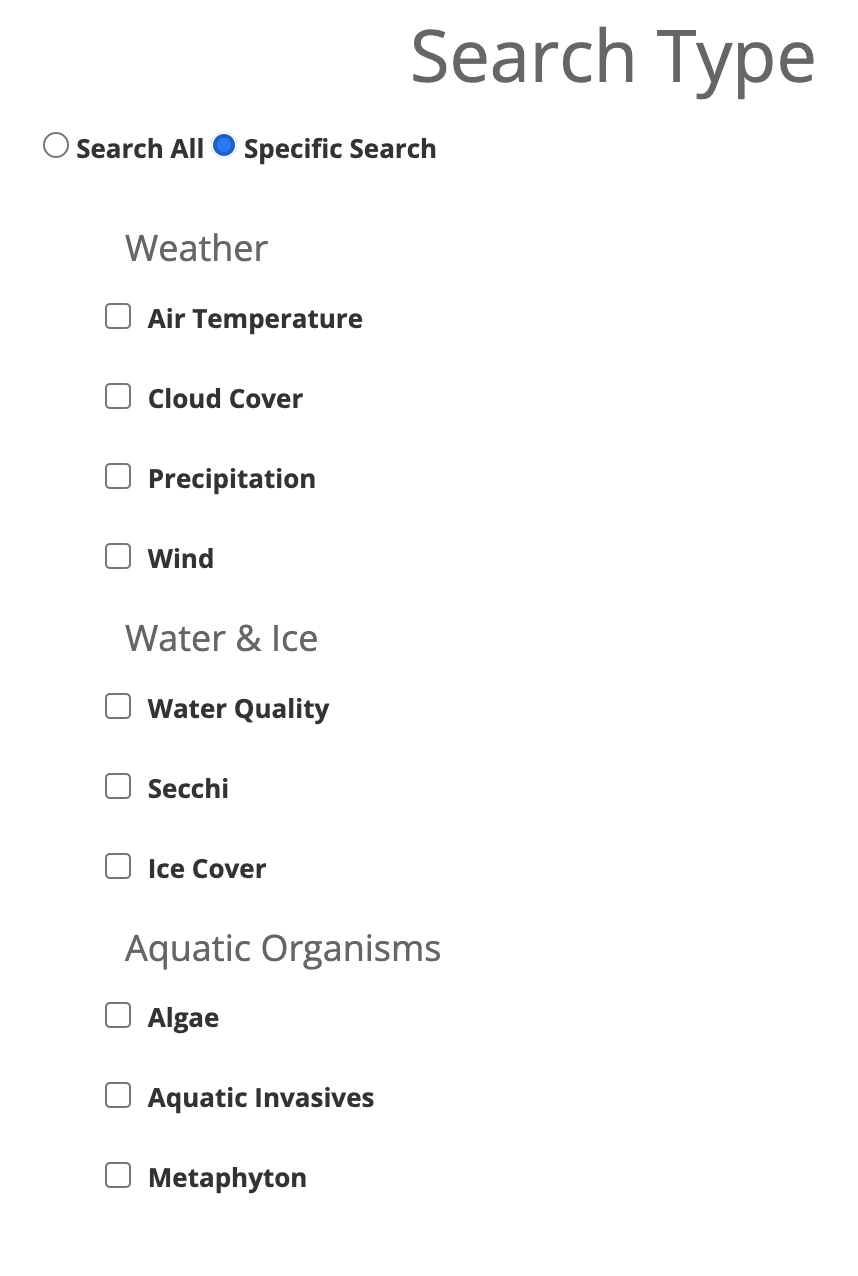
The search page offers two different search types, a global 'Search All' option which will search all data types, and a 'Specific Search' option which allows you to specify which data types to search.
Search Filters
There are a number of search options that can be applied to further filter your search results. Search options include the following:
- Date Range: Allows you to return results from a specific date range, or one specific date.
- Country, State, County: Allows to limit the results to a specific country, state, or county. Please note, in order to search within a specific county you will first need to select your state.
- Project: Allows you to limit your results to a specific project only. If searching within a specific project, you also have the option to "Show Results From Approved Users Only." As described in the Projects section of the guide, any user can submit data to a Project, but the Project administrator has the ability to designate users as Approved members of a Project.
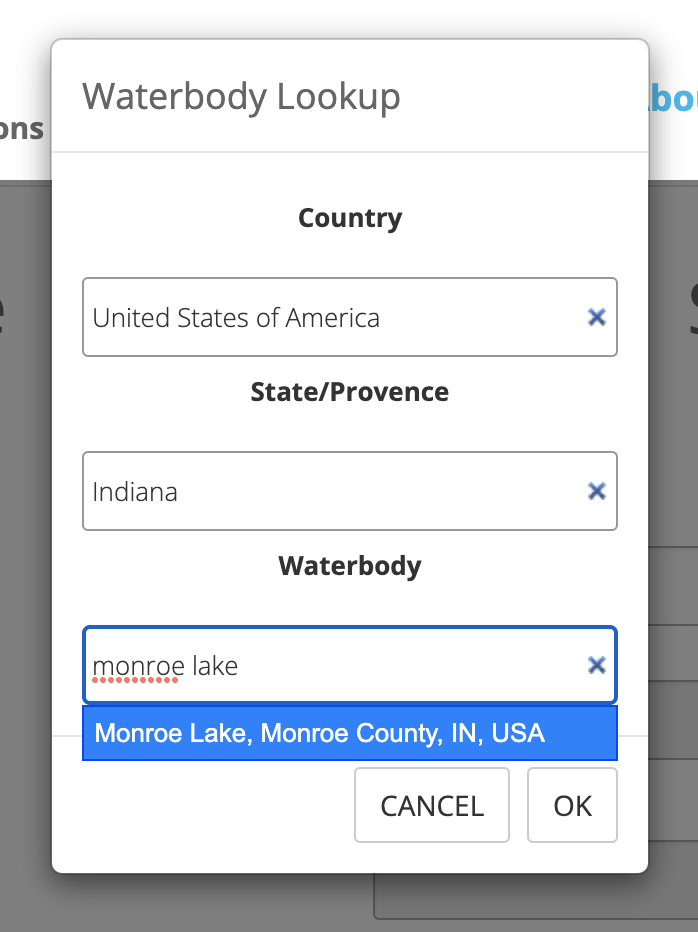
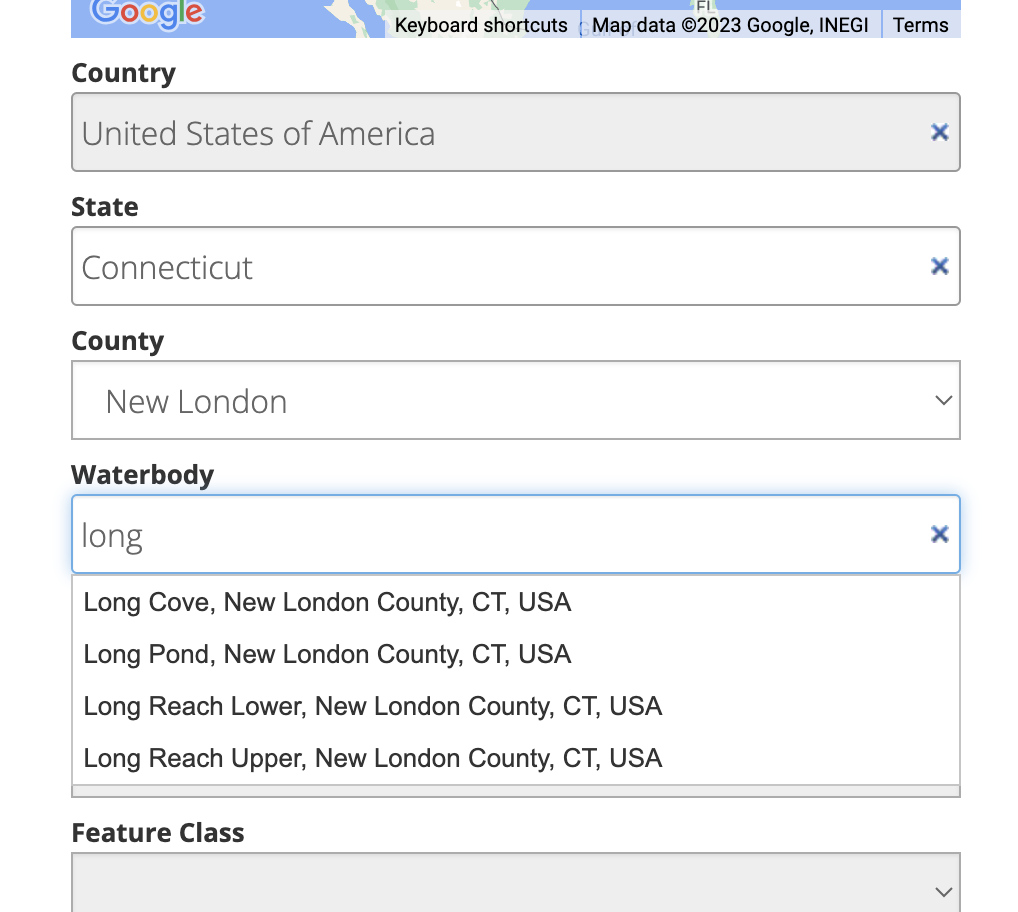
- Waterbody: Allows you to limit the results to a specific waterbody. Next to the waterbody text field you will a 'Waterbody Lookup' button. This will help you to find the exact name of your waterbody, which could be useful for very common waterbody names. For example the results for 'Long Pond' may be different than the results for 'Long Pond, New London County, CT, USA.'
- Site Name & Site ID: Both of these options allow you to specify a particular site on a waterbody. Site names are assigned at the Project level after sites have been added to a Project, as described in the Project section of the guide. Some sites may not have names associated with them. All sites that have been created will be assigned a unique Site ID. For more info on finding your Site ID, see the Site ID section of our guide.
- User: Allows you to search for data from a particular user. In order to search for data from a specific user you will need to know the username of that user.
- Ecosystem Type: Allows you to specify the ecosystem type of the waterbody, such as river/stream or lake/pond.
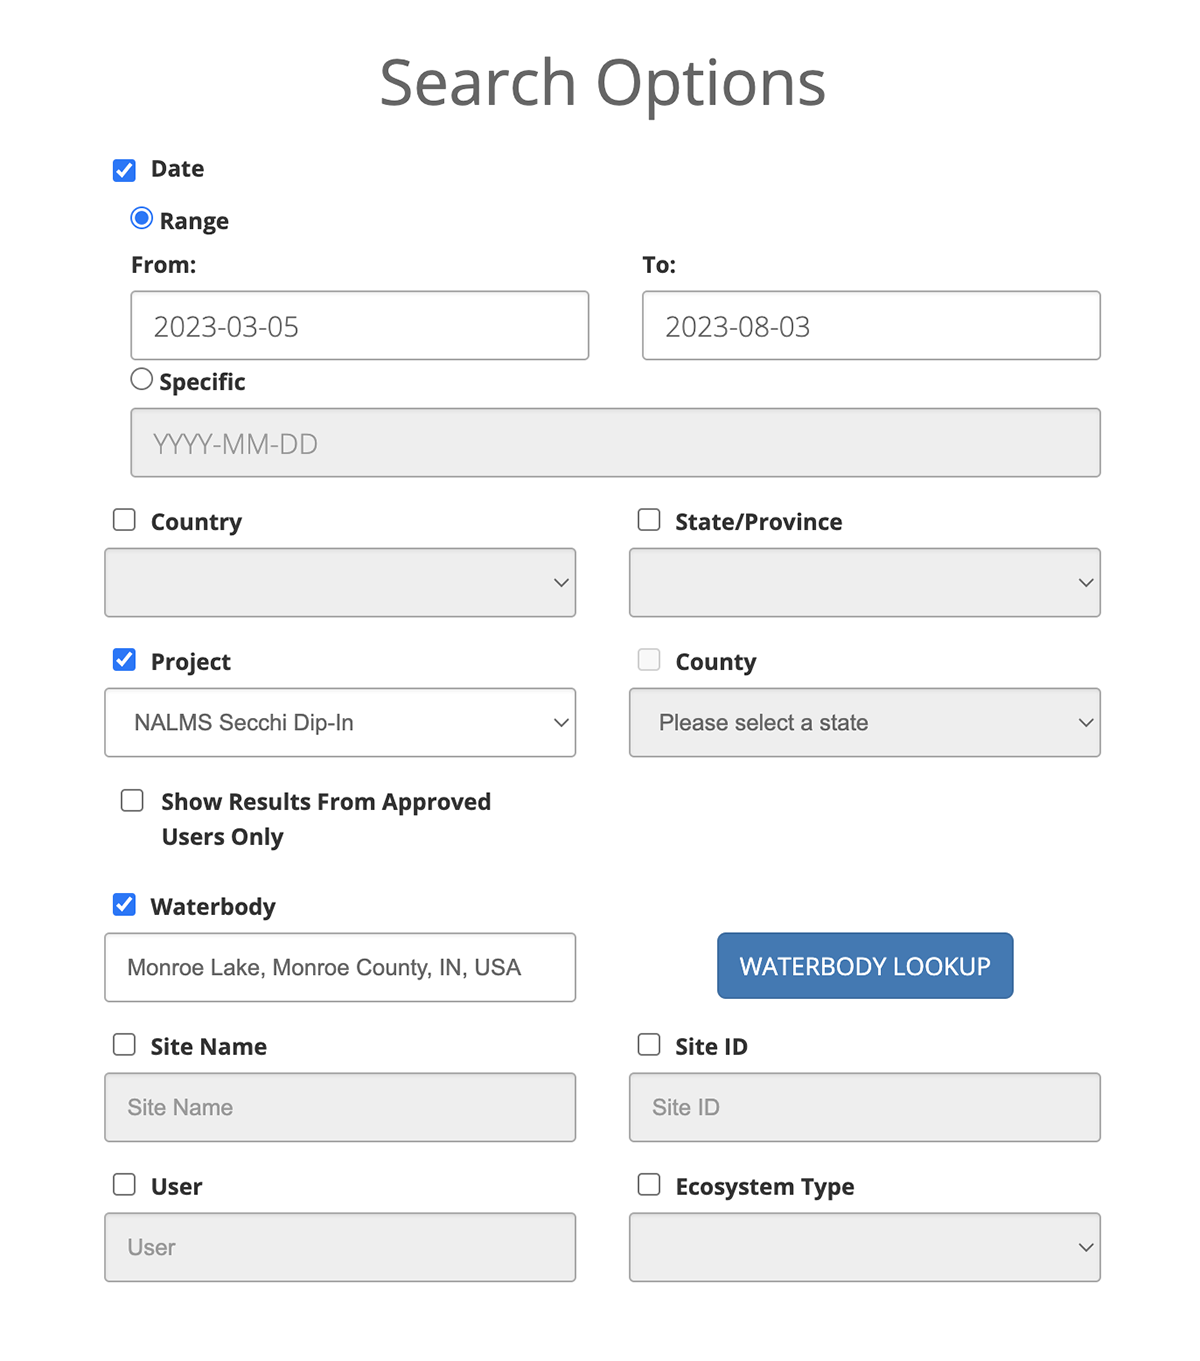
Table and Map Views
After you have clicked the 'Search' button you will be redirected to the search results in the table view. You will see your search filters listed at the top of the tables. Each data type will be listed in its own table. There is also a units toggle button at the top of the page that allows you to switch between imperial and metric units display. Some table columns such as Project name, and lat/lng are hidden by default. These additional columns can be shown or hidden by toggling the 'Show/Hide additional columns' button.

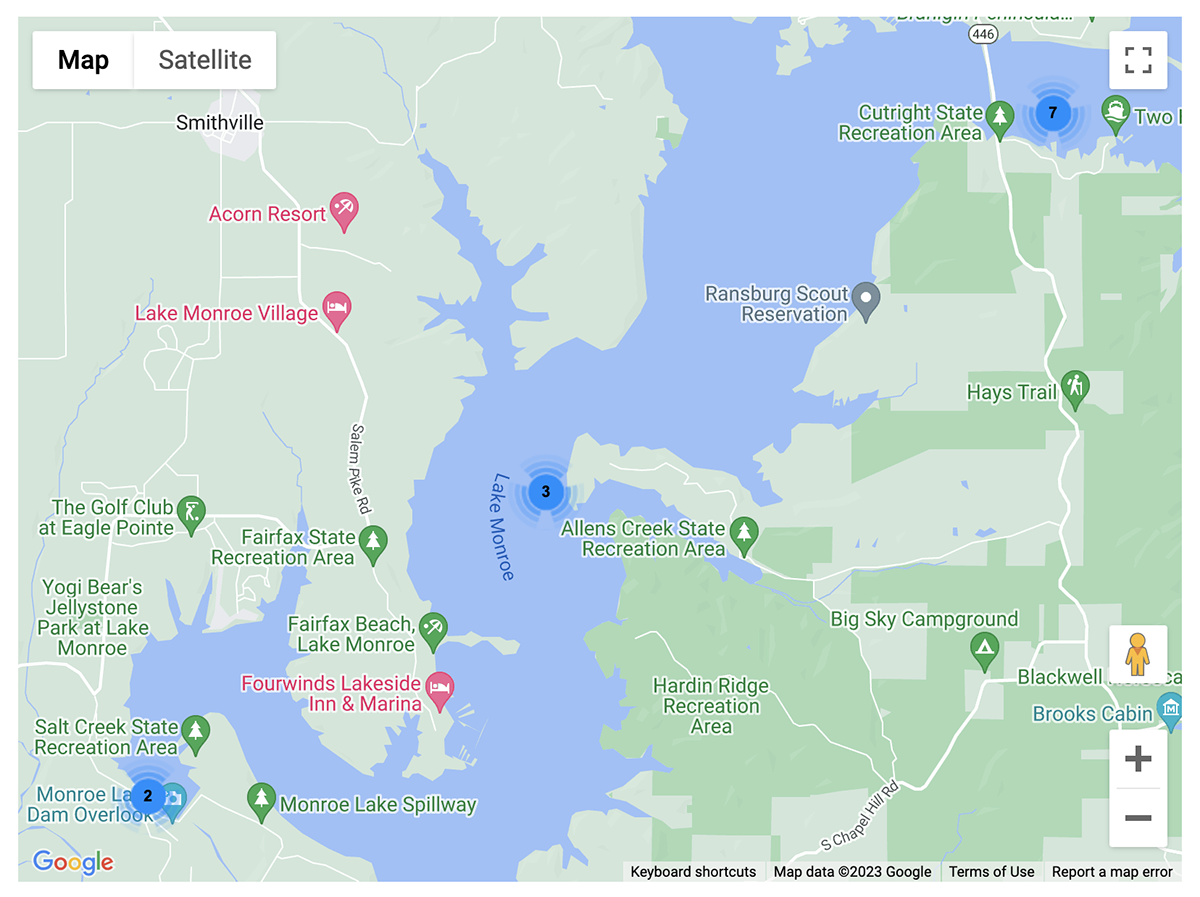
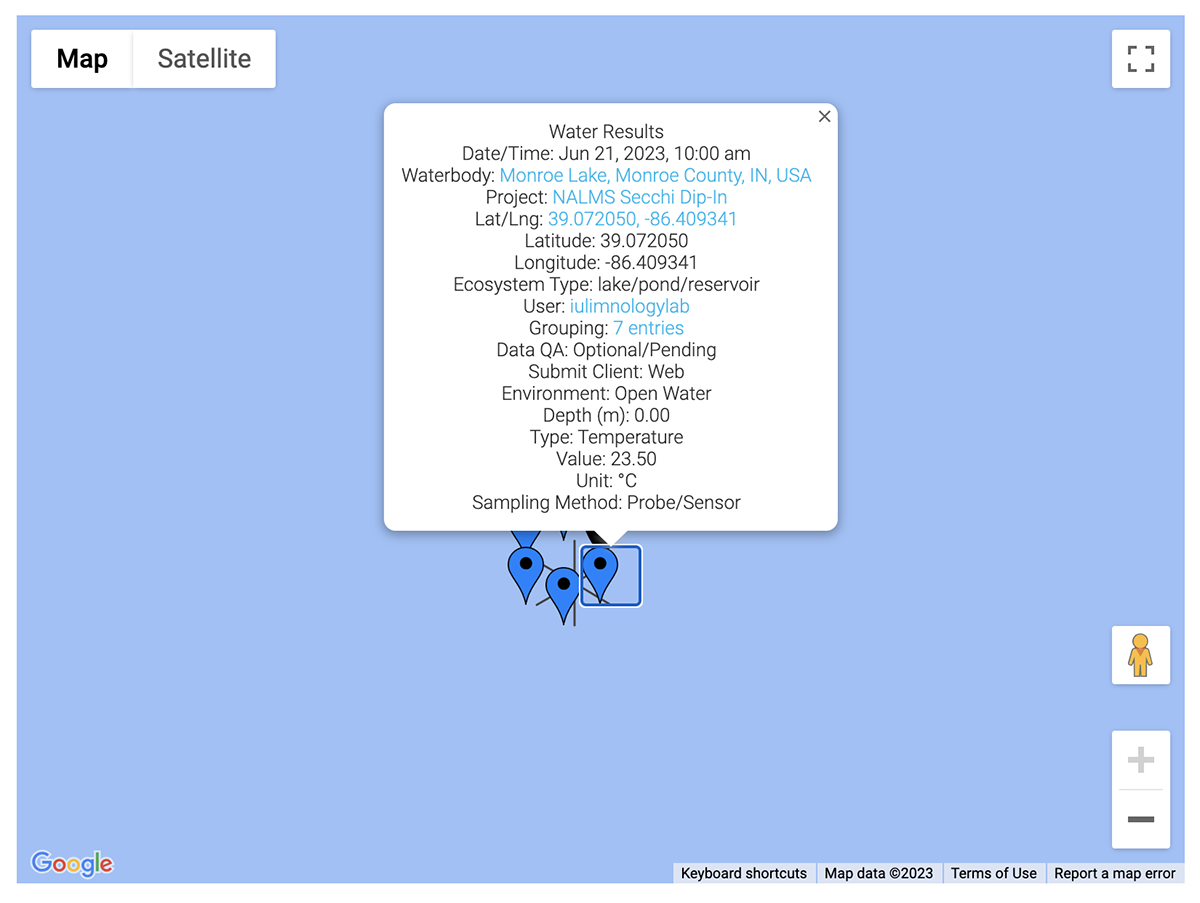
The Map view will show each observation as a pin on the map. If there are multiple pins in close proximity you will see a pin with the number of observations in that area. Clicking on these numeric pins will zoom the map into that area. Once you've reached maximum zoom, if there are overlapping pins in an area, you can click the grouping to spread the pins out. Clicking an individual pin will bring up all the information related to that observation.
Downloading Data
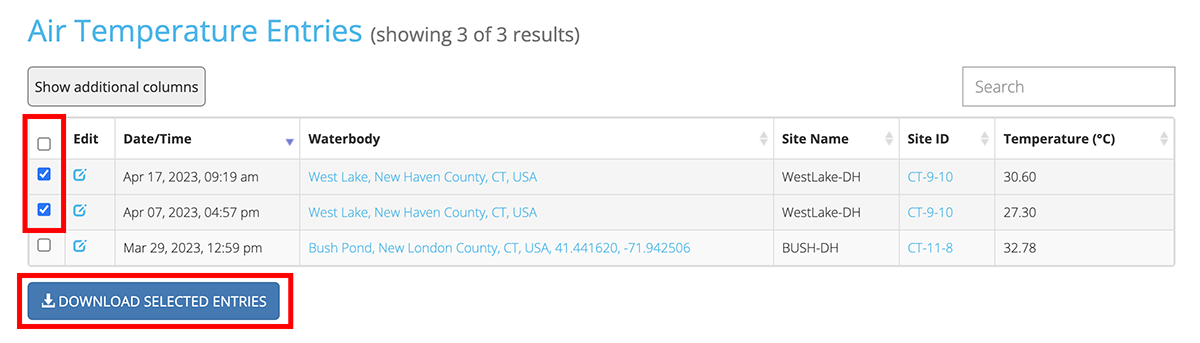
All of the data in the search results can be downloaded to a csv file. The csv file will contain all of the table columns, including those that are hidden. To download data, you must first select those rows that you wish to download. You can select rows by clicking the checkbox at the leftmost side of the table. The checkbox at the very top left corner of each table will select all entries in that table. You can also select a row by double-clicking it. Once all of your rows are selected, simply click the 'Download Selected Entries' button. Entries for each data type must be downloaded separately.
Exploring the Table Columns
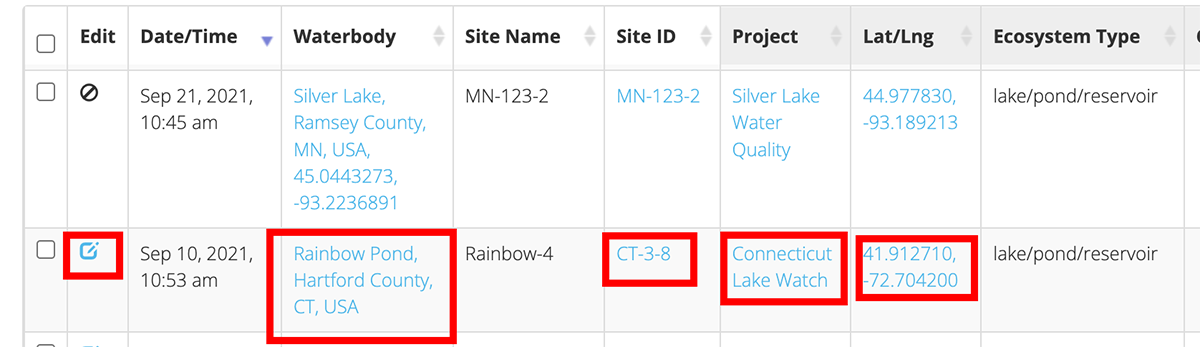
Several of the table columns, which will all be shown in blue, will link you to other pages. The following columns can be clicked for additional information:
- Edit: The edit column will generally show the circle-ban icon, which means you do not have permission to edit that data. However, if the data in the search results was submitted by you, or you are the administrator of the Project for which that data is associated with, you will see a blue pencil icon in the edit column. You can edit that entry by clicking the blue pencil icon. For more information on editing data, see the editing section of the guide.
- Waterbody: Clicking the Waterbody name will redirect you to our waterbodies page, showing all of the information for that particular waterbody. You will also see a list of all existing sites for that waterbody. At the bottom of the site table are two buttons. One button will allow you to create new sites for the waterbody. For more information on creating sites, see the guide section on waterbodies and sites. The other button, View Waterbody Data, will return all data search results for that particular waterbody. Next to each site in the site table, you will also see a View Data button that will return all data search results for that particular site only.
- Site ID: Clicking the Site ID value will redirect you to the search results for that particular site, same as clicking the View Data button in the site table.
- Project: Clicking the Project name will redirect you to the details page for that project. This page shows all relevant public information for that project including project members, waterbodies, sites, number of data entries, etc. If you have not yet joined the project, you can do so by clicking the blue Join Project button at the top of the page. Towards the bottom of the page there will be a View Data button. This will redirect you to all the data search results for that project.
- Lat/Lng: Clicking the lat/lng coordinates will bring up a map with a pin showing the exact location of the submission.
- User: Clicking the username will redirect you to the page for that particular user, showing all information they have chosen to make public. As detailed in the profile section of the guide, only the username is public by default, as well as any data submissions. Other information such as first and last name, email address, and expertise level can be made publicly visible in the privacy settings of your user profile. Note: user information can only be viewed by other registered Lake Observer users.
- Grouping: The grouping column will show you the number of entries that are included in the grouping. Clicking the grouping will redirect you to the search results, showing only the entries that are included in that grouping. For more information on data groupings, see the Submission section of our guide.
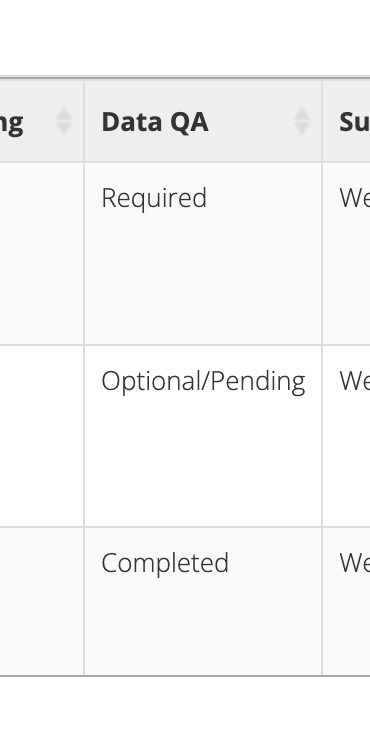
Non-Public Data
When searching data from the public search page, you may notice that some of your submissions are not showing up in the search results. This happens if your are submitting data as part of a Project and that project's administrator has set the project to require data QA. This means that until the submissions have been reviewed by the project administrator they will not be publicly visible. Your non-QA'ed data will still be visible to you from your My Data page. To confirm the status of your submissions go to your My Data page. Make sure that hidden columns are toggled as visible by clicking the 'Show additional columns' button. Look for the Data QA column. If the value is listed as 'Required' then that data is not publicly visible. A value of 'Completed' means that data has already been reviewed by the project administrator. A value of 'Optional/Pending' means that the project does not require data QA (although project administrators do still have the ability to review and approve submissions). And a value of 'Not Available' means that data was not submitted as part of a project.
Waterbodies & Sites
It is important to understand the distinction between waterbodies and sites within the Lake Observer system. A waterbody represents an entire lake, pond, river, creek, etc.
A site represents a specific location on a waterbody, which can be defined by a set of latitude and longitude coordinates. A site will generally be created by a user or organization for a location where data is regularly sampled.
Waterbodies have the following characteristics:
- Feature Name: The feature name is the name of the waterbody, e.g. Long Pond, Lake Wallenpaupack, etc
- Country, State, County: The country value is required for all waterbodies. The state/province value is only present for US and Canadian waterbodies. The county value is only present for US waterbodies.
- Latitude & Longitude: A waterbody will have a latitude and longitude value associated with it. This value is somewhat arbitrary, although ideally it should represent the approximate geographic center of that waterbody.
- Display Name: The name that is displayed for each Waterbody will include the feature name along with the county, state and country names. In some cases there may be multiple waterbodies in the same county with the same feature name. In these cases the display name will also include the latitude and longitude values to help identify the waterbody. e.g. Long Pond, New London County, CT, USA
- Ecosystem Type: The ecosystem type will be one of the following: Lake/Pond/Reservoir, River/Stream, Wetland/Swamp, Other Water.
- Feature Class: The feature class is a sub-type of the ecosystem, e.g. Lake, Sea, Spring, etc
Sites have the following characteristics:
- Site Identifier: The site identifier is a unique alpha numeric value which is auto generated when a site is created. The identifier is created using the country, state, and/or county data of the site's waterbody.
- Waterbody: The waterbody to which the site is associated.
- Latitude & Longitude: The specific geographic coordinates of the site.
Site Naming
Sites can be given recognizable names for easier identification. However, since different individuals or organizations may have different names for the same site, the names must be assigned on the individual user or project level.
Site Naming Within a Project
A Project administrator can also assign Site Names at the Project level. This will help facilitate data entry for your Project users. To assign Site names, you must first add your Waterbodies to the Project. See the Project section of our guide for more information on adding Waterbodies. Once you have added your Waterbodies, if those Waterbodies have Sites associated with them, those Sites will appear in the 'Sites' section, just below your list of Waterbodies. If you do not see the Sites section, then none of the Waterbodies that you have added to the Project have Sites associated with them. See the section below on adding Sites to a Waterbody.
If you do see a Sites section, you can assign names to your Sites by clicking the blue 'Edit Selected Sites' button. You will now see a list of all available Sites across all of your Waterbodies. You can assign a custom name to a Site by editing the text box that corresponds to that Site.
Site Naming Outside of a Project
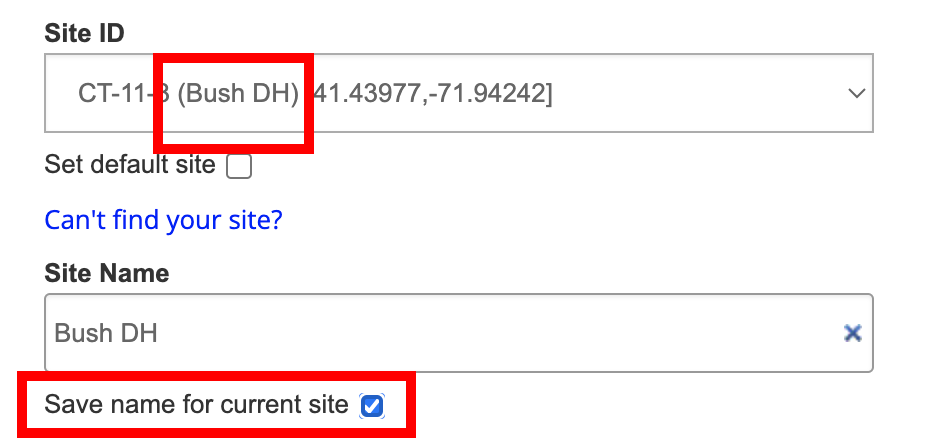
If you are submitting data outside of a Project and wish to assign a name to a Site, you can do so from the data submission page. When submitting data, after you have selected your Waterbody and Site, you can enter the desired name in the Site Name text field. If you wish to save this Site Name for future use simply check the box below the text field. During future submissions, when selecting your Site from the dropdown menu, your custom name will appear alongside the auto-generated site identifier.
Create a New Waterbody
There are several places from which you can create a new Waterbody. Look for the blue 'Can't find your waterbody?' button.
From the waterbodies page you will find it directly below the Waterbody text field. From the submission page you will also find it directly below the Waterbody text field. And from the project creation page you can find it within the 'Add Waterbody' dialog box, just below the Waterbody text field.
In each case, you will see the same submission form to create a new waterbody.
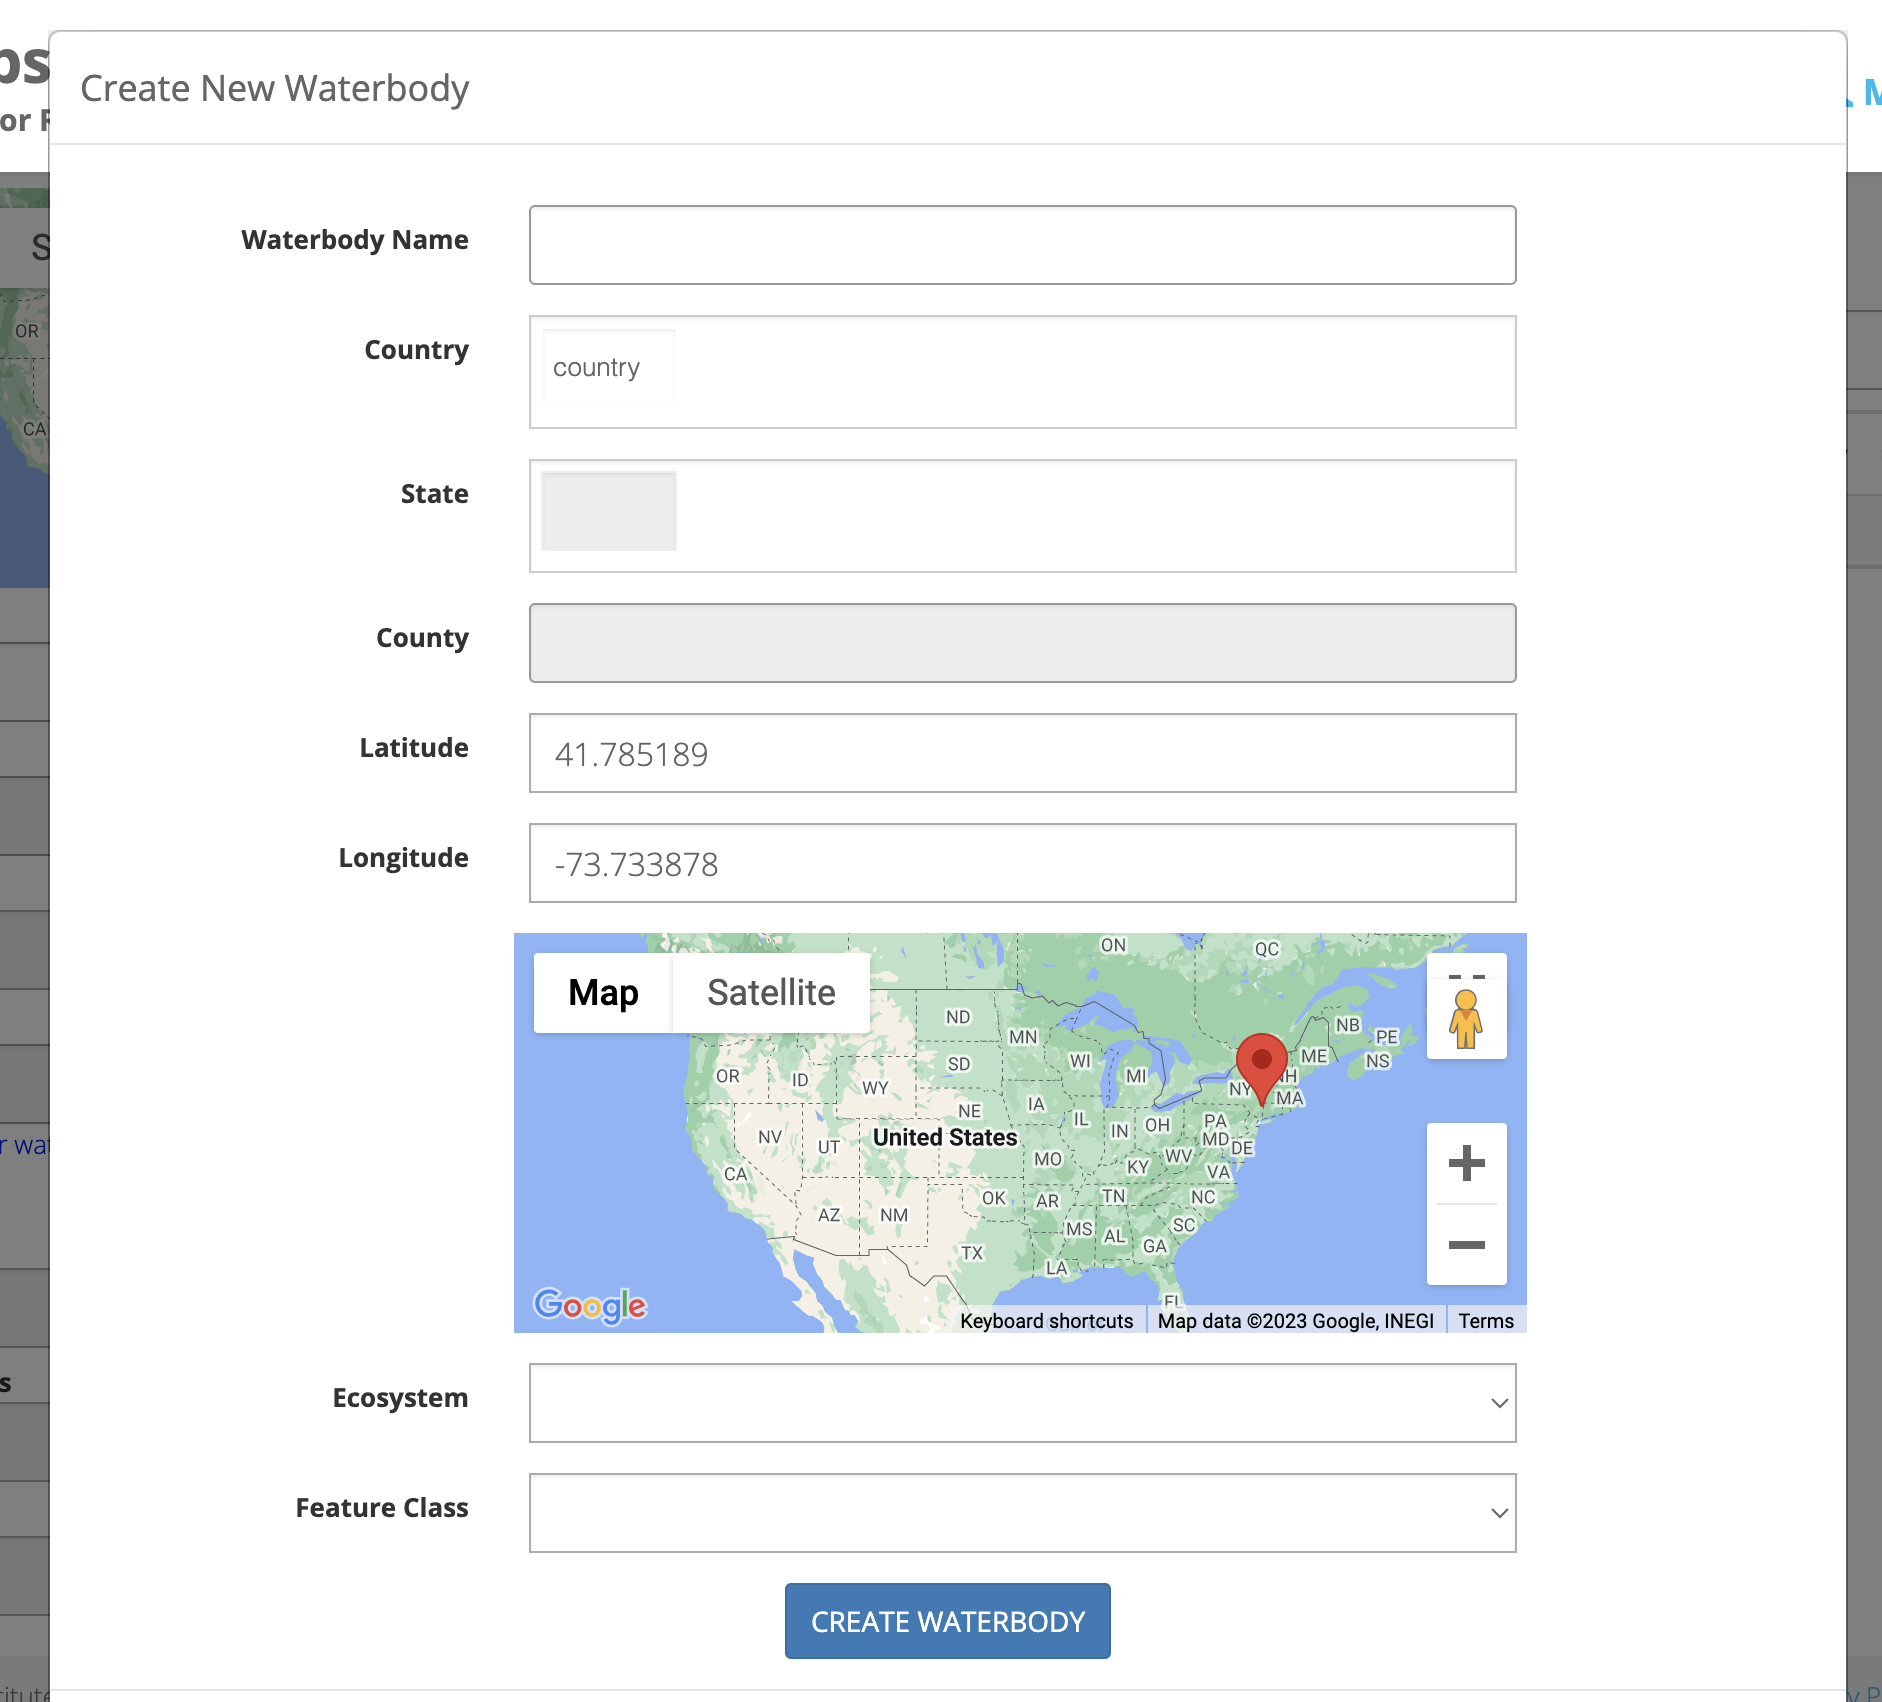
You will first need to enter the name of the waterbody. You will then enter the country or countries in which the waterbody lies. If entering a waterbody for the US or Canada you will also need to enter the state/province or states/provinces in which the waterbody lies. If entering a waterbody for the US you will also need to enter the county in which the waterbody lies. If the waterbody lies within multiple counties, select the county in which the majority of the waterbody lies, or the county in which the majority of the sampling might take place.
Next you will need to enter latitude and longitude values of the waterbody. These values should represent the approximate geographic center of the waterbody. You can set the latitude and longitude values by clicking on the map. You can also click and drag the map pin to reposition it. Or you can enter the coordinates manually in the text fields.
You should then select the ecosystem type and features class for the waterbody from the two dropdown menus.
Note: Please be sure not to create a duplicate entry for a waterbody that is already in our system. You can search for all waterbodies that are currently in our system from the waterbodies page. If you've created a waterbody by mistake and need to update or delete the waterbody that you've created, please contact our support team for assistance.
Create a New Site
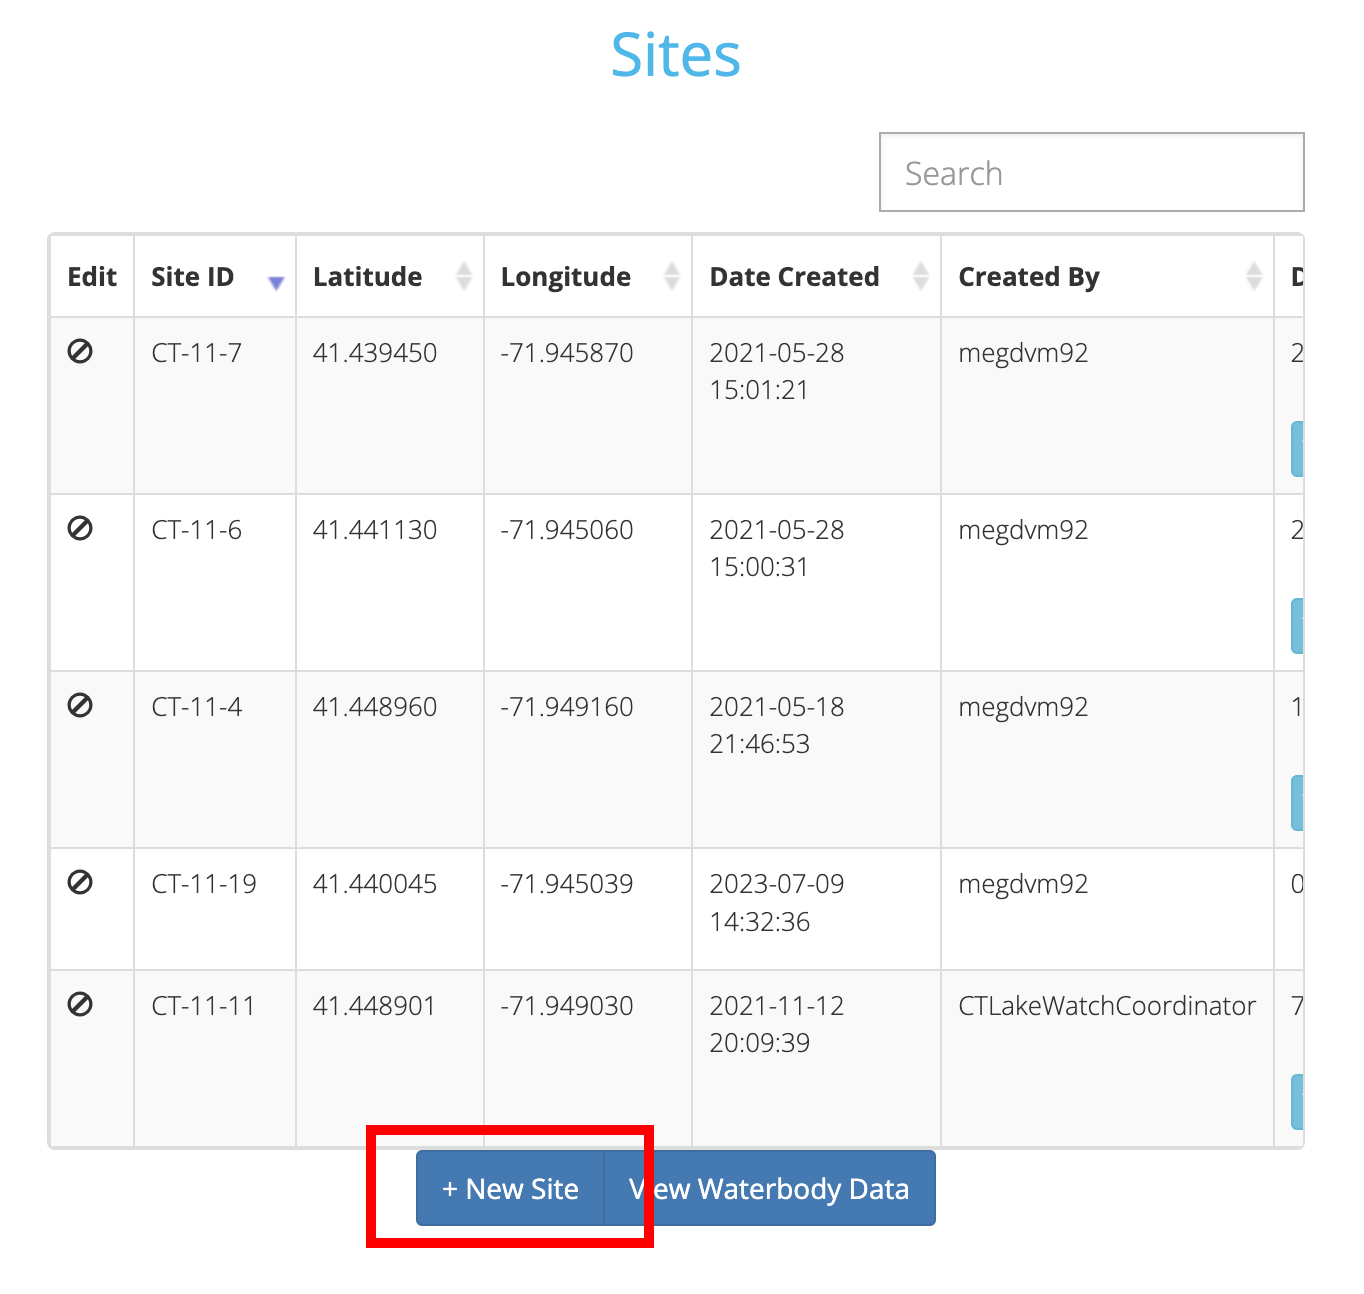
To create a new Site for a waterbody, start by visiting the waterbodies page. Enter the country, state, and county data for the waterbody. Type the waterbody name into the waterbody text field and select the waterbody from the autocomplete list that is generated.
Once your waterbody has been selected, you should see a list of all current Sites for that Waterbody along with their geo-coordinates. You should also see the Sites as pins on the map. To create a new Site for the Waterbody, simply click the 'New Site' button.
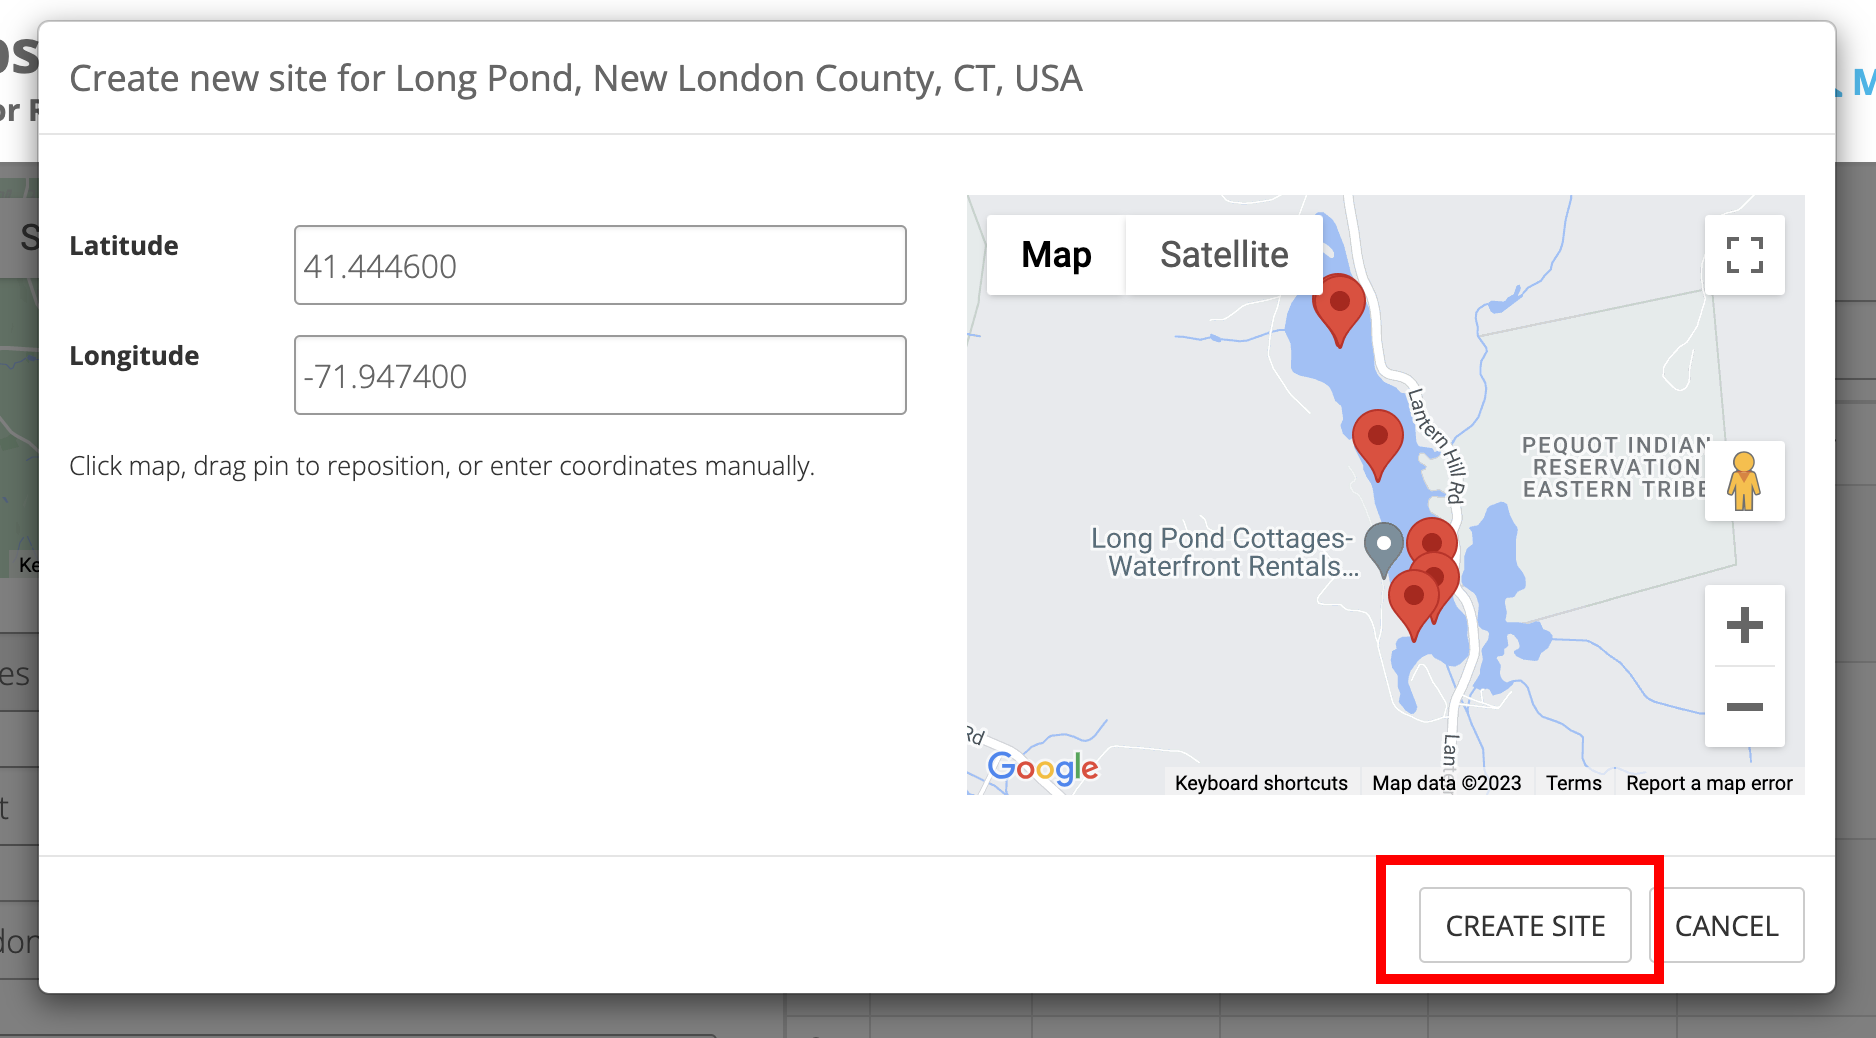
In the form that appears, you will only need to enter the latitude and longitude values for your Site. You can set the latitude and longitude values by clicking on the map. You can also click and drag the map pin to reposition it. Or you can enter the coordinates manually in the text fields. Click the 'Create Site' button when you are done.
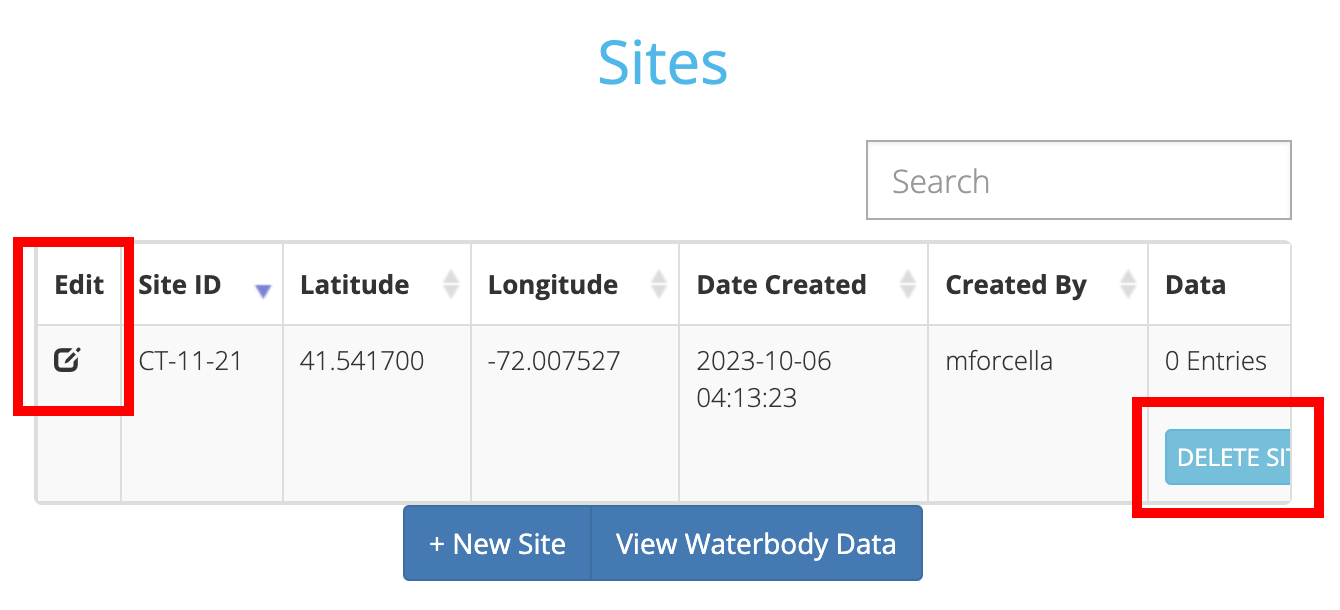
If you have made an error in creating your Site you can edit or delete that Site if needed. However, once data has been entered for a Site you will no longer be able to edit or delete that Site.
Aquatic Invasives
Lake Observer offers a section for tracking aquatic invasive species, both plant and animal. From the web submission form, expand the Aquatic Invasive section. In order to add an observation for a known species, that species needs to be added to our database. You can see a full list of species in our database on our species list page. For instructions on adding a new species to our database, see below.
To create a new observation you can search for a species either by its common or scientific name (genus and/or species). If you are unable to identify the species you can enter 'Unknown' for the species value.
Note: There are some apps such as iNaturalist that can be helpful in identifying unknown species.
It is highly encouraged, although not required, when submitting an aquatic invasive observation that you include a photo of the species whenever possible. This will help us to confirm your observation.
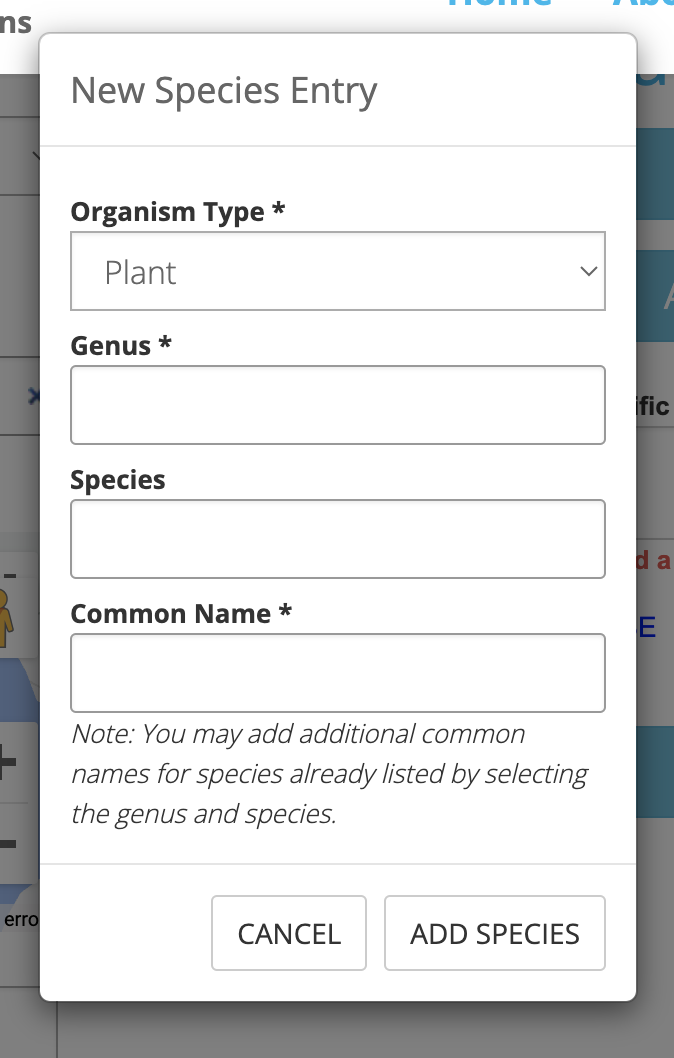
Add a New Species
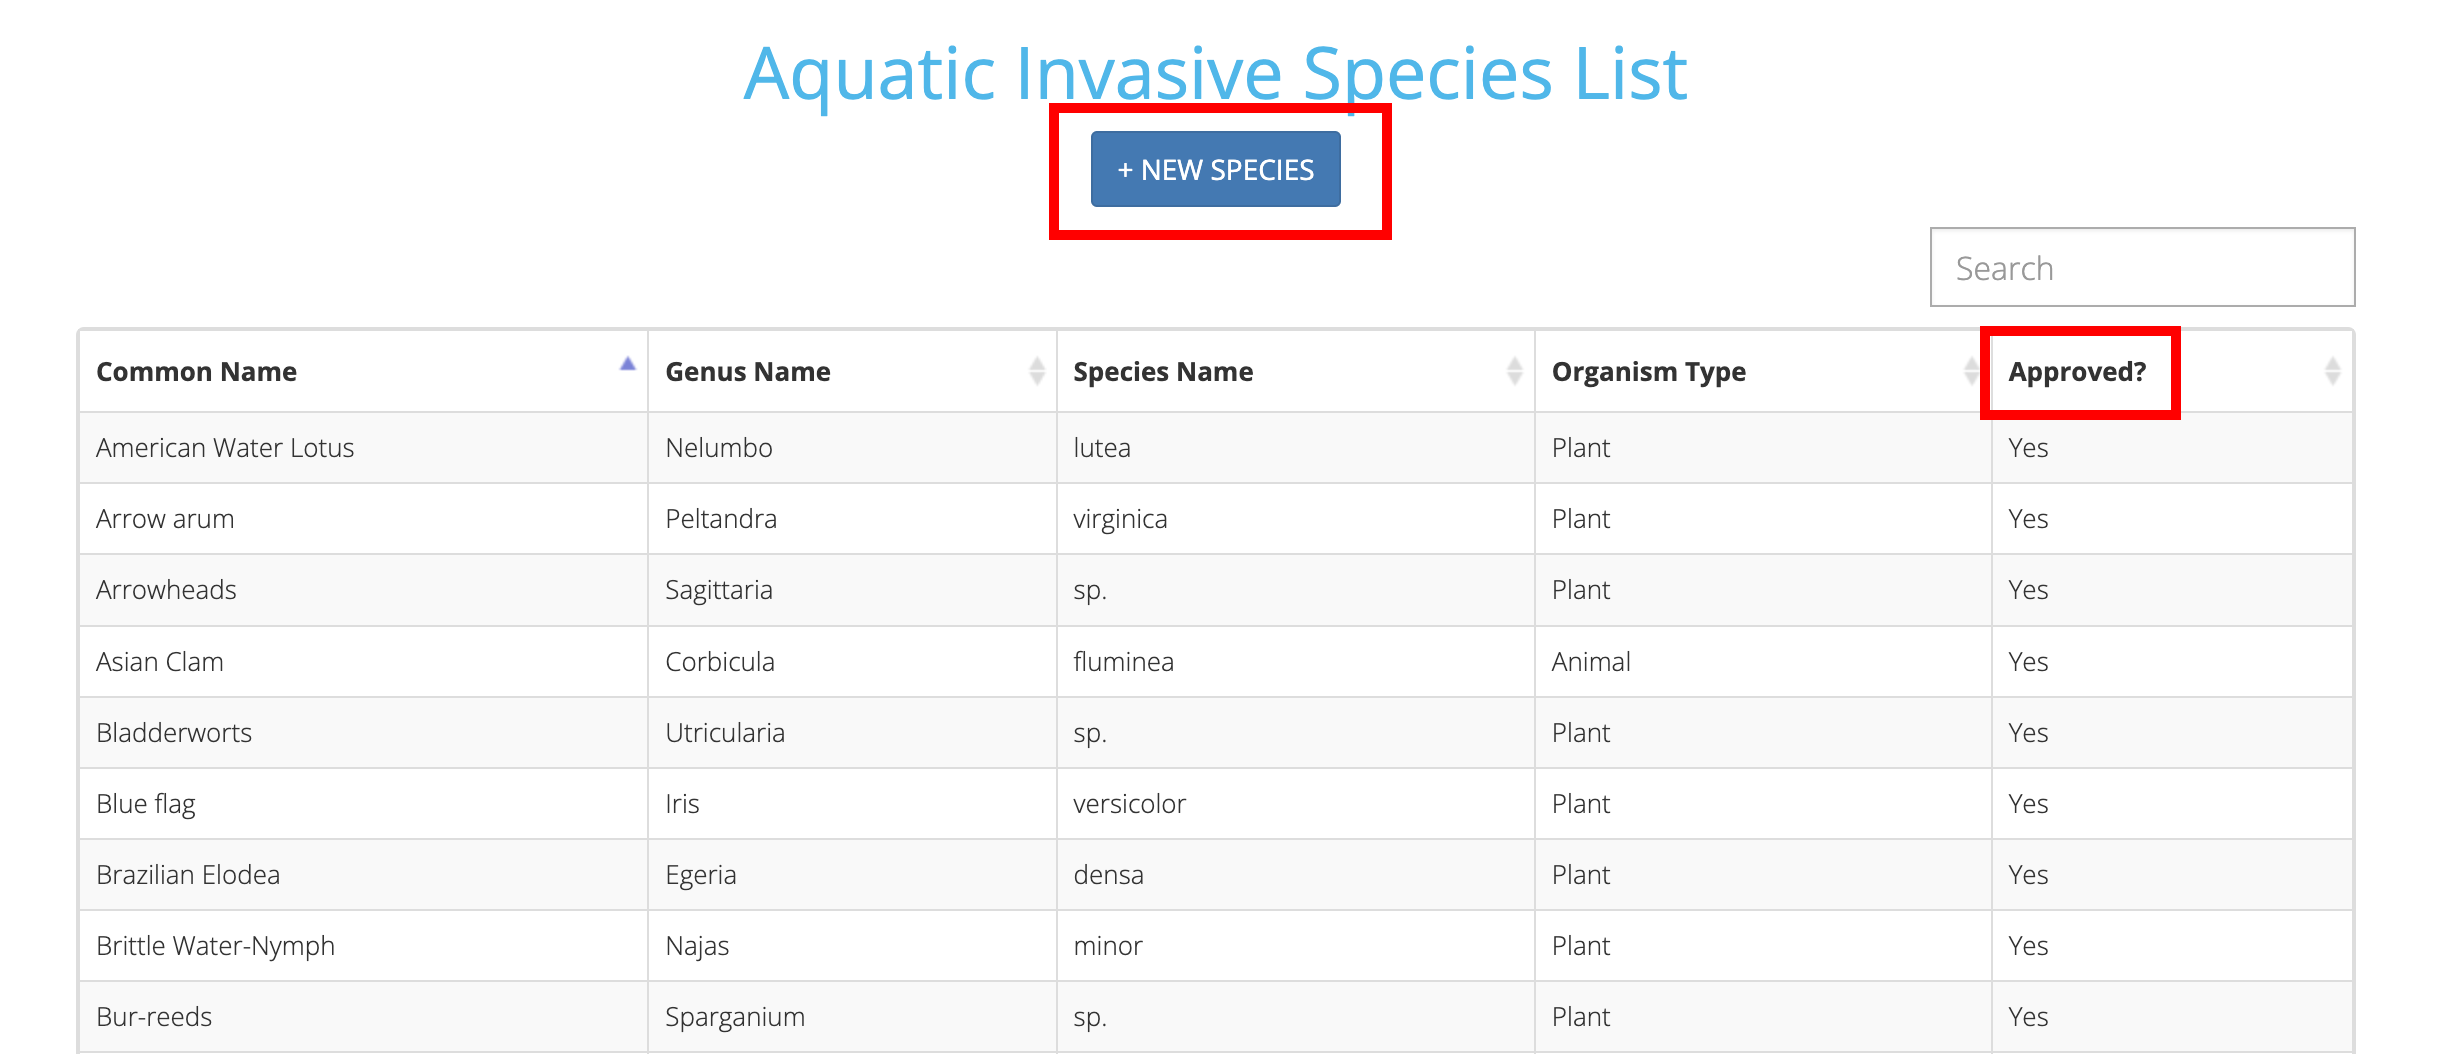
If you need to add a new species to our database, you can do so either from the submission page or from the species list page. Simply click the blue 'Add New Species' button below the Species text field. You will need to enter the following information when adding a new species:
- Organism Type: Choose either Plant or Animal
- Genus: The genus name is required
- Species: The species name is optional. If left blank, the scientific name will appear as genus name + "sp." in our database.
- Common Name: A single common name for a genus or species. If a species has already been registered in our database under a different common name than you are familiar with, you can enter an additional common name for that species. Simply enter the genus and species values as they exist in our database and then enter your own common name.
After you have submitted a species to our database it will not be immediately available. The species will need to be approved by one of our aquatic invasive species administrators. Once your entry has been approved you will be notified via email.
Note: If you are knowledgeable on aquatic species and have any interest in helping to administrate our aquatic species list, please contact us.